Chipboard and Puzzles. And varnish. Continued, Again

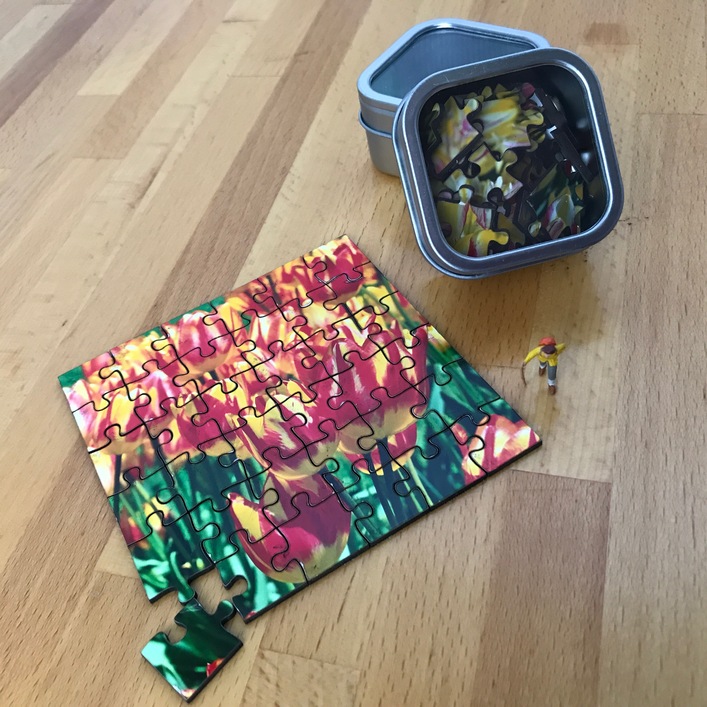
What a process to nail down the perfect settings for a Non-Proofgrade application. I haven’t used a lot of Proofgrade (yet) but it makes one realize the value of “click and go”. Part of what complicates the process is that I’m working with multiple substrates that are adhered together, where smoke and char just won’t work for the end product, and that I’m cheap. I don’t want to mask these if I can avoid doing so - one, because it’s an additional expense to production, and two, it’s many extra steps to weed each and every individual puzzle piece.

I finally got around to testing the .05" chipboard. The end product is significantly thinner than the .10" chipboard (duh, right?). It’s not, but it feels like it’s less than half. The final caliper dimensions, with the picture mounted, adhered and special sauce (that I’ll mention below) come to .07", which is within the realm of good/strong jigsaw puzzle pieces. I personally would like to find something that is a bit thicker though… maybe something that calipers at around .09-.10" when finished.

The .05" stuff cuts a ton better than the .10" product. Chipboard is really freaking dense. I didn’t think it would take so much to cut through the .10". For the .050", I nailed down some settings of 350/Full Power/1 pass for a good, repeatable cut.

But, I was still getting some smoke stains on the bare paper in testing. I had tried sacrificial paper below, nothing below, some masking I took from PG material (not good, too much tack for photo paper), wiping it off, etc. Finally, I went and bought some varnish thinking maybe this will help keep smoke from getting in the paper itself and I can just wipe off any remnants. It will help with puzzle pieces anyways, since they need to be protected somehow (varnished, laminated, or other ways) Varnishing is just one way to finish photos and protect them from the elements, fingerprints, etc. I have both an aerosolized spray and a pure liquid that can be applied with a roller or brush.

I sent a few test prints to the printer, mounted them up on some chipboard and went the varnish route - doing a few with the aerosol and doing a few with the liquid varnish. I haven’t cut the liquid varnish yet… and I’m thinking that’s what I’m going to do in the future since it can be purchased in quantity much cheaper than the aerosol. And it’s quite a bit safer… respirator definitely needed with the aerosol. And a warning - if you use this, make sure that it is completely and totally dry before you stick it in your Glowforge. Once dry, it’s inert and no problem but still wet… just don’t do it.

Anyways - the .05" chipboard cuts like a dream. And the varnish - wonderful. Smoke is no longer a problem, with or without sacrificial paper below (I will continue using it just to avoid potential flashback from the honeycomb).

I sent my first cut at 350/Full Power/.07" Focus Point (top of material) and it cut through great and no smoke stains! Woohoo!

I felt that I could get the kerf a little tighter yet, so I set the next piece up to process. Side now - I had varnished the back side of this one as well as the front. Set up the same cut settings except changed the focal point to mid way through the chipboard and paper (at .035"). Even better!

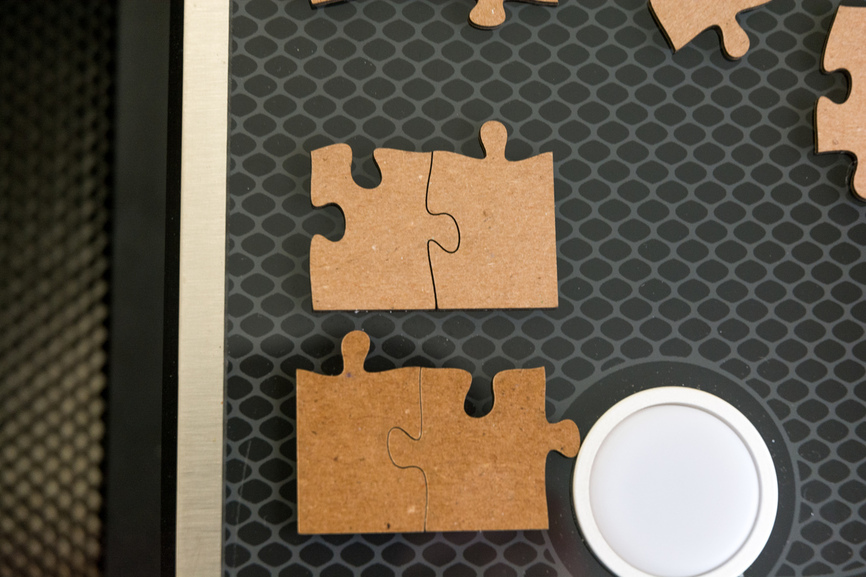
Here are a few pictures showing the difference. Both samples were cut face down (@paulw) with a piece of sacrificial paper below.
Figure 1: Cut at 350/Full Power/.07" focus point (top of material). Not too shabby. I have taken the puzzle apart and reassembled it on the Glowforge bed at this point.

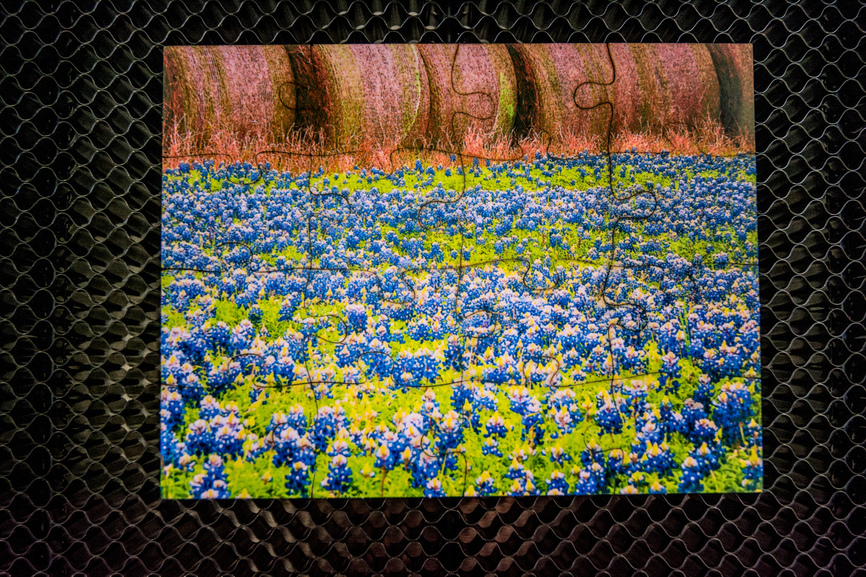
Figure 2: Same cut settings but moved focus point to .035" (midway through material). Don’t mind the miscut at the top from my trimming process - hey, it’s just testing, ok? :flushed: Much, much less discernable kerf on the front of the image.

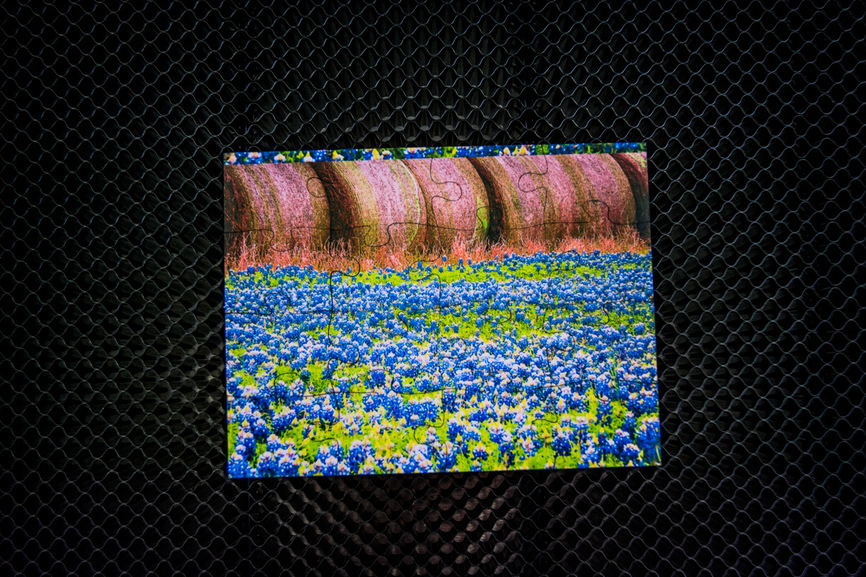
Figure 3: Comparing the cuts from the backside of the puzzle. Again, the puzzles were cut image down so the back is where the laser hits first. On the left is the first cut, focusing on the top of the chipboard. On the right is the second cut, focusing at the middle of the chipboard.
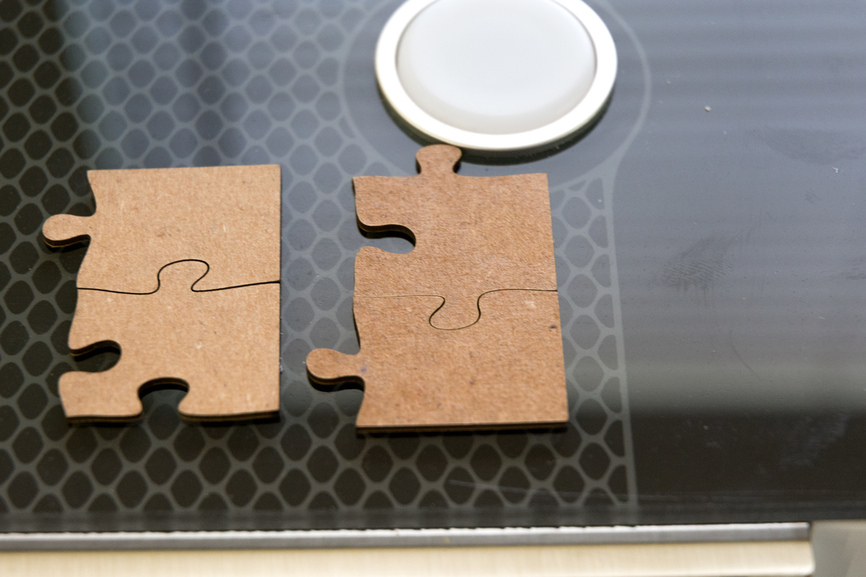
Figure 4: Naked Glowforge button! :scream: This is a top down view showing the difference between focusing on the top of the chipboard (top assembled pieces) versus focusing in the middle (lower assembled pieces).

61 Likes

Thanks for the write up, this is one thing that has not been on my list but now, I might have to try this.

4 Likes

I’m loving reading your write-ups. So many ideas, so excited about the possibilities. You might have said it before and I just forgot, but where did you source your chipboard from?

2 Likes

That is one fantastic description! (And of course I approve the bluebonnets!) :wink:

But dude…naked button! :face_with_raised_eyebrow:

4 Likes

It’s a cool journey so far… when you start getting it “right”, damn - the feeling is good.

I got the chipboard from Dick Blick (http://www.dickblick.com/products/all-purpose-chipboard/). I won’t use this in the long-run but it’s fantastic for testing. I’d prefer to find something archival/acid-free. But, I haven’t been able to find a good source just yet. Right now, I’m just testing to see where I want to be with the thickness. Too much, too little, just right. Goldilocks principle.

6 Likes

Really appreciate your write up!

(Thinking I better put “button enhancement” on my early “to do” list!

3 Likes

Sounds like you went through every step I also tried a few months ago, but more thoroughly, with better success. Managed OK results but not acceptable. When I get back to puzzles you have saved me some pain. Thanks.

2 Likes

More spendy but have you looked at mat board?

https://www.archivalmethods.com/product/conservation-mat-board-2-ply-4-ply

The 4-ply would be about .06" thick. The 18 x 24 pack would give you 30 12 x 18 cuts (photo format 2:3) at $3.50 each.

1 Like

Too rich for my blood. :slight_smile: but for one offs, it would be a consideration! Since these will be packaged and both wholesaled and retailed, I have to keep costs pretty reasonable. It costs me about $0.95/sq ft to print (including ink and paper), so an 18x24 puts me at 2.85 for just a print to cut. The prep costs are pretty minimal per sq ft but I’m not sure what packaging is going to cost me. I need to mock up that design tonight and order some samples. The box I’m thinking of doing won’t be as cheap as others - but packaging sells.

4 Likes

Well if you find a good source please do share. :slight_smile:

2 Likes

Hey man, great write up on the focal difference! The visual comparison is dope. I visualize, I don’t make plans. “When I do, the word ‘Premeditated’ keeps getting tossed around”.

4 Likes

Wow. Looking at that, I wonder whether the mid-board focus pic is showing you the hourglass effect, where the kerf is smallest in the middle. The other one would have kerf widest at the top, but also a bit more char.

2 Likes

What brand/type of liquid varnish did you use?

@jbmanning5 why did you land on a spray varnish (I saw you post that elsewhere) versus a liquid?

The water content of the liquid versus aerosol. The water content is pretty high in the liquid varnishes. It was possible to apply it without lifting the ink, but it took a lot of finesse and that still didn’t always work. The spray is way easier to work with, it just unfortunately costs more.

That said, I’ve seen some info that people are spraying the liquid varnish through something like an airbrush set up. I think it applies light enough that the potential for water damage to the print is reduced quite a bit.

2 Likes

Interesting-- thanks for that explanation. I found that the Winsor & Newton matt spray you recommended is in stock at Michaels, so with that trusty weekly one item is 40% off coupon, maybe if I end up liking it I’ll just have to make regular trips there. And full price was cheaper there than via Amazon, in fact, which is always surprising in the world.

This summer I made a lot of really adorable pocket size puzzles with my photos (used to sell photos but now use my giant stock to make into other things)-- 4x4 and 4x6, packaged into tiny metal, glass-top tins. Perfect way to use the thousands of prints I have laying around. Many of them are photos I’ve taken with tiny people

…but I was masking the fronts and decided not worth it to sell (at local indie craft fairs) because the labor time was so so so much to hand peel. They made great host gifts as I traveled across Europe this fall, though. Deciding to give it another go without masking and trying varnish and cutting upside down to see if I can get a process that’s worth the time besides as a one-off gift. Appreciate all of your advice and posts on puzzles as you’ve evolved your process!

10 Likes

It’s tough to mask the fronts and make it efficient. I do it with wood, but I have a technique for that (cut only vertical or horizontal lines, carefully remove masking, and apply new layer of it - so you don’t have to weed individual pieces). I don’t do it with the chipboard (I cut those image side up). I don’t cut using full power though. Instead, I make two passes at 100 power - it’s more delicate on the photo paper.

For something like the 4x6” postcard size puzzles, I would set up a jig for sure, and do multiples. With Snapmarks, if you have those, it would be super easy (thinking along the lines of setting up everything in Illustrator, printing it on the wide format printer, and just gluing down a sheet with however many puzzles you can fit on it).

Actually, my original intent on doing the puzzles was to make puzzle postcards. Where the person could write the message on the back, break the pieces real quick, and stick them in a provided envelope to mail. My concern with doing that is the char that develops on the cuts and cleaning those without disassembling and reassembling.

5 Likes

Thanks for that advice-- I haven’t tried the two passes yet but will-- I’m using a 60 pt chipboard (.065 thickness with photo) that I like-- as you said in a previous post, thicker chipboard is so hard to cut-- I tried with an 80 pt and abandoned it pretty quickly. And good tip re: wood – might try that on this that I finally got the river & stream layer onto late last night (on a test cut on draft board)-- the draft score setting worked well for those. Finally tried the duct tape method for removing masking and was surprised that it fairly easily got about 1/2 the masking off with it. Because of the scored rivers there are more small pieces that on a normal puzzle…

7 Likes

FWIW, I use speed 260, power 100, 2 passes on 80 pt chipboard with 10 mil paper (so .09" total). IIRC, the full power settings for 1 pass were 175-180 speed. The thick stuff is hard to cut , but thankfully its incredibly consistent once you nail down good settings.

I bet that’s a tough puzzle! :slight_smile:

5 Likes

Hello. Where do you get your small tins? I am making 175 small puzzles for a company conference…thought about using small jewelry burlap bags, but these tins look great!