Colibri Hummingbird

Plan to play with it one day. (Not anytime soon though, got too much else going on at the moment. Maybe next year if no-one beats me to it.)

Some Assembly Acquired!

I’ve made some progress. Here is the big picture of all the sub-assemblies:
(picture quality is sub-par, sorry… next time I’ll break out the DSLR)

The piece with the blue tape and binder clip is a wing I dropped and had to glue. The Mr. Mister song immediately got stuck in my head for the rest of the day - hope that doesn’t happen to you. :wink:

A few - slightly blurry - close ups:

The head and beak:

The tail feather spreading assembly:

Some of the cams and gears:

The gear train frame:

This gear train frame was made by stacking and gluing 3 pieces of medium maple Proofgrade. I thoroughly sanded the finish off the sides to be glued and used normal wood glue (Tightbond). It is amazingly rigid. Much stronger and durable than I thought it would be. You can twist it with a great amount of force and it barely flexes, and there are no ominous cracking sounds when you do.

(Pro-Tip: Buy all the 1" document binding clips you can find at Staples. They make great clamps. See the broken wing in the first picture)

The flower:

From the side, the flower and base look rather Dr. Seuss’ish:

It’s hard to tell from the pictures, but this thing is BIG. The top of the flower stands at 20".

I tried to assemble the gear train, but ran into an issue. The instructions call for making everything out of wood, but make the recommendation that some parts are made out of something more durable. Turns out that is less of a suggestion and more of a requirement.

Specifically, there are 3 hypocycloid cams that attach to shafts and are secured with a set screw. Yes, a set screw in a wooden piece. This did not hold up well, and I was unable to get it to secure very well. So, I whipped up a prototype of the piece in brass:

This worked very well, and I’ll be making three of these (with minor adjustments) to use in place of the wood pieces.

The entire project is made out of Proofgrade, which is performing pretty well. Most of it is Proofgrade plywood, and many of the accent pieces (wings, tail feathers, flower petals…) are made with Proofgrade hardwood.

17 Likes

Curse you! :scream:

That does look huge, though. The chair behind it gives an idea of the scale. Can’t wait to see the finished product!

1 Like

+100 on that! Binder clips are great clamps for a lot of the projects you can do in a laser because we tend to use sub-1/2" stock. They’re quick, cheap and everywhere.

1 Like

That’s a great idea.

1 Like

By the way - I assume you did this the tough way since you mentioned select all of the paths (I know what they say about assuming…) - which is to use the “Direct Selection Tool” (keyboard shortcut - “A”)?

If you’re using Illustrator CC17, they have a join tool that works quite well. It’s basically like a paint brush. It’s not instant and amazing but it’s much faster than finely selecting end points and joining by that method.

Here’s how Adobe sells it:

4 Likes

I never knew about that tool! That would save me a lot of detail work. Off to try it now, thanks!

1 Like

I did it the easy (somewhat) way with the direct selection tool, and then doing a CTRL-A to select all the paths.

My fingers have calluses from my excessive use of CTRL-A, and even more so from CTRL-Z. :slight_smile:

4 Likes

As a slight distraction from all the “other things” being passionately discussed in other threads, here’s the newly machined gear collars and cam lobes in beautiful brass:

I’ve started assembling the gear train and cams. They’re a bit tricky and require much patience.

When I get them tweaked, a post will surely follow. :slight_smile:

17 Likes

A quick update…

Moving along fairly well.

I’m a bit disappointed in the operation of the gear train at this point. Not due to design, but just the need for some serious tweaking. It binds up a little in a few places and just doesn’t have a nice smooth operating feel to it. I get that it is wood and it won’t be super fluid, but I endeavor to refine it to the point of silky smooth movement.

I’ll be able to correct a lot of it with some patience and my Dremel. Some of it may require the use of different materials.

The Proofgrade, while holding it’s own pretty well in a role it was certainly never intended for, tends to be a little “sticky”. It’s could be from the special laser safe finish, but I can’t be sure. It certainly works well for the structural parts, but isn’t seeming to do so well for the moving parts (especially the cams and the hypercycloids, which rub together quite a bit).

Some pictures:

Off to cover it in saw dust…

26 Likes

I’ll try to dig up a video of MDF gears I did for a clock I will pretend to finish one day. I did the MDF as a prototype. It ran super smooth and great so don’t blame the wood to much. Having any finish in the gear tooth can affect it. Also look at the balance of the gear, does it tilt when it spins. In which case you may need to balance them a hair.

1 Like

Please shoot a quick note to support@glowforge.com if you haven’t already to let them know if and when this happens!

2 Likes

It’s been a couple weeks, but those haven’t been without progress. Most of it has been unworthy of posting an update. I’ve been mostly tweaking here and there.

A few parts do not hold up well in wood. You can see in the pictures below there are two sore-thumb clear acrylic pieces. Those are temporary place holders until I find something more suitable. I just couldn’t get the Proofgrade to hold up in those parts. I don’t blame the Proofgrade - these are just small pieces that have a lot of holes (including a threaded one for a set screw) and they undergo a lot of stress.

It’s pretty well finished, though I am not entirely happy with smoothness of the motion. I have a little more tweaking to do, and I am going to re-machine a few of the parts to make their sizing a better fit with the differences in wood thickness from the original plans.

The bird body is impressive. It’s 18" from the tip of the beak to bottom of the tail feathers, and the wing span is 25" !!

Here’s some pictures:

Sorry, no video of it in motion… My next step is to motorize it. I’ll post some video of it moving under power, rather than the somewhat jerkiness of my hand cranking it. :slight_smile:

It may be another couple weeks before I get that worked out, though…

25 Likes

Beautiful work on your Colibri. I wish I had my Glowforge when I built mine. I cut every last peice out using a scrollsaw.


IMG_5337

21 Likes

Thats is gorgeous!

There is definitely a more artistic look to the hand crafted pieces versus the laser cut. I think it is the round sanded edges and the softer lines.

1 Like

Both Colibri are looking good, I would also have appreciated having the Glowforge around. Did my cutting on the X-carve CNC. I still need to get the motor and the counterweight mounted.

16 Likes

Nice! I like the dark wings. Are those painted or is it a dark stain?

The wings and the beak is black metallic spraypaint, the brown color is stain.

1 Like

Hey! I am considering taking this on. Any status?

1 Like

I’ve been immersed in another GF related project, so I haven’t had much time to finish the fine tuning.

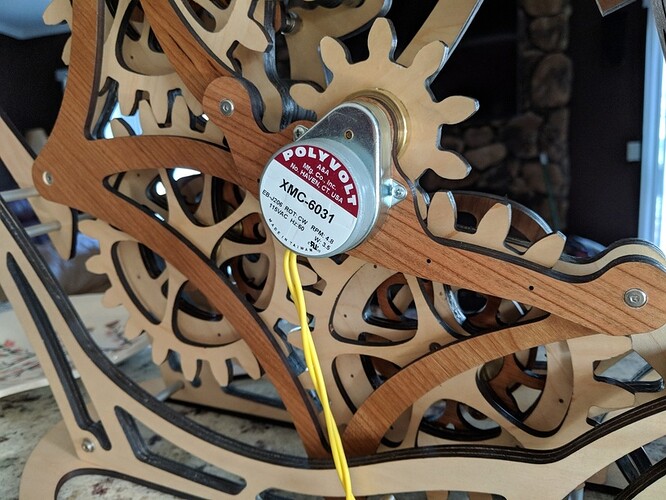
I did get it motorized:

The gear connected to the motor is the same one from the plans that is used to drive it manually.
I purchased the motor from McMaster-Carr. I picked up both the 5 and 7 RPM versions. The 5 RPM has more torque, which aids in smoother running, but the 7 RPM is more visually appealing. If I was only going to purchase one, I would get the 7 RPM - but you will need to fine tune the mechanism to be smooth as silk.

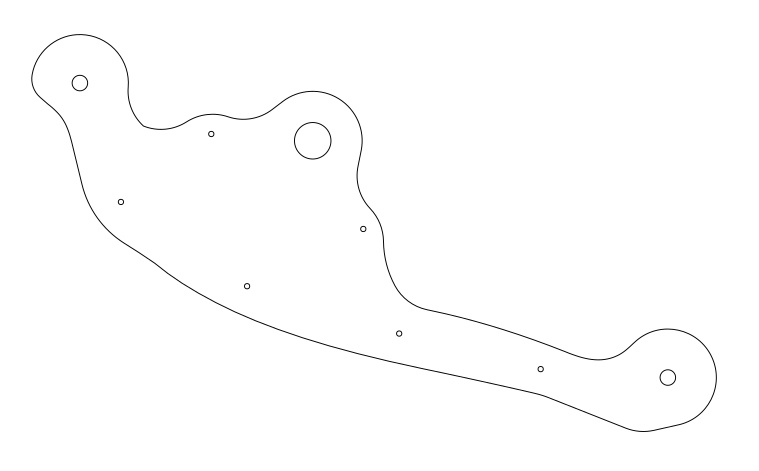
This is the motor bracket design I whipped up:


Discourse Friendly ZIP’ed SVG: MotorBracket.zip (4.0 KB)

The four small holes along the bottom were intended to add screws for additional strength. They don’t seem to be needed and could be omitted.

As far as construction tips…

You’re going to curse GF for not having the capability to directly import DXF or kerf compensation. Easily, one of the longest and most tedious parts of this process was manually converting and correcting the large number of parts for this project.

An open offer to anyone undertaking this project: If you want to save some time, I can send you my converted, kerf corrected, GF ready SVG files (to protect the intellectual property of the artist, you’ll need to provide me with proof of purchase of the plans, and agree not to redistribute to them to others without the same).

I had fairly good luck building up the thicker components by gluing layers of Proofgrade together. In places where it took three layers, I used draftboard for the middle piece. A quick sanding with some coarse grit on the mating surfaces before gluing is necessary to get the finished PG to adhere. In the end, they are surprisingly rigid.

The downfall to making the pieces with Proofgrade was that they don’t always build up to the exact thickness of the plywood used in the plans. You’ll find that in some places you’ll need to add and extra spacer or two. YMMV.

Also due to the thickness differences - some of the parts you need to machine will need slight adjustment. You’ll know those when you see them.

The pivot blocks for the wings will not hold up if you make them from wood. I made them from 1/2" acrylic from Inventables. See this post for details on cutting acrylic that thick - you’ll get pretty good results.

All around, this was a pretty enjoyable build. It was the first real project I took on with the GF, and it helped me to develop my workflow.
11 Likes