Hello. I just received my Glowforge last night. I purchased some images to learn how to use the machine before I get into making custom designs.
I would like to engrave the item and also cut the outside. I know that by using different colors in Inkscape, you can determine which is cut and which is engrave. However, since they are odd shapes and I can’t just draw a circle or a rectangle around it, how do I cut the outside when it’s done engraving?
I searched the help topics but I couldn’t find anything regarding freeform-type shapes, just easier shapes.
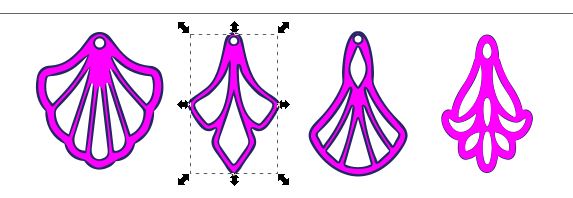
I have attached a jpg of the images I received. I have also attached what it looks like in Inkscape, showing the different colors.
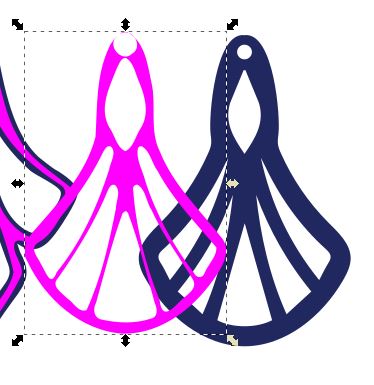
Duplicate the shape. Leave one of them as a fill, this one will be engraved. Change the other one to a stroke, this will be cut. If you only want the outside line cut, you can break it apart and delete any internal stuff. Center the two pieces to each other and you should now have an engrave and an outside cut. Hopefully that makes sense.
How do I make the second shape as a stroke. I have the two images but I’m unsure if I need to zoom way in and erase everything except the far outside line or if there is an easier way to do that.
I’m guessing a bit here, but I think you’ve got two bitmaps in your inkscape file. If this is right, then in the glowforge UI, when you select the shape, you are probably only getting engrave options and cut and score are disabled. If so, then the steps you need to take are:
Select the shape that is meant to be cut out
Path/Trace Bitmap - since it is a solid color, I’d toggle live preview and play with the brightness cutoff setting until the preview looks good and then “OK” it.
You now have a file with two shapes as bitmaps (pink and blue images above) and a path that is filled (and likely black by default).
If you load this into the GFUI you should find you have have three objects to play with. If I understand what you want to do, one of them will be an engrave, one will be ignored, and one will be your cut.
You’re working in Inkscape? Leave the pink one filled, with no stroke color assigned to it. Give the blue one a stroke color but no fill. Line them back up. That should take care of it.
Stroked shapes with no fill color become cuts or scores. Shapes that have a fill color but no stroke become engraves.
Thanks for the answers everyone. Since we haven’t heard if the advice was helpful and it’s been a while I’m going to close this thread. If there are more questions, go ahead and post a new topic. Thanks for asking about this!