So I know that this has been explained in other forums and we have posted videos of how to do this, but I cannot, for the life of me, figure out how to do this.
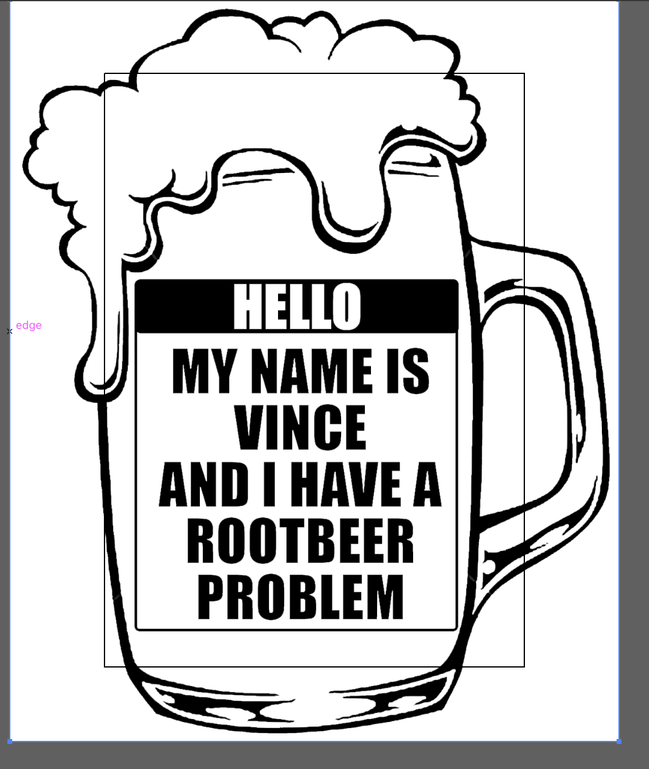
I have made an SVG file for an outline of a PNG I am trying to engrave. I am wanting to engrave the whole PNG image then use the SVG outline to cut around it. When I go to open the PNG file in Illustrator, there is a black box in the middle of my picture that I cannot get rid of and I cannot move the image over to my SVG file without the white background covering everything. Can anyone direct me to a video explanation or give me simpilized (dumb people) instructions so I can do this myself in the future? Any help is appreciated.
This is my SVG file that I have created for the outline using trace image and all that jazz explained in another forum.
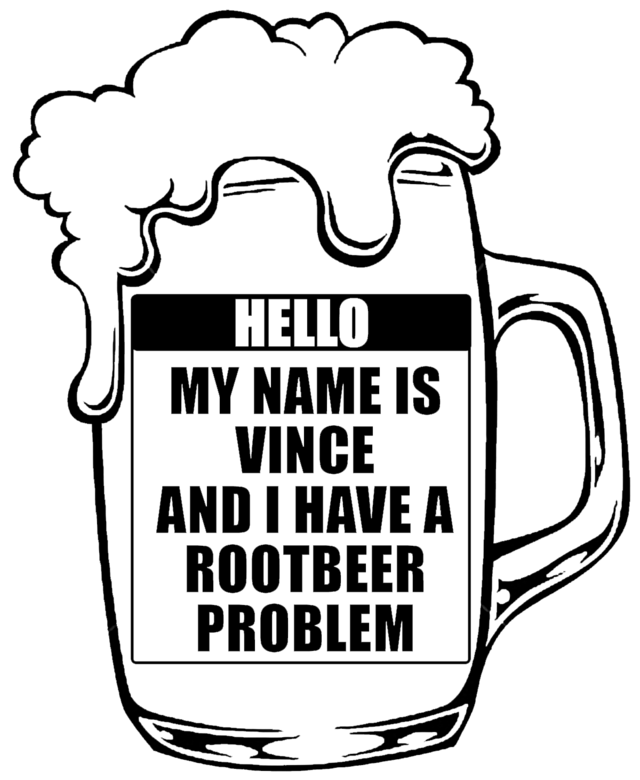
This is the image I am trying to engrave from a PNG file
I don’t have that option when I right-click from what I can see. When I scroll over the images I have uploaded I can enlarge them, then download them. Is there way to do a zipped file when uploading a reply?
The black box is your artboard, and it is currently smaller than your art.
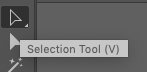
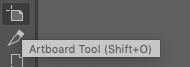
You can use the Artboard Tool to drag the sides of the artboard to a new, larger size, or you can use the selection tool to resize the art (smaller) to fit the current artboard.
You are almost there with the svg outline and the png art to engrave. The svg outline has a red stroke and a white fill; you want to get rid of the white fill. The PNG has a white background; you will want to remove that in photoshop and save it with transparency instead (you could leave it in place, but the engraving will take longer as the laser faithfully engraves nothing over the entire white space, and as you have seen, if the svg layer is below the png layer, that extraneous white space obscures the red cutline from view.
Personally, I would probably just do an image trace of the PNG in illustrator, as it is a fairly straightforward image, and add the cut line to that file.
@deirdrebeth there should be meetings, if no one has set them up yet. This is actually for my father in law, who is one of the biggest collectors of rootbeer memorabilia in the United States. I believe he is a part of a facebook group for it.
Well, this is what I have come up with. My only concern is when I upload the image to my glowforge, the red outline seems to be really thin - even though I have adjusted the stroke up to 25 pts. Is this normal or is there something else i should be doing?
I would really like for it to be an actual outline, with space between the cut line and the actual engraved image, but I cannot figure out how to adjust the image so it sits perfectly within the outline. I was also trying to cut a hole for the handle, but that seems to just make things worse.
The thin red line is not a problem. The cut line is always the the lasers thin cut size not how it looks. The only way to get a 25pt stroke is to expand it making it a fill and engrave instead of cut.
also if you expand it it turns into 2 lines, outer and inner. You can delete the inner and make the outer the cut line.
Keep in mind that the laser line will be in the center of that 25 point line - so you may end up with an un-engraved edge…if you want it to cut just outside your engrave, take that line back down to 1 (I usually use .5) and make sure it’s where you want it
I personally don’t use points for stroke size. I use .008” so that it mimics the approximate beam size. On very intricate designs, it helps to see where self-intersections may occur.
A point should be 1/72, or .0138”.
Corel users (and users of other laser brands) tend to use “hairline”, which I think is just .001”. The problem I have with that on Illustrator, is that the strokes tend to disappear for me if I’m zoomed out, which is annoying.
oops, you’re right, the PNG background is pure white and gets ignored. I’ve been bitten a few times by not-quite-pure-white backgrounds, so now I try to always use the transparency capability of PNG, just to be sure.
It’s a good practice if you aren’t making files yourself. Stuff gets re-saved in different formats etc. so that PNG with a white background you think is clean might just be full of JPEG noise or been saved previously as a very low quality/compressed JPEG.
can I take a moment to complain about people taking cellphone pictures of their computer screen, instead of just emailing the actual file? What’s with people taking cellphone pictures of their computer screen, instead of just emailing the actual file?
ok, sorry for the derail/mini-rant, it does not apply here, thanks.