D&D Dice Vaults

I’m just starting a new D&D campaign, so I decided to make dice vaults for the party:

Made with:

dice-vault v1.0a

The dice and dragon designs are from public-domain clipart I found online, which I also used on my dice tower; the D&D class icons came from @laughingmoonleather’s D&D Class Ornaments ; the rest is my original design.

Cut 2 of the “magnet” layers, 5 or 6 of the “middle” layers (I initially planned for 6, but during assembly decided to use only 5), and any two “top” layers. I left the text in place, in case you want to change the font/size/etc, but if you do, remember that GFUI ignores the text, and you’ll need to use Inkscape’s “object to path” option to convert the text to be able to engrave it. Or just leave the text off, as I did.

It took just over an hour to for each print, using the default settings for “Medium basewood plywood”.

Here’s the grid for the hexes, to cut the foam. For the 2mm eva foam, I used speed 500, power 60. For my test cuts, this went all the way through, but with the final cut it left everything just barely connected (which was actually better). This one was especially fun to watch cut. I designed this to cut in 3 passes, with the idea that it would cut all the way through and the goal of keeping as much attached as long as possible to avoid anything lose getting misaligned.

hex-grid

If anyone else makes this, please post photos & let me know how it works for you!

52 Likes

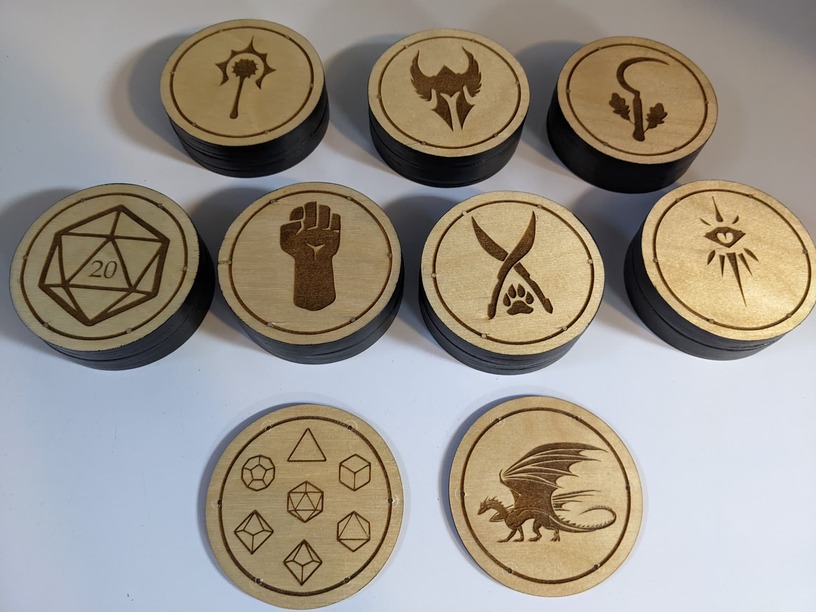
Some thoughts on design, assembly, and what I’d change for next time:

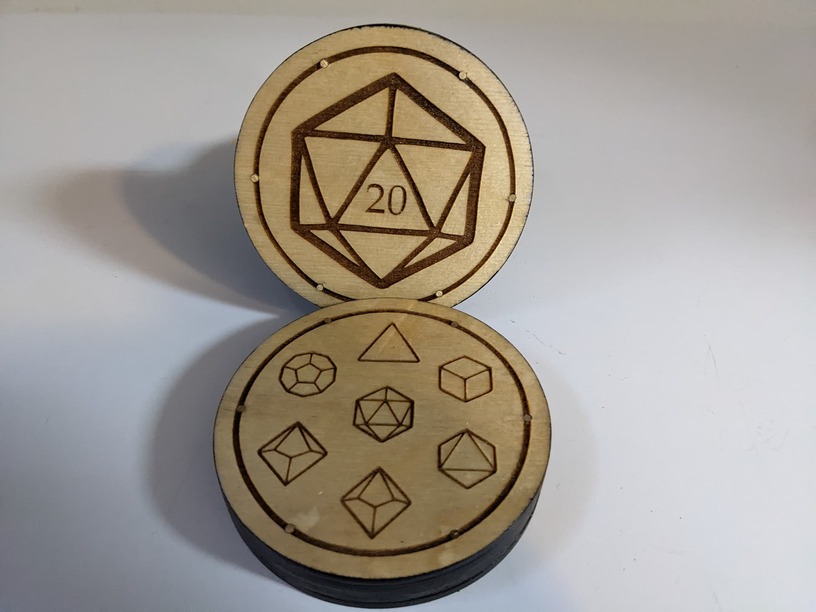
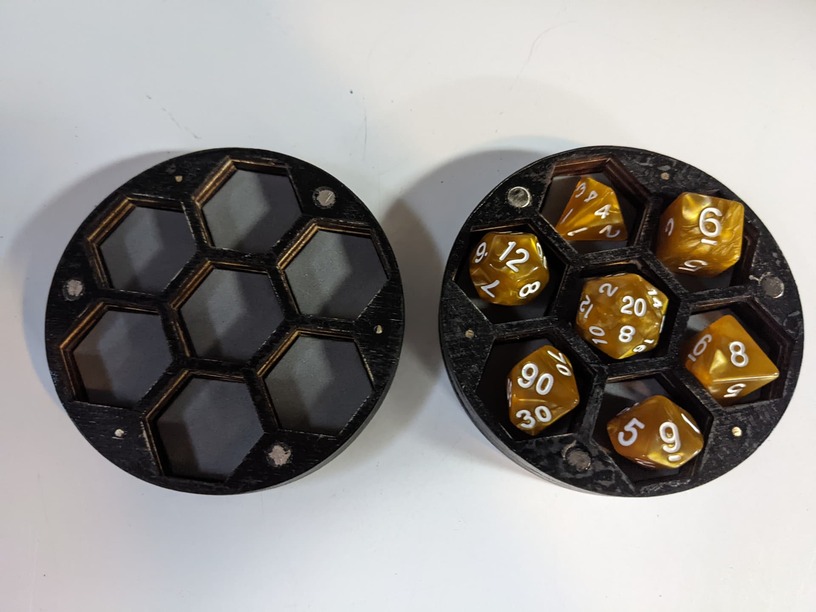
I had considered using 1/4 material, and wanted to find the engraving setting that would produce a depth of 1/8" to fit the magnets in, but couldn’t find just the right settings for this to be consistent, so I just went with 1/8" material and more layers. I picked a 1" hex (flat-to-flat) based on measuring some dice, and then decided to also make the pocket 1" – 4 layers on each half. During assembly, I discovered 7 layers, even with the foam padding, was sufficient, so I went with one fewer layers on one side of each dice vault.

Some other project posted here used brass rods to align multiple layers, which seemed like a neat idea, so I decided to incorporate that into my design. The brass rods I selected are 2mm diameter. Some test cuts determined that a 0.034 radius circle gave a reasonably tight fit, but still insertable by hand, so I made my alignment holes that size. (I craft my SVG files both by hand (in a text editor) and in Inkscape – the SVG file format defines circles with their radius, so that’s what I think of them as, not diameter.) Interestingly, 1mm (radius) is 0.03937 inches, and the laser kern is reported as 0.005 inches, so my test fit of 0.034, plus the kern of 0.005, matches up to my calculated expected value. I had several problems related to these brass rods. I engraved a ring with the alignment holes along this ring. Because the holes were a tight fit, the top layer of plywood often chipped off between the engraved ring and the edge of the board, as I was pushing the rod through. This could have been fixed by using a slightly larger hole (ultimately I used a 3/16" drill bit to open up the holes). Having the rods come through exactly where I was engraving made it very difficult to get the end of the rod flat and even w/ the work. I used a combination at times of a Dremel w/ a cutoff wheel, tin snips, and a vertical belt sander to deal with the rods. The rods also bent easily, if I wasn’t careful. Next time, I’d consider using 18ga finishing nails instead, making the holes loser, using fewer alignment pins, or even none at all.

I used 1/8" Baltic Birch instead of proofgrade plywood because it costs less than half the price, and is available locally. Using it, however, does not have as nearly as nice of a finish, so I decided to add a polyurethane coating. This looks good, but adds significant time (several layers are needed), smells terrible, and requires ventilation. Next time, I’d consider using proofgrade for the top layers, or just add a single veneer layer instead. It might be possible to just use a veneer layer as the top layer without a solid plywood layer. I’ve never actually worked with veneer, so I’m more guessing here.

When gluing the layers together, I rotated each layer by 60-degrees (one step along my alignment pins), so that the grain of the wood would be crossing rather than aligning with the previous layer, thinking this would make it stronger. Ultimately, this was probably a bad idea, causing more problems than it solved. First, I’m not sure that the dice vaults really need this “added strength”. Secondly, plywood already rotates the wood between layers, so my rotating at the macro level didn’t really add much. Most importantly though, the circular disks of each layer are not perfect circles. I assume that this is due to slop/backlash in the Glowforge. They certainly all look circular, but when stacking several layers, there was as much as a 1mm difference between the edges of adjacent layers, when the hexes were as aligned as I could get them, and the brass rods were through all 6 alignment holes. This contributed to the rods bending slightly, making it all the more difficult to add the next layer. I expect that had I been careful to maintain the orientation from when they were cut, they would have fit together much better. Once together, I felt it was important to sand all the edges. Fortunately, I have a belt sander, so I did not have to do this by hand. The result of all this sanding, though, was that there were parts of the edge that still showed the black of the laser cut, and parts that were fresh sanded wood – not a good look. I could have sanded even more, but it was taking a lot of time and making a big mess of sawdust. I decided that the feel of the edges was good enough, and added a coat of black paint to hide any remaining imperfections.

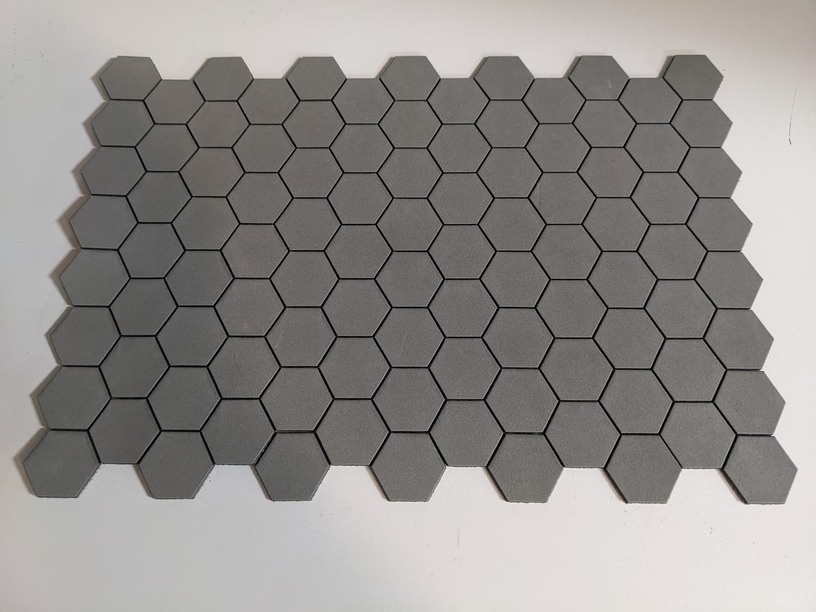
I had initially planned to line the dice pockets with felt, and ordered some sticky-backed felt from Amazon. Holidays, weather, and “global supply chain problems” means it’s been over two weeks since I placed the order, and the felt still hasn’t been delivered. I went to Joann to pick up some locally, but then found the 2mm eva foam, and decided to use that instead.

16 Likes

Thank you for the file, and thank you even more for the write up and in depth explanations. I know many will appreciate both.

7 Likes

Those are beautiful! I’ve so far resisted individual dice vaults - but you are not making it easy!

5 Likes

Nice design and even better writeup!

6 Likes

Thank you for the share. These are great, and, thanks for the discussion of your process!

5 Likes

Thanks for the generous share, these are really nice.

4 Likes

I bought my nephew a D100 for his last birthday. It’s a bit bigger than a golf ball (and pretty much looks like one, with all the facets).

2 Likes

Thank you! It’s always nice to read a write-up of someone’s project. It was great!

2 Likes

I picked up a dice box like this from a convention last summer. I’ve been working on getting it set up for the GF because it was cnc made. The ones I’m doing are hex shaped but beyond that, there’s only one way to make these for the most part. Very cool!

2 Likes

I almost made these hex. Actually, I initially made the dice pockets circular, but switched to hex because they packed better. Then I was going to make the overall shape a hex, for a consistent shape and styling. I switched to a circle in part to give space for the magnets, in part because I wanted a bit more width for the outside walls, and in part because I decided I didn’t want potentially sharp corners with this thing bouncing around in my backpack, especially with my D&D books, which are way-too-easily dentable.

I like working with a CNC, and I like working with a laser cutter. There are a lot of similarities, but also some key differences. A CNC router can generally work on thicker material (often also larger length & width too), and has more precise control over depth, but you can’t beet the inside radius of a cut made with a laser. With a CNC clamping the work piece is vital, and designing to cut pieces from the inside out is necessary; with a laser, it typically doesn’t matter what order you make the cuts.

Thanks to everyone who’s replied. I’m glad you like my work.

5 Likes

How do you download the files for this? Iv got quite a few people who would love these as they are always playing D&D and would be a great present for them.

Right click on the line drawings (after the material list in the original post) and save the image as an svg on your computer. Do the same for the honeycomb pattern at the end of the post.

3 Likes

Note that the honeycomb pattern I posted uses shared lines, so you can’t easily change the number of hexes by deleting a few objects. That file is 98 hexes, which is the number needed for 7 dice vaults (each vault takes 7 per side), which is how many I was making. If you need fewer, you may prefer to design your own (they are exactly 1-inch from flat side to opposite flat side), to avoid wasting material.

1 Like

Did you try putting the magnet in the middle layer? I find if I do a top layer of wood, engrave a hole for the magnet and flip it over when doing assembly with magnets you can put the magnets in, they hold on well and you cannot even see them. Which is nifty :slight_smile:

Not sure if you tried something like this with the wood boxes?

1 Like

I find it much easier to use a layer of veneer if I want to hide the magnets. Engraving depth can be really inconsistent- I cut through and then cover and have much more repeatable end product.

Bonus: cutting is faster than engraving, too :slight_smile:

My magnets are 1/8", the same thickness as a single layer. I tried engraving a pocket into 1/4" wood, but could not get consistent results to use that approach. I considered having the magnet in the 2nd layer, but that would put two 1/8 layers between them, and my testing showed that the magnets I was using would not be strong enough to hold in that case. I had initially been planning to put a layer of felt on each side, covering the magnets, but (a) the felt shipment was delayed and (b) I had enough other frustrations with assembly that I decided to skip that additional step. I expect that the magnets, while not strong enough through two 1/8" plywood layers, would be strong enough through two felt layers, but haven’t tested.

Exactly, that’s why I use veneer when I do this. 2/42” or thereabouts, about 0.05” instead of 0.25.

Using this calculator:

You get about 10x more force at 0.05” than 0.25”… I haven’t vetted it but this seems about right.

1 Like

Hmm. Interesting point, will try with Veneer sounds like a good way to handle this too. Which type of veneer do you use? I take it the really thin type you get in packets from the various wood stores. Rather than the thicker type that is used for iron on.

Yup exactly that. Raw veneer, you can get packs online fairly inexpensively.

Even amazon has some, like this:

Sauers - SCV-20-MXDOM&EXOTIC Veneer Variety Pack 20 Sq. Ft. by https://www.amazon.com/dp/B003F0G60A/ref=cm_sw_r_cp_api_glt_i_4D23CCP3E005A5JK6X36