I’ve been trying to start work on designs for the GF so I have plenty of ideas for when it arrives. I love the idea of layered projects to make something really 3D, but I’m worried about the edge burns and wondering how much work it is to clean parts up to remove it.
I know it’s cut on a laser cutter as the internal corners of the grill are too sharp for a CNC (at least I think they are), but I’m wondering if the external shape was routed out or just cleaned up. Can any of the experienced mods / GF pre-release folks comment please?
Yes, looks like they just sanded the outside cuts. Two levels of discoloration occur from laser cutting wood. Smoke and material backsplash occur on the top and bottom of a cut. You can minimize that by masking the top and bottom surface. Some cleaning is possible. The inside of a cut are mostly burn. Sanding away the burn is the only way I can think to remove it.
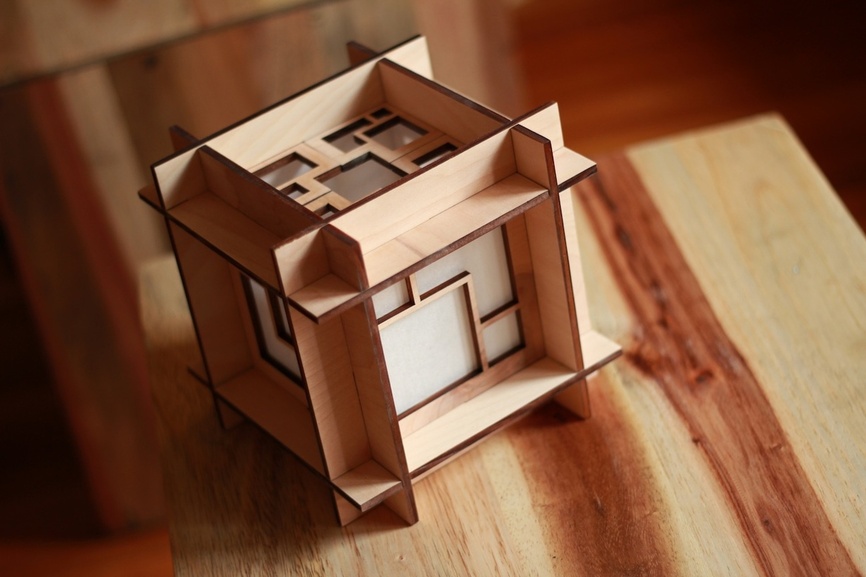
correct. i googled a bit; this is called the amplio. from the product page:
The laptop stand as all the other products Flio makes are from wood or bamboo panels, laser-cut and then hand polished, assembled and packed. These natural materials were selected due to their sustainability, strength, aesthetics and tactile proprieties. You really have to hold our products in your hands to understand the joy and warmth the surface of a wooden product gives. Because we’re freaks of perfection we wanted to have a product made entirely by us, from the selection of material till the hand printed packaging. We make all the work from our small studio in the heart of Rotterdam, the Netherlands.
This is also where you want to play with your settings a bunch. I burned things way more than necessary when I first started due to some bad advice but I’ve gotten my settings dialed in and no more charcoal on the edges so less work. The other way is to look into laser joinery on youtube… You can design it where all or most of your cut edges are hidden inside the piece.
Plenty of us know about these things that arent mods or prereleasers you know.
And you can tell looking at the pictures its a stacked cut design, so I’m sure they glue them, stack the parts, and then sand it into one cohesive piece. It’s gorgeous.
Yeh I knew it’d been in a laser cutter because of those corners (I had clocked the burned internal edges too). I guess my worry was that the external cuts had been done on a CNC.
I’m a bit worried about having to sand everything down a lot (a bit is always going to be required), especially if the cuts are intricate. So, I was wondering how much you really have to take off to get rid of the char? I ask because a have a few ideas which will require the edge sections to be visible and I want those to be sanded. Am I going to drastically lose the uniformity of my parts through sanding?
I love the layered construction, it gives me plenty of cool ideas. And sorry, rubbersoul, didn’t mean to suggest you guys weren’t qualified
In my experience, it doesn’t usually take much sanding to get the edge burn marks off, particularly if they aren’t scorched too much. All of my designs actually incorporate the edge burn as a design element (it can help give more visual depth to a design, and also helps to seal the plywood edges and strengthen the veneers at the edge to prevent chipping), but even using sanding jigs to keep my sanding flat to the face, I’ll occasionally nick a side and remove the caramelization. Doesn’t take much to take that burn layer off at all – sometimes I have to “paint” it back on in places using brown ink.
If leaving the edge burned is a concern because of later handling, once you rub the sides down with a paper towel a bit, the burn edges generally stop releasing ash, and you don’t have to worry about more coming off later when people are using it.
FYI, when I’m sanding, I’m using an old Porter-Cable palm sander with 220-grit paper, which is great for quickly and evenly taking smoke marks off the veneer faces.
And here’s an example of one of my designs, just to give you a sense of what I’m talking about:
Can you describe generally the differences in what did and didn’t work? More power and faster movement is better than less power and slower movement, or vice-versa? Or is there some other setting that makes all the difference? Just want to file away that info in my noggin for future reference.
SarbarMultiMedia on youtube showed that you can avoid the char on wood altogether and get clean cuts by using a powerful air assist blowing down the cut and going as fast as possible while still just cutting through. The stronger air assist allowed him to go faster. I.e. it makes the cut deeper for a set speed and power.
I don’t think that will be possible with Glowforge as it blows across the cut and doesn’t seem to go particularly fast.
He also showed in a more recent video that blowing across the work or using no air assist at all on engraves leaves the surface cleaner.
Admittedly, even if they’re perfectly aligned, you’d probably still want to sand if you need a totally even surface with stacked layers. This is because on any cut, you’ll end up with a slight slant on all the edges of your pieces, due to the fact that the beam focal point is at one very specific distance from the lens, not across the entire thickness of your material. Basically, instead of getting straight side walls in your cutting line, you always get a slight “v” shape, with the pieces just a hair wider on the lower surface than they are on the upper. Normally, it’s such a slight slant you’ll barely notice, but if you glue laminate multiple layers side-by-side, you’ll end up with slight ridges at the bottom of every piece where the material flares out just a bit.
Unless you’re going for a textured grip. Then you’re golden.
I handcraft a lot of items and sometimes getting a surface “just perfect” becomes such a task, that it’s almost better (and more unique/interesting) to make it so far away from uniform that it obviously is not trying to be perfect. Some might call that being lazy, I call it artistic.
You want to go the fastest you can at the highest power possible to have clean edges. Speed will almost never be the limiting factor on your Glowforge, since cutting speeds are much slower than engraving speeds.
We’ll optimize Proofgrade presets to minimize char so you don’t have to worry about it there. For your own materials, you want the highest power/fastest you can go while reliably cutting through.