Instead of introducing this info as a new topic, I considered adding it as an addendum to a previous post The undisputed heavy weight champion of the world which dealt with the same general idea, but ultimately decided that the techniques and finished look were different enough from the original post to merit it’s own entry.
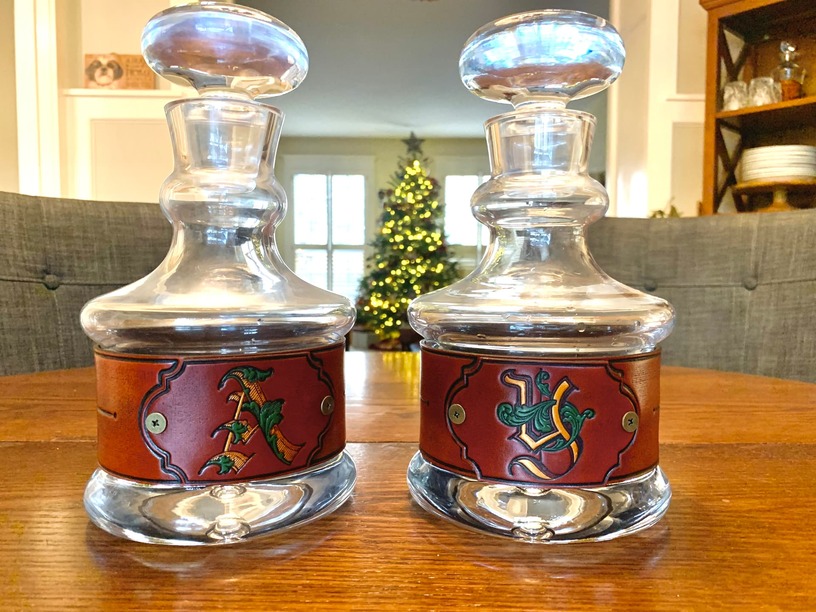
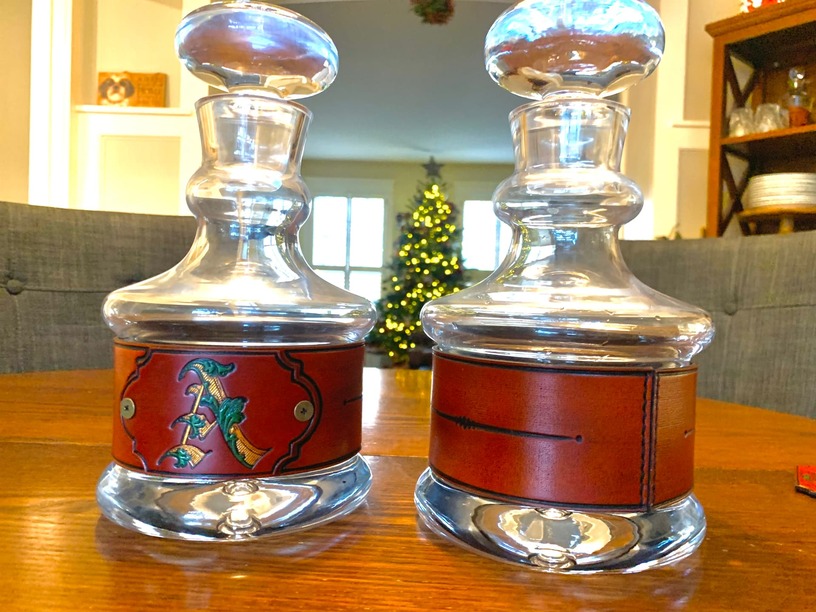
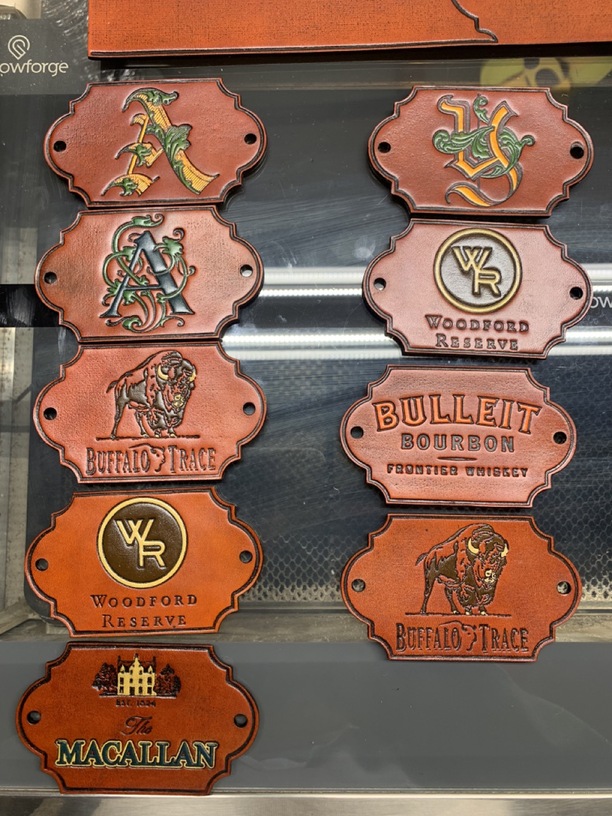
The general idea is a leather wrap around a decanter upon which you can affix different badges dependent upon which particular spirit is contained within. In my first go round, I directly laser engraved the leather with the desired graphic. This looked OK(ish) and I definitely got some decent engraves. However, rooting around in the remarkable wealth of information on this forum got me thinking that I really, really liked the look of embossed or stamped leather a whole lot better than engraved leather.
Delrin seems to be the material de jour for making leather stamps, but I did not have any on hand so I delved into making stamps out of acrylic which I had plenty of on hand. I eventually dialed in settings for a very serviceable and durable acrylic stamp with which I was able to get very good results.
In the interest of brevity, I will finish up by adding that I colored the badges using Angelus leather paint and then stained them using eco-flo gel antique. I finished them with an application of Feibings antique paste for good measure (brown, I think) and a finish coat of eco-flo satin sheen which I sprayed on. If I make more, however, I will probably go back to Resolene as a finish - I just think it’s more durable though I don’t really care for it’s high-gloss sheen.
I made three of these as Christmas gifts for my brothers and father and they were pretty well received. I would be happy to share details of the workflow I developed for anyone who may be interested…just let me know if you have any specific questions. Cheers!
Wow! You really have mastered that technique. Like you, I prefer the stamped/embossed look to engraving for designs like these. You are inspiring me to revisit the leather stamping I toyed with awhile ago.
The interchangeable badges using Chicago screws are brilliant, and the whole thing is so well
executed. And the painting is excellent too, and now I’m off to buy some Angelus paint to try it myself.
FWIW, I’ve dabbled in stamps and also found that thick acrylic worked just fine, so if anyone else wants to give it a try, don’t think you have to use Delrin. (I would use Delrin if I was making them for production work, but it’s certainly not a necessity.) I have issues with my hands and couldn’t get an even emboss using a vice or clamps, so I dove right on in and bought a small arbor press which made it so much easier. What did you use?
Thanks! It was a bit of a challenge. I found it worked best to do it almost like you would lace a new shoe - stitch it very loosely. When all the stitches were in place I slipped the band around the decanter and began pulling the slack in the thread to tighten each stitch one at a time beginning with the first one. I toyed with fastening the band with snaps or other types of closures, but found them all to be too bulky for my taste.
Stitched it closed. I experimented with different types of closures like snaps or studs, but liked the stitch the best. It was by far the cleanest and least bulky. This is a fairly simple butt stitch, but I tried a few with a baseball or corset stitch as well.
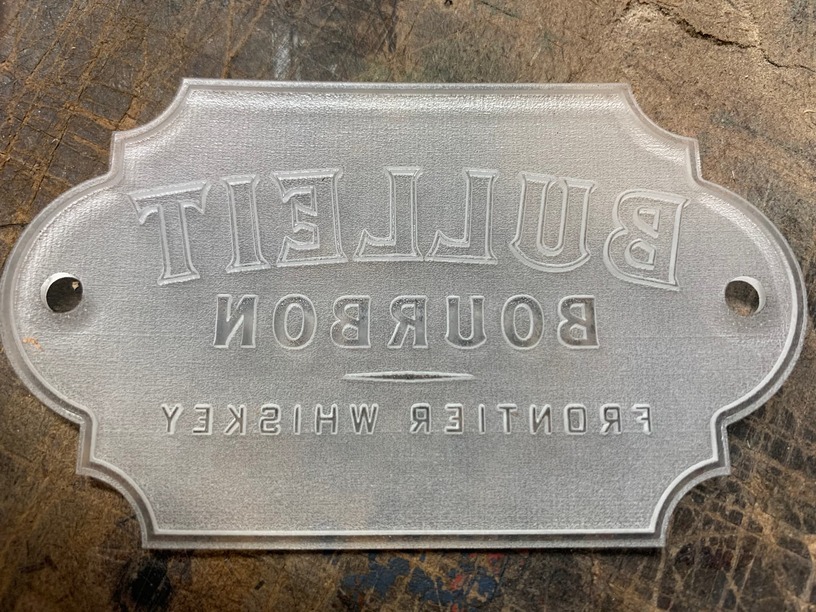
This is from the underside or “stamping” side which is why the words are reversed. The ridges that do the embossing are 1 to 1.5 mm in height. I found this gave me a very good impression (if the leather is adequately wetted) while still maintaining some strength in the stamp. I clamped these under A LOT of pressure (bent or broke a few cheap harbor freight C-clamps in the process) and never had a stamp break or chip and this is just 1/8 acrylic.
While I’m on the subject, another thing I learned about stamping is you really don’t want to emboss large faces or profiles. You will notice that most of the stamping surfaces in the picture above are relatively thin lines. The word “bourbon” represents about the thickest or widest profile I would attempt to emboss. Any wider and the depth of the impression just isn’t adequate to hold on to the gel stain or the antiquing paste (which is what gives the embossed lines a nice dark color in the finished product).
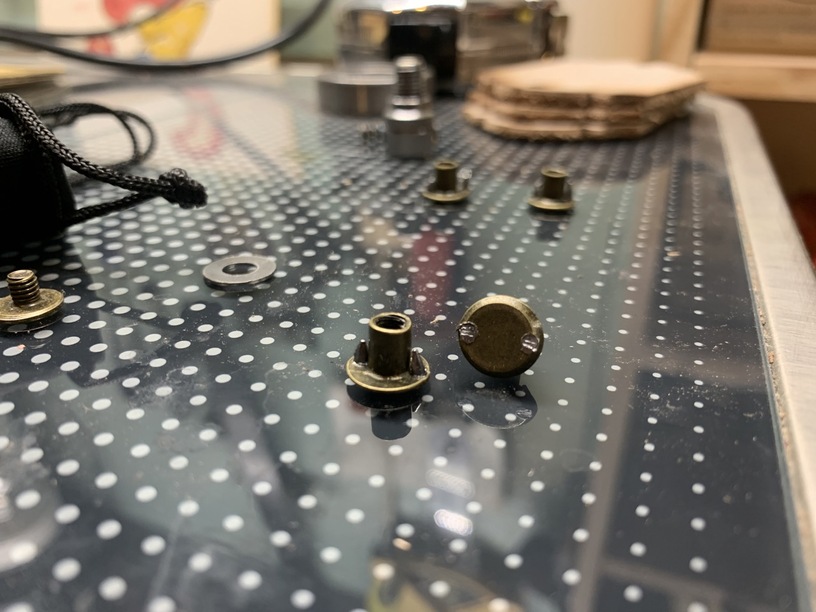
Hey thanks! The screws ended up working well, but weren’t without their own challenges. In my previous post on this topic, someone asked a very sensible question about how I prevent the receiving end of the screws from spinning when I tighten or try to loosen the screw. At the time, I didn’t have a better answer other than a nice tight friction fit when installing the screw into the leather and don’t over tighten the screw. I tried something different this time. It was a bit fiddly and not terribly elegant, but it worked so I guess I’ll call it a success.
I cut off the tips of some brad nails and press fit them into holes I drilled in the flange of the Chicago screw so I wound up with something like this…
You might just use a drop of glue when you seat them. I’ve used CA and Goop.
Not laser related, this was on things long before I had the GF. They’ve held up to this day - some over 20 years. Saddles, halters, a purse, belts and bracelets, etc. They do not, however, need to be frequently unscrewed.
Oof, that sounds like sone work! Like @eflyguy i generally use Chicago screws on things that don’t get taken apart much… or ever. I’ve actually taken to using red loctite on them, especially the stuff that will bounce around a lot: dog collars, keychains.