Does anyone have a fool proof trick for centering designs on material? We are having a hard time figuring out how to make sure our designs are exactly centered on our materials, not too far left, right, up, or down. Any advice is appreciated.
Best thing to do is to make a template. Do you use inkscape? Or possibly run the lid camera calibration if you have not done that.
https://app.glowforge.com/maintenance/camera-recalibrator
4 Likes
I agree with running the calibration, but even then you should use a jig for perfect alignment.
This might be helpful: Video Tutorial - How to make a jig
Suggested forum search terms: “make a jig” and “perfect alignment.” 
3 Likes
Not sure I understand why you would want to, but just use the “center” points on the design to line up with the center of the bed (10" horizontal, 6" vertical, which is the center of the PG 12x20 material, even if you can’t cut to the edges.)
Positioning to the center of a sheet is going to produce the most waste. I am usually positioning so that I am as close to one corner as possible.
In addition (everyone else’s advice is great, and basically the same as mine), I am a proponent of that I call “corner jigs”, it’s really useful for aligning quickly and using very little material to do so.
1 Like
We do cutting board engraving so it’s pretty important to be centered.
1 Like
Aha, makes sense! Hopefully my suggestion helped?
I am not sure if ‘foolproof’ is right, but here is what I’ve been using as an easy jig set up. I have a set of round dog tags that have a round logo that needs to be etched – so it has to be centred. In Illustrator, I centre the logo on an outline that is the same size/shape as the dog tag. Then in the GF, I tape a piece of paper to the crumb tray, I score the outline on paper on a very low power (1-2%) so that there is an outline. Then I tape the dog tags to the etched location, adjust the height in the GF software and engrave the logo. I am a teacher, etching student-designed logos on tags for their bags and it has meant that the logo location is nicely centred. Bit of a different scale from a cutting board, but the principle might work.
3 Likes
I echo what everyone is saying. Jigs are really the way to go. What @hcdragon is doing is essentially a jig too. I use cardboard and in the Illustrator/Inkscape/etc. file, you just need an outline of the object (cutting board in this case) as a cut line, and then your design in the same file. @evansd2 post is a good explanation of it, and his take of using an offset corner instead of cutting out the entire outline is nice and efficient
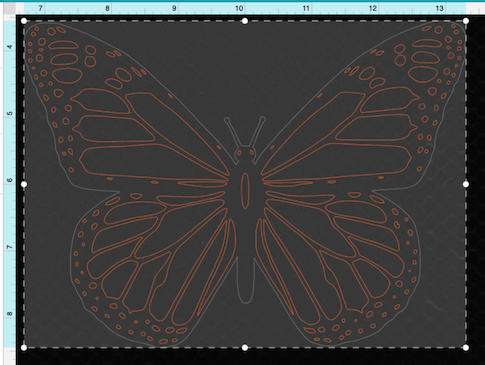
The key to why this works is that in the GF interface, the lines will stay aligned to each other even if it doesn’t visually match the camera’s scan. So if you cut the outline in the cardboard as a job, remove the cardboard cutout (being careful not to move the jig), place your cutting board in that cutout, then run a second job with the cut outline turned off and your artwork (cut, engrave, etc.) turned on, it will be aligned exactly to how you had it outlined in your file. Below is a screenshot of the GF interface with a quick and easy cardboard jig for engraving flash drives:

2 Likes
Or GlowForge could make centering lines on their software just like literally every other design program has. But then they wouldn’t have materials being wasted and increased sales on their overpriced proofgrade materials. This company is honestly garbage. 
3 Likes
Welcome to the forum.
Your first post really doesn’t add much to the discussion, however. Many of us do not share your opinion of the company.
3 Likes
It helps if you learn how things work before complaining that they do not work the way you expect. Properly set up you could specify the center to the thousandth of an inch.
3 Likes