Something like a 22 inch circle in 1 piece.
Some kind of template maybe , I have tried several ways and its not working to good.
Any ideas would be a relief and very thank full.
Something like a 22 inch circle in 1 piece.
Some kind of template maybe , I have tried several ways and its not working to good.
Any ideas would be a relief and very thank full.
22" circle when the usable width is 19" and a bit?
Do you have a passthrough Pro?
With a basic you would be only able to do something like 14" circle using the part of the crumb tray that goes under the gantry and to the top. Cut part of the circle and then rotate. Doable now with set focus or with careful alignment or with snapmarks.
I’m not seeing it.
Did not say if have a PRO or not, and the PRO is the only one that may be able to do an 18.5" circle in one piece using the pass thru.
Height (even on Pro with pass thru) is limited to about 10.65 inches. The width is about 18.5.
These are usable limits due to the dynamics of head travel and overall machine design.
I never really understood the benefits of the Pass thru until now, I have the non pass thru.
I have figured out how to keep the front door down and have been trying to stick a corner inside and cutting and arc but after a trillion tries not working well.
Is there a good tutorial on how to use the Set focus with snap marks ?
Im not even sure how to do it if i had to parts.
Thank you for your help .
We might want to move this to the category Beyond the Manual since it is not an issue that is within the operating parameters of the Glowforge.
Do you have Snapmarks?
I congratulate your ingenuity. Nibbling at the arcs to make up a circle.
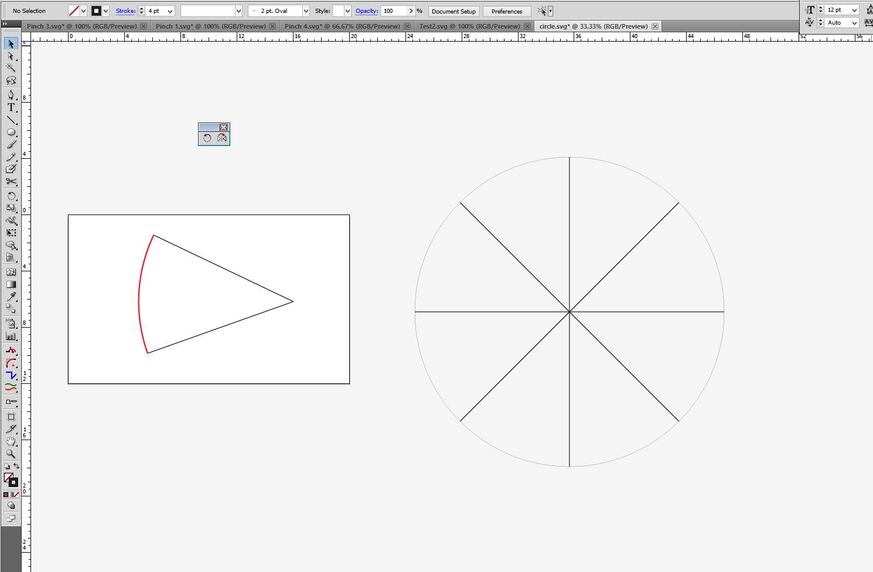
You can cut a paper template, 1/8th of the circle, trace it onto your foam, and then use a knife. (To keep from setting fire to things.)
To cut your paper template:
Divide a 22" circle into eighths, use one section with the attached arc, and cut that out. Draw a vertical and horizontal axis centered on the foam, align the template along each axis, and trace the arc. Then cut around the 22 inch circle.

(Or you could just tie an 11" piece of string to a tack, put a pencil or knife on the other end and make a really big compass.)
That’s what I’d do, depending on how accurate I needed the circle to be.
Wait that leaves me a big hole, lol Thanks Jules, Im trying to make a dart board, lol
Wait wait , ok I get it now
Different things, you don’t need set focus and snapmarks together.
No just cut the red line, the side black lines are just for placement. (It should net you a 22" circle.)
(You cut the shape out of paper (on the Glowforge if you like) and use that as a template on the foam to draw in the circle. Then you would just use a knife to cut the circle out along the red lines.)
Ok, got the SVG file, thank you, going to give this a spin , 
One last question Jules, if I have two circle in 1 to cut out a big circle and a little circle, how can i get the little circle to cut out first. It seems that the machine always changes it up as to where it cuts when . What the secret ? lol
On that note I keep waiting for you to make the Glow Forge video series on how to master this marvel. How much longer do I have to wait. ?
You can specify which one comes first if you give them different stroke colors. Then just drag the smaller circle up higher in the thumbnail column. It processes from the top down.
(I’m leaving the video instruction to those who do it better.) 
All this time , going on a year now and I still do not know how to do that, all i have learned is to use the trace on the illustrator with 1 Picture showing all black line cut outs , no wonder i waste so much material .
what I end up doing is if i make 4 of the same design on 1 sheet , I look for the one that the glowforge cut in the right order and than copy and paste it hoping it cuts the same order.
No, it could very likely change each time. (Don’t know why, but it does.)
Just practice on one of your files, grab an icon (click hold) drag it up higher and let go. (It does work.)

So this is the trace , and no matter how high i move the Trace icon those circle are random and it blows away and moves . I got this from the glowforge forum for example.
Okay, make all of the little circle icons red, not black. Then you will get two operations for it. Then you can move the little circles up above the sleeve in the column.
oh my god I learned something , thank you. That has been the missing piece of the puzzle for me.
Please someone make the video series. please .
Don’t use a screwdriver when you need a hammer.
https://www.ehow.com/how_8326623_draw-large-circle-compass.html
A Glowforge may not be the best tool for your job.
I’ve made really big circles with the GF, but never in one piece.
This piece is 4 feet in diameter: My first piece of art created on the GF
The largest gear in this one is more than 36" wide: Giant Wooden Gears
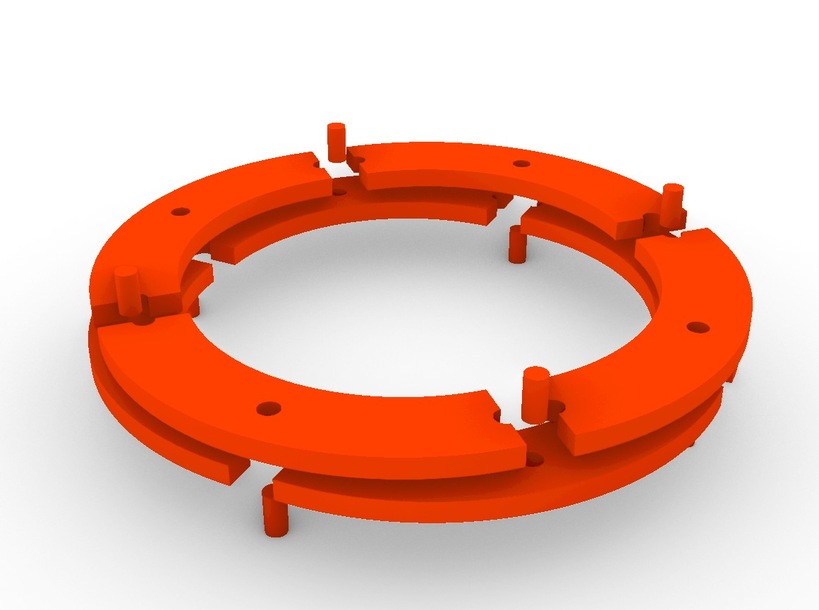
If I wanted to make a 22 in circle, I would make it in 2 layers. Each layer would be made up of 4 segments (a quarter circle, 11" x 11"). I would rotate the bottom layer 45 degrees from the top layer and glue everything up.
That’s how the big gears were made (but using many more segments for each layer).
…and when you have a hammer, EVERYTHING looks like a nail.
![]()
If you’re gonna have keying/registration holes for alignment, might as well go the full layered approach where some well-placed alignment keys not only add rigidity, but the upper ply’s assembled shape ensures the roundness of the lower and vice-versa.
This idea can be applied toward concentric donuts and the keys themselves can serve as the numbered score indicator. Also, upper layer done in cork?