Very useful tool. Thanks for sharing.
2 Likes
I’m in the process of combining this into my own version of a material test template and I wanted to know what range of thicknesses to focus on. I’ve measured medium PG Acrylic as 2.8, PG Maple plywood as 3.5, PG Thick Acrylic 5.7, and some random 1/4 MDF as 6.2. So, I was planning to go from 2.6 to 3.6, in 0.05 steps, and 5.6 to 6.3, also in 0.05 steps. Are there any other measurements of “thick” materials that would help to inform my range?
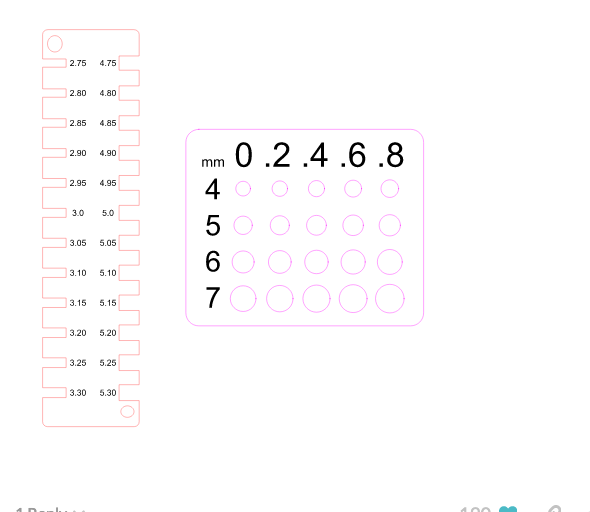
can i ask what the one is with the circles is for I am new I am just getting started.
I dont think I’m understanding what youre saying. Are you saying to place the material im cutting in the grooves of the ruler? If my material fits in the 5.30 slot how does that change the kerf? I thought kerf was the amount of material the laser removed.
Once you have this piece cut out, you can take whatever round item you have and insert it into the various holes to find the fit that you like. Then simply read off the size, and use this size in whatever you are designing. The design “requested” the listed diameters, and the kerf took out whatever it took out. You are simply indexing on the result.
There is the possibility of have different materials for the slot and the insert. Use the “comb” pattern in the material you want the slot in. Then, take a sample of the other material and figure out which slot it fits in with the pressure you desire. This will tell you the size of slot you need to use in your design SW.
Kerf is the amount of material the laser removed. The resulting “comb” piece has slots that are actually going to be wider than the requested spacing. In your example, the design program made a slot that was 5.30. The laser actually cut a slot that was a bit larger than 5.30. But, if this is the slot that gives you the fit you want, all you need to know is that a requested slot of 5.30 produced it. You do not need to know the actual size of the 5.30 slot, which would tell you the kerf. That is why this is the “easy kerf gauge”.
3 Likes
This is really handy! Thanks
@tim1724 I did not know this tip! I’m just starting to use Affinity Designer; so thank you!
1 Like
I am learning a lot from this thread! I avoided using anything I had to design that would include kerf because I was unsure where to start — so I would skip to another project I wanted to do. LOL Thanks for the explanation!
1 Like
Also, unless you need your design to be “squeaky” fit - really tight fit, you can just ignore kerg altogether.
You only really need to worry about it when you really need a precise fitting. If you don’t - or a bit of glue will do - then don’t worry about it.
1 Like
My suspicion is that if you use the measurement from your gauge as the material thickness and 0 for the kerf in Tabbed Box Maker, the tabs and slots will have the correct width/thickness, but the tabs will be too long and will extend beyond the slots by the length of the kerf. If you are making keyed dividers, the width of the holes for the divider will be correct, but the height will be too big.
1 Like
This has helped me greatly! Thanks 
2 Likes
Thank you very much!!
1 Like
would love to download this file but I am not sure where the download link is
Welcome to the forum.
The file is in the original post. Right click it and save as an SVG on your computer. The file looks like this:
3 Likes
got it, thank you so much
Thx. I cut out the gauge in the wood I’m using. Found that my wood fits into 3.30 snugly.
“That is the dimensions you need to use in your drawing program.”
Where do I put this number in MakerCase.com?
I’m sorry to sound dumb but I simply don’t understand. The thickness of the wood never changes, we cut through the thickness, so to say to check the thickness in the slot doesn’t make sense to me. its like taking the edge off a tabletop and checking to see if the thickness changed. Those planes intersect so how does your gauge work?
1 Like
Totally understandable not to understand this when new. Most of us have had years to learn these things now.
I’ll give a short answer and then let you look at the archives to get deeper.
Whenever you cut with anything, there is a certain amount of material taken away in the process. A table saw is an extreme example that will take about 1/8th of an inch away. A laser will remove much less, but it still matters when you go to assemble things that fit together, like boxes with finger joints or tabs and slots.
If you don’t account for kerf, your assembly will always fit loosely, overcompensate for it, and things are too tight, and you can’t put it together.
If all you do is flat items, then this is not something you need to worry about, but the day you set out to make a gift or jewelry box, you will be glad to understand kerf.
8 Likes
By way of example, let’s say you wanted these pieces to “key” together.
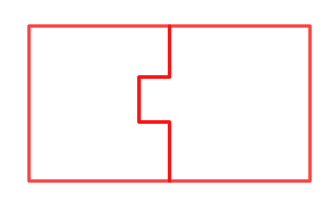
If you were to cut as shown, the fit would be loose by the width of the material removed by the laser. Instead what you need to do is increase the width of the tab by the kerf to get a tight fit. In practice, it takes practice to determine what number to use, and that’s where this gauge comes in handy.
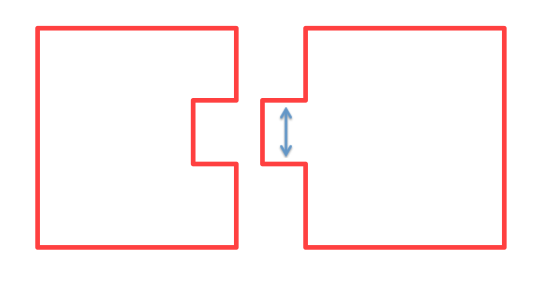
(you could also reduce the width of the slot instead)
6 Likes