Good Morning,
The main reason that I bought my glowforge was to make make/engrave maps. I’ve posted a couple of times about this when I was working on 3D topographic maps or engraving historical maps on tile.
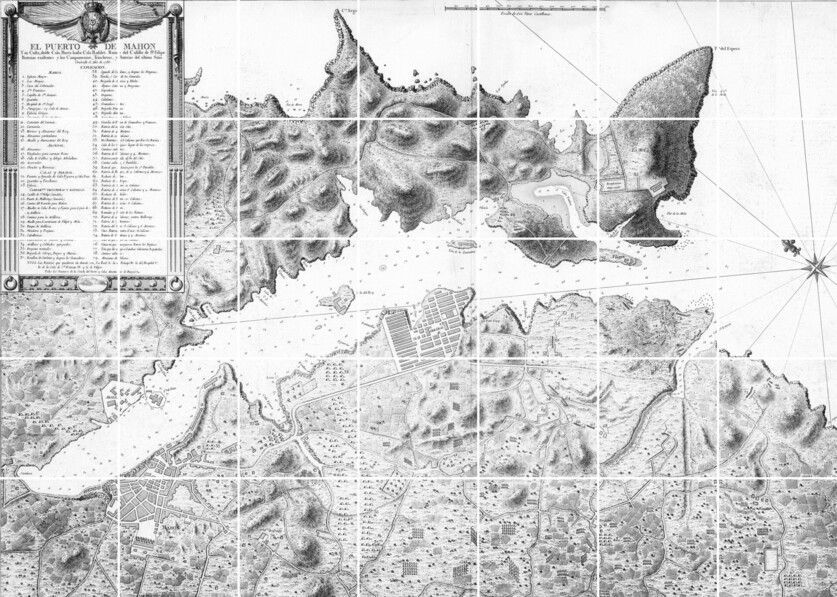
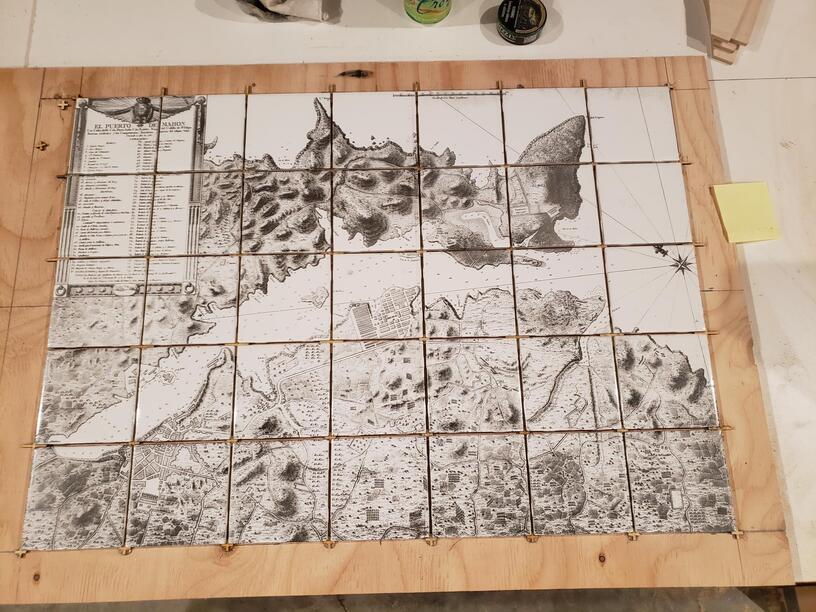
I’ve really been wanting wanting to make some BIG maps that exceed the bed size of the glowforge, though. I just took a crack at it this past weekend for the first time and I’m pretty happy with the results thus far. The map I used is El Puerto de Mahon from the David Rumsey Historical Map Collection, from 1786. I’m planning to turn this into a coffee table that will end up in the room in our house that’s decorated with a cartography theme. The settings & technique that I used are the same exact ones that I posted about in the thread about engraving on tile linked above.
I’ll try to add some close-up pictures after I get home tonight. All in all I’m pretty happy with this, but i’ll want to work on tweaking a few things to try to get the small text and small hatch lines to be a little more clear. I might try lowering the LPI to 450 and see if that helps, but I think that the main thing I need to try to do is do a better job of cleaning up the background and making it transparent before engraving. I only gave that about seven and a half seconds worth of effort before trying this one.
EDIT: If anyone wants to take a spin, I put 1 group (8 tiles) from this map + tile spacers in this google drive folder - MosaicTiles - Google Drive
The top-left origin for all of these should be 1in/1in, so you can cut out a jig with the first file and then just replace the tiles for subsequent engraves (or cut out the spacers with the original pieces from cutting the jig). They’re a little bit expanded beyond the tile size so that the tiles themselves fit perfectly in there, but you’ll still want 1/8 of spacing between the tiles.
If you want to try your own image, just delete the PNG from that SVG file and drop one in there. Or more specifically (and assuming you’re using inkscape like I do) :
Ungroup the SVG and delete the PNG in the background. Leave the polygons as they are, and using a fill with no stroke.
Copy the group of 8 polygons and paste off to the side. Put your desired image in the background and select both.
Object–>Clip–>Set to crop your image to the 8x polygons (which will disappear with default settings)
Select your cropped image. Cntrl+Shift+E to open the export dialogue. Set it to “selection” and 300dpi, then export out the png.
Delete the cropped png that’s still in your drawing, then import the recently exported png
Select your remaining group of polygons (with the top-left corner at X:1in y:1in) and your image file, then control+shift+A to bring up the alignment window. Align centers horizontally and vertically.
Take a close look to make sure everything appears aligned. Then select both and control+G to group them and save. Then upload to glowforge.
Holy crap, that’s awesome. Now can you grout between the tiles without messing up the engraved part or do you something else when it’s not an actual bathroom?
I think you may find that if you clean it up too much it looks…off. I did that a couple of times, even re-typing the wording once so it was clearly readable, and it just didn’t look right to me. 7.5 seconds may be the right answer
@henryhbk - That’s the theory, but I haven’t actually tried it yet. I’ll seal the tiles before applying grout, but otherwise they’ll be “secured” the same way you’d do a bathroom counter.
You can also grind off the spacer tabs on the tile edges so they can butt against each other tighter. Thinned silicone sealant can be used to glue the edges together when you set them into the mortar base so you have just a seam & not a grout line between the tiles.
or just build edges of the table 1/8" higher and after putting the tile down, do a flood fill of clear epoxy. that would protect the tile and create a smooth surface. probably way more work, but another approach. wouldn’t have to seal the tiles, either.
I’ve gotten asked about doing just that twice since I started engraving on tile. So far though, it’s just been to have something like every 5th tile be a playing card or a compass rose or something. Not mosaics like this.
That kind of horrifies me to be honest. It’s pretty hard to get the tone to be consistent between different sets of engravings (and I haven’t even tried splitting it up between my glowforge and my friend’s yet). I made 14 10x14 tiles for a coworker to give out as end of season gifts to all of his teammates and I had a lot of trouble getting them all to look uniform. Wasn’t a problem I had anticipated. On this one, I was a lot more careful about cleaning the machine between every cycle, mixing the ink very well, wiping with alcohol before inking, applying it the same way, letting it sit for exactly 3 minutes, etc. It seems like it worked on this one, so we’ll see if it works between different machines too.
Currently I’m just using clear coat to seal it. I have a few coasters that we’ve been using for about 2 months now that are holding up just fine with clear coat. I’m not sure what else to try though. I went to a tile store and a ceramic “factory” to ask for recommendations, but they didn’t have any for me. The ceramic place said that their normal process would probably cook all of the ink out of it.
I was wondering what clear epoxy between tiles + acrylic + backlight backer would look like, but I’m actually more excited about having grout between the tiles than anything else. Who knows until I actually try it, but a “normal” tile job that has a crazy engraving on it carries a lot of the appeal for me. Also, I’m a little bit obsessed with trying to make sure everything lines up perfectly and having the standard process of 1/8 tile spacers seemed really reliable.
We’ll see though…I have a habit of beating something new into the ground twice over, so I’ll probably end up getting bored of the grout and trying your suggestion in a few months.
If anyone wants to try 8 of these tiles (or use my file as a template to do your own), I edited in a link and some quick instructions to the bottom of the original post. Let me know if any of it isn’t clear and I’ll spend a little more time writing it out at home.
I’ve been sticking with my method using calligraphy ink because its been the best way to have variable shades that I’ve seen. I haven’t seen other methods work well with greyscale pictures, just solid colors.