Having a problem engraving and then cutting a design on PG maple plywood medium board. It engraves beautifully but then only cuts half way through the board. The engraving itself takes about 20 minutes, so is it that by the time it gets to the cut it is out of power (sounds dumb to me even saying that out loud but I am out of ideas). I even tried to tell the machine it was the thick maple PG material and it still did not cut through. However, when I told it to ignore the engraving and just do the cut it did it perfectly. I have gone through 2 sheets of the material and am seeing $$ in my eyes as I fearfully have to try again to make this work. Any ideas?
Telling the Forge it was thick will actually weaken the power making it to your board - because the laser will be focused 1/8" above the top of your board - telling it that the board is only 1/16" thick might help, but you shouldn’t need to do that.
1st question - unless you’ve only had the machine for a few days - have you cleaned everything recently? There are 5 areas that should be cleaned regularly to get a good strong beam
2nd question - if the first answer is a yes, check that you didn’t put the lens in upside down - the “bowl” should face up (away from the tray) when you put it back in.
1 Like
You are amazing for answering so fast!
Now I feel a bit silly but I do not know what five areas I should be cleaning  …can you share those steps? I have just cleaned the mirror with the Zeiss wipes and it has not helped… well, that and the crumb tray is what I have cleaned…
Sure - the official instructions are here: https://glowforge.com/support/topic/cleaning-service-and-moving/cleaning
If I may suggest, if you haven’t, going through “the Matrix” and bookmarking it may make your future life easier!
3 Likes
Thank you so much!
Very odd it cut fine when you ignored the etching–but was this on a different sheet?
Are you pinning the boards down? There are great hold down pins in the free designs Honeycomb bed holdown pins that are a MUST. Boards may look flat, but rarely truly are (tap on the board and you can tell if it’s tight to the crumb tray or not by the sound–more hollow = bit of a gap). And any non-flatness will not get a clean cut.
And magnets (but not the super strong rare earth ones) can help in the center of the board–just keep 1/2" or so from the laser path.
And a tip–before you move the sheet, try to wiggle your design to verify if it’s been cut thru yet or not. And without moving the material or the design in the GFUI, ignore the etching and the run another cut. (Lesson learned after losing jobs/material, too!).
Also many users always slow down their cut speed, since environmental conditions can affect the performance, too. I don’t always have to, but going down by about 10 always helps.
Exact same board and it is a beautifully flat one, which is what I cannot figure out. If it had a problem being clean enough or focused enough then it should still be a problem cutting without engraving. I feel confused at the moment
Being flat is not as critical as many would have you believe and, given what you said about cutting fine if you ignore the engrave, that’s obviously not the problem.
I don’t have an answer. We’ve seen this pop up lately and I strongly suspect some kind of software, not hardware issue - based on the fact that some things can cut just fine. Several people have posted pictures of cuts that simply skipped small sections of a continuous path. That’s my observation based on the posts here - unfortunately, a lot of times the support process switches to email and we don’t find out how things go after that.
1 Like
As a workaround - can you engrave the whole job with cuts set to ignore, then when completed, go back and ignore the engrave and enable the cut?
1 Like
Unfortunately the engrave and cut are such an exact match there is no way to line them up accurately (I tried). Feeling frustrated because it feels like just one more thing the Glowforge is deficient in…wishing I had gone for the Epilog 
I mean, in the same file, don’t touch the material, don’t even open the lid. Run the engrave, then run the cut as separate jobs.
1 Like
Yep, exactly what I tried. There are circles that go at an angle around holes and as soon as the cut is done there is a slight readjustment of the outline line the glowforge uses to identify the item and that is what throws everything off.
That would only make a difference if you were moving things in the UI to try and locate them manually.
With a complete design comprised of precisely aligned engraves, scores, and cuts, the machine will accurately place them in the exact same location whether you run them as one job or several.
Put the entire, complete job into the UI, then in the left column, “ignore” the cut operations. Run the engraves/scores, then without doing anything else, “ignore” those operations and set the cuts to “cut”. There will be no mis-alignment.
I’ve had instances where I overlooked some score operations, watched them run again, and you couldn’t even tell other than being a little bit darker - it’s accurate/repeatable to tiny fractions of a mm…
1 Like
I will give it a try…thank you…ummm may I just ask what the UI is?
The GF user interface, the “workspace” after you upload and open a design.
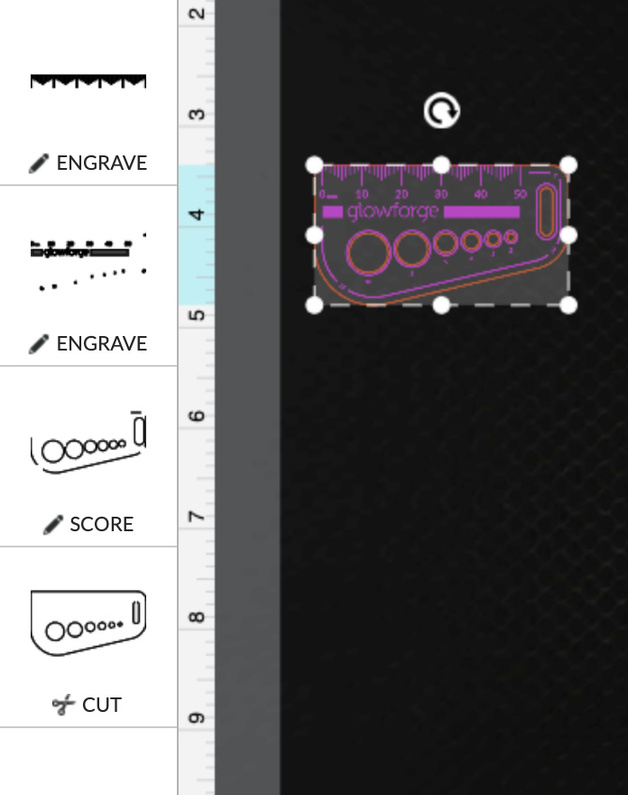
Let’s assume your engraves and scores were fine, but the cut only works by itself (which is what I think you were describing) - so set JUST the cut to “IGNORE” on the left:
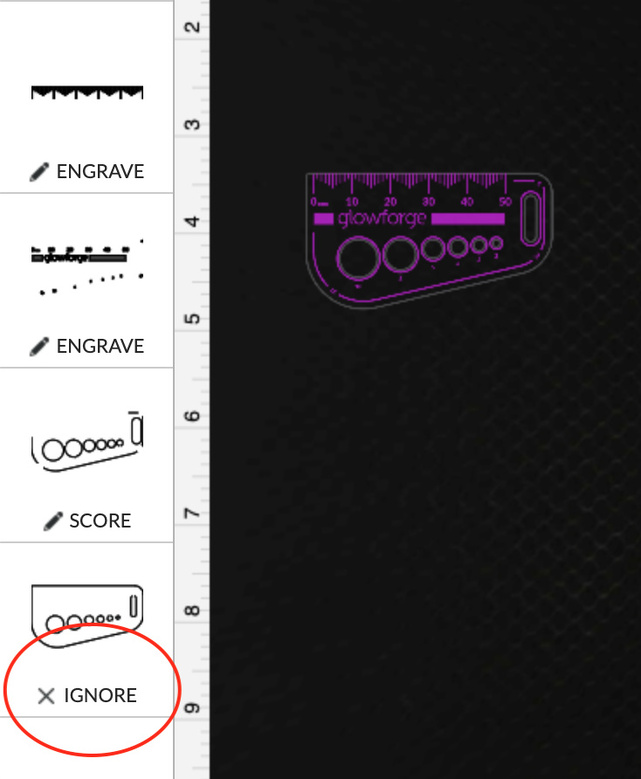
… then, without even opening the lid, switch the already run operations to IGNORE and flip the cut to “CUT”:
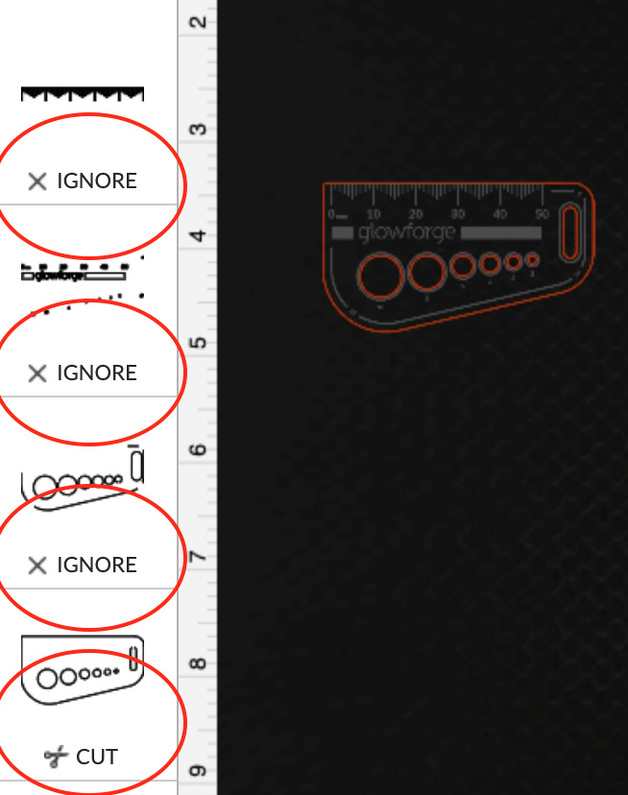
Those are the only changes you should make - don’t touch the design elements over in the workspace itself. I’ve done this kind of thing countless times - not because of problems with my machine, but (for example) to repeat an engrave for more depth.
2 Likes
You are so very kind to take such time to explain everything! I am going to try it just as you mentioned in the morning and let you know what happened. Thank you so very much!
2 Likes
I could not wait until morning to try your idea and it worked FANTASTICALLY! Thank you so very much! Cutting out all of my cut/engrave work like this moving forward
2 Likes
Respectfully disagree. I only say this because folks might get the impression that a little error is OK. It takes only the slightest focus error to cause a cut not to make it all the way through. If you can feel the material move when pressing down that’s enough of a difference to cause problems if the autofocus does not compensate. How do I know? I worked with staff for over a week early on to find a cut through problem that turned out to be an almost imperceptible amount of warp in my material. They offered to replace the machine for a problem that turned out to be operator ignorance. That said, it’s not as much of a problem as it used to be because of Set Focus and other improved method of determining material height.
Used to be that the automatic focus was not always taken at the design. It would be taken between design objects or even at the center of the material. Now a focus check is always taken at a section of the design. And now we have Set Focus which lets us decide where to check the material height. But if your design is spread out over a larger area then even the slightest error will cause problems.
1 Like