I recently cut some Acrylic for the Ear Savers project with a plastic film on it instead of with the paper backing. Noticed too late that it was emitting a horrid smell. At some point I think it swamped out the filters ability to do its job fully.
We’ve aired out the room and all is well now, but the Filter seems to have absorbed it. Now every time we turn on the filter, it fills the room with those same horrific fumes.
What can I do here? Do I just need to replace the entire filter? Should I pull it out and try and air it outside? Do I just try and run it and keep venting the room until it hopefully comes clean?
This isn’t an issue where I open the print bed and a little smell wafts out.
Right now the issue is that without ever turning on the glowforge, if I turn on the air filter by itself, it starts to vent horrid fumes into the room. As long as the filter is running, it’s awful.
Yeah, but we were cutting acrylic very successfully with minimal odor until I ran the most recent batch of acrylic through.
After doing some additional reading from people here, it seemed to indicate that it was likely a problem with the adhesive that kept the plastic film on the acrylic. Once that was taken off before cutting the smell is no longer a significant issue.
Whatever fumes it gave off though seem to have saturated the filter. Will that dissipate over time and I just need to let it run, or is the thing hosed and I need to replace the filter cartridge?
Why don’t you try running just the filter by itself outside for an hour or so to see if that will dissipate the smell?
Btw-the recommendation to run the filter additional time after the cut isn’t about smells when you open the GF lid, it extends the life of the filter cartridge by spreading the micro particles you just cut deeper into the filter instead of all of it sitting at the front.
Interesting. I didn’t know. That said, I tend to spin it up when I first need it and then it winds up getting left running typically until the end of the day so I’m sure it’s running at least that recommended minimum.
I’ve left it running inside for hours, upon hours, upon hours at this point. It’s only gotten better somewhat, but still not to the point where it would be practically usable for anyone in the room.
I happen to have a small ozone generator, which does a great job on odor removal. What I usually do is put it in a bucket outside, along with the pieces to be deodorized (usually paper cuts), loosely cover the bucket, and run the generator for 20-30 minutes.
If you have access to an ozone generator and have given up on all other options and ready to pitch the thing, maybe this would be worth a try. Be aware that ozone acts aggressively on rubber so make sure none of that is present. I wouldn’t send it through the whole filter setup, I’d just put the filter cartridge in a bucket outside and treat it there.
Note that this advice is not endorsed by Glowforge.
It’s possible that the acrylic you used is extruded vs. cast and that can have a much stronger smell when cutting. That doesn’t solve this problem, but is something to consider moving forward. Extruded is more likely to have a plastic coating than cast, which is more likely to have paper (this is not a hard and fast rule, just “more likely.”)
If your cartridge is full, you can purchase Air Filter Cartridges from our shop. They are $249, with free shipping.
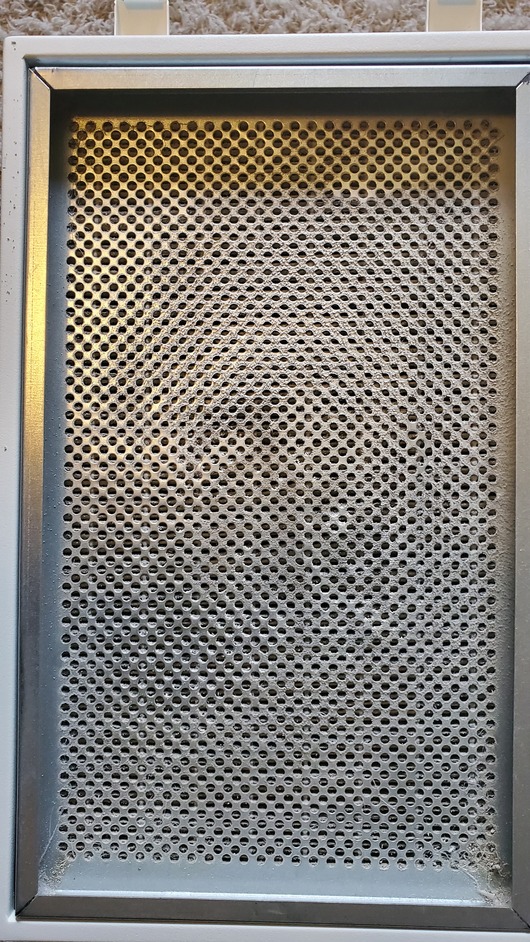
If you don’t think your cartridge is full yet, would you mind sending over a photo of the top of the filter cartridge?
Turn off and unplug your Compact Filter
The power switch is located on the back, next to the cord. Turn it off first, then unplug it from the wall.
Open Compact Filter
There are four latches holding the top of the Compact Filter in place. Lift the bottom of all four latches to release them, then lift off the lid.
Take a picture
Without removing the filter cartridge, take a picture of the top of the cartridge seated in the Compact Filter and send it to us.
I hope my filter isn’t full. We only purchased it a couple months back. I’ve got maybe 70 hours worth of cutting time on the laser itself. We’ve been largely cutting earsavers for that duration on a combination of Proofgrade Acrylic as well as 2 4’x8’ sheets of cast acrylic sourced from other local vendors. The rest has been draftboard, a couple small cuts of Santoprene an PETG film.
Have I just fried my filter and I need to replace it? Is 70hours of cutting time about the life of a $250 filter cartridge? Is there anything else I can do to “recondition this”? I tried just letting the filter run for 3 days while exhausting the room outside and it helped some, but not nearly enough.
Is that a normal wear pattern? Burning through an entire filter after just 70-ish hours?
We’ve not cut a lot of draft board, maybe 2 sheets tops. No other wood products.