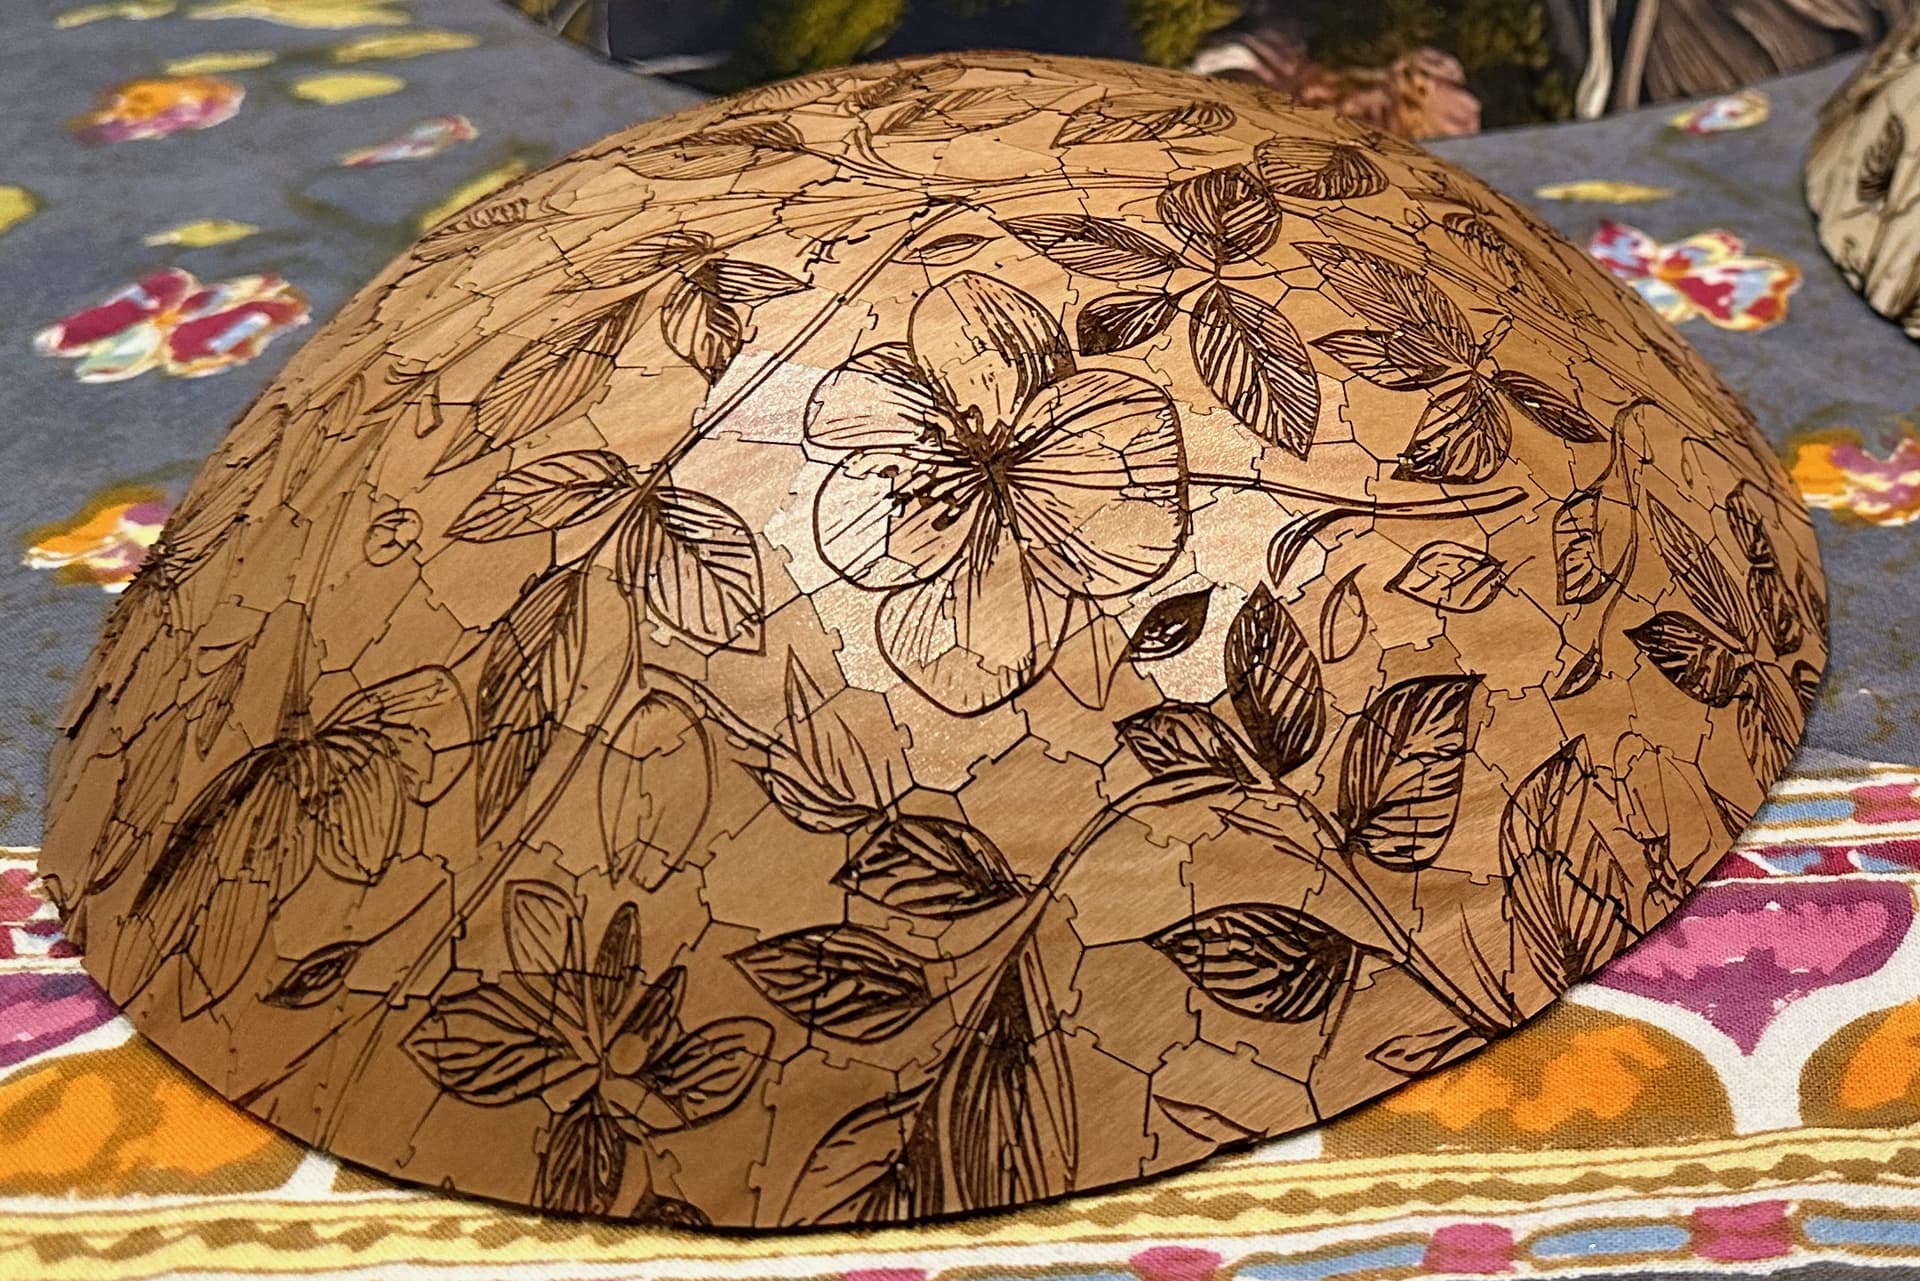
A mini dome puzzle with floral engraving, that you can make from a single sheet of Proofgrade. It’s 8.5" wide, with 357 small pieces. Hints are scored on the back.
Prerequisite Skills:
- Using a vector editor (not the Glowforge UI) to arrange shapes and create offsets
- Engraving (choosing settings, weeding)
Materials:
- 1/16" or 1/8" plywood: a single 12"x20" sheet (Proofgrade standard size)
- Masking paper
Files:
engraved-dome.zip (8.3 MB)
Overview:
- Use one full sheet of Proofgrade light plywood or similar. Replace the masking on the front.
- Use the attached kerf tester pattern to find a snug fit. Use a vector editor—not the Glowforge UI—to adjust the piece outlines by half the number on the kerf tester.
- Place the material face up, and engrave the image from engraved-dome-front.svg.
- Cut out the border rectangle, and flip the piece upside-down in place, top-to-bottom (not left-to-right)
- Score the hints and cut the pieces from engraved-dome-back.svg.
Detailed Instructions:
Click to view detailed instuctions
Read all the instructions before you begin. Also, read my weeding notes in this post, which I’m not repeating here.
![]() The engraving takes several hours and is easily ruined by a misstep in the rest of the process. I recommend a test run with a spare sheet of the same material first, skipping the raster image engraving. This will also give you a chance to confirm that your kerf adjustment is giving you the right level of tightness for the puzzle.
The engraving takes several hours and is easily ruined by a misstep in the rest of the process. I recommend a test run with a spare sheet of the same material first, skipping the raster image engraving. This will also give you a chance to confirm that your kerf adjustment is giving you the right level of tightness for the puzzle.
1. Choose plywood.
You need one varnished Proofgrade-sized sheet. The photo above shows a dome cut from Proofgrade Light Cherry Plywood.
Use quality plywood, not solid hardwood. Do not use a warped piece. Thickness of 1/8" is best. 1/16" is also good, if you don’t engrave too deeply. Larger than 1/8" won’t work.
2. Choose your engraving settings.
The default HD Graphic engraving takes about 17 hours! I got similar results, faster, with higher speed and lower power.
I can’t repeat specific manual settings here; that’s “Beyond the Manual”. You can message me, or do your own experimentation with a small piece of the raster image.
3. (Optional) replace masking
To make weeding easier, remove the Proofgrade masking from the front side and substitute your own masking.
4. (Optional) Test your horizontal arm alignment
Sometimes the horizontal arm gets out of square — it should be accurately perpendicular to the side rails. That’s important for this project.
Test it by taping down the edges of a large sheet of cardboard or heavy cardstock in your print bed, and cutting out a large rectangle. You should be able to flip the rectangle top-to-bottom and make it fit into its original space. If it won’t fit, refer to this support article.
5. Cut the kerf adjustment test pattern.
Getting the right level of tightness between pieces is essential for this project!
Place your material face-up in the Glowforge. Attach it very firmly with hold-down pins.
Load the kerf-adjustment-tester file into the Glowforge interface. Don’t resize or move this pattern! It should run along the left edge of your piece.
Set the digits (black) to “Score” and the outline (blue) to “Cut”, and press Print.
The kerf tester has a range of different kerf adjustments already applied. Try to zip the two halves together, and you’ll see at what point the adjustment becomes too tight. Find the adjustment that is snug, but not so tight that the pieces can’t be pressed flat. You should be able to bend the two pieces at a slight angle.
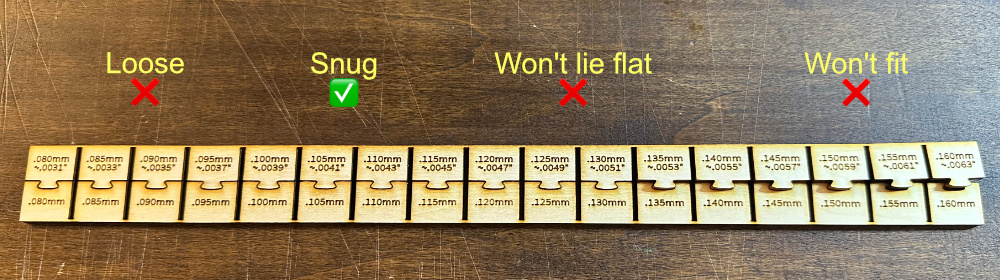
Note the number indicated on the tester. You will use half of this number for the adjustment offset.
6. Do the engraving
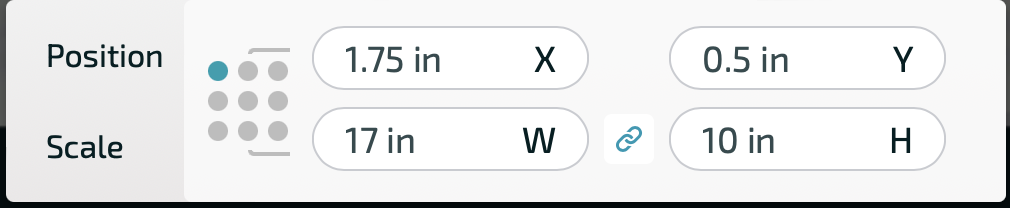
Load the engraved-dome-front.svg file into the Glowforge interface. Don’t resize or move this pattern! Verify its position and size using the ruler tool:
Then,
- Set the raster image to “Engrave” with your chosen settings.
- Near the corners are four green test pieces. Set these to “Score”.
- Finally, set the large rectangle to “Cut”. Verify that this is the last step in the cut order.
Hit Print.
7. Edit the second vector file, apply the offsets
While you’re waiting for the engraving to finish, open engraved-dome-back.svg in your vector editor. (Don’t use the Glowforge GUI for this, because its offset tool isn’t accurate enough.)
Set your editor’s units to inches, and resolution to 96DPI. Verify that the large rectangle is 17"x10". If it’s not, you need to rescale the whole document to make it the right size.
Select all the pieces (“Pieces” layer), and apply an offset of half the number indicated on the kerf adjustment tester.
Save or export the edited file to SVG, in the usual way for your editor.
8. Flip the piece upside-down, top-to-bottom
When the engraving is finished, carefully holding down the frame of the material with one hand to keep it from moving, use a piece of tape to lift out the cut rectangle. Flip it upside-down, top-to-bottom (not left-to-right), and put it back in its place.
If the flipped rectangle won’t fit, your Glowforge’s horizontal arm might be misaligned. Don’t touch anything! See this post.
9. Verify alignment
Load your edited engraved-dome-back.svg file into the Glowforge interface. (Note, the pieces in this file have already been flipped top-to-bottom for you.)
Verify the size/position of the pattern. Correct if necessary.
There are four differently-colored test pieces near the corner. Set one pair of them to “Cut” and everything else to “Ignore”. Cut them. Carefully holding down the rest of the piece to make sure it doesn’t move, pull out the test pieces with bits of tape. You should see some well-aligned outlines, like this:
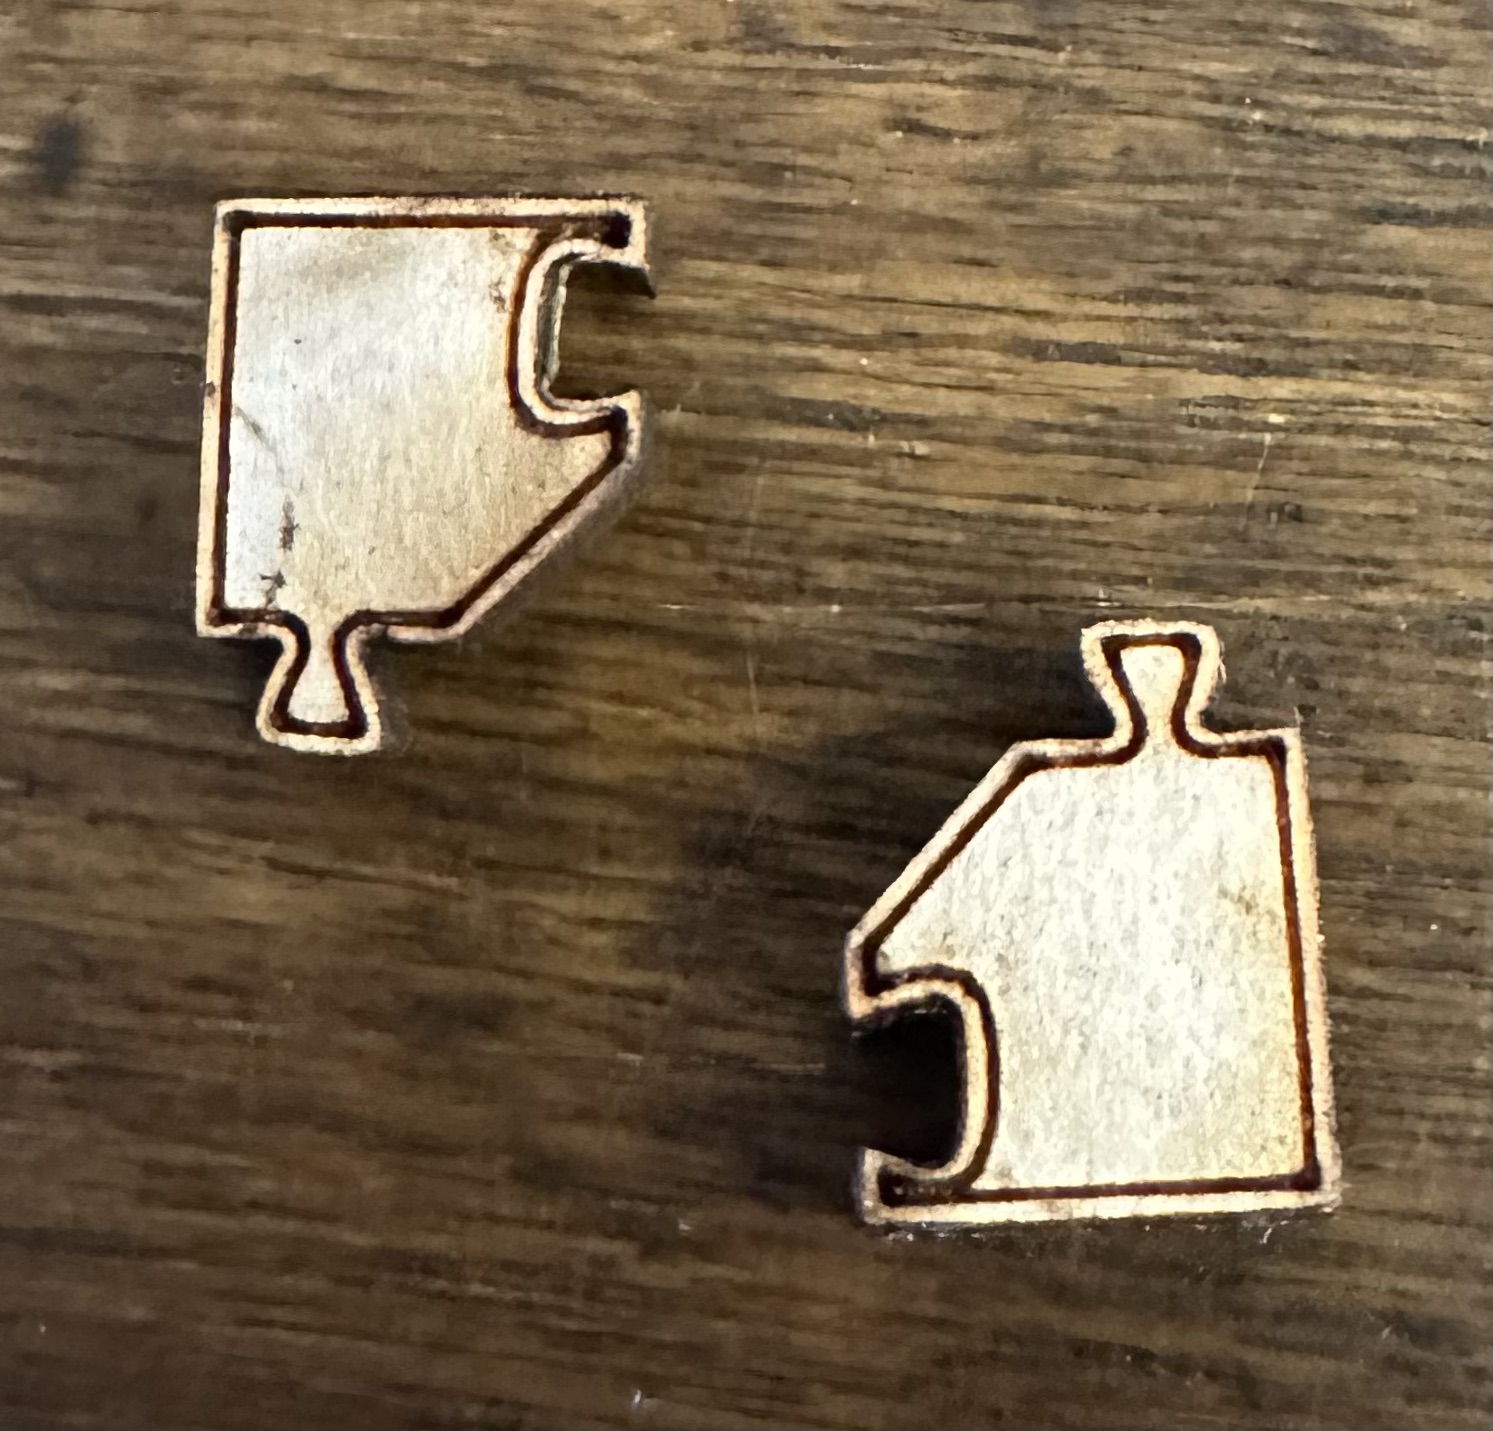
Up to 1mm misalignment is within tolerance. If you see a problem, it might be possible to recover. Is the rectangle aligned with the previous cut? Did you forget to flip over the workpiece? Did you flip it left-to-right instead of top-to-bottom?
10. Cut the pieces.
With the same file loaded in the Glowforge interface, set the hints (digits) to “Score”, the pieces to “Cut”, and the rectangle to “Ignore”.
11. Weeding and cleaning
You’re done except for the weeding. Don’t do it piece by individual piece! Before removing the work from the laser bed, you can simplify the task by using adhesive sheets to hold the cut work together as a single piece — see my weeding notes in this post. Then weed the whole thing (I assume you already have experience with this).
Happy cutting! I’m happy to answer any questions or respond to feedback. If you make one of these, consider sharing a photo!