Works for me. Select the “Glowforge Air Filter Attached” option in the (…) menu before you start. 250/50/75 seems to be enough… no matter. Nothing else to print today…
![]()

Works for me. Select the “Glowforge Air Filter Attached” option in the (…) menu before you start. 250/50/75 seems to be enough… no matter. Nothing else to print today…
![]()
lol. So you just engraved (scored?cut?) the whole honeycomb tray? That’s great…kinda like the self cleaning ovens
How long does it take?
I wonder if defocusing and upping the power would be more effective?
Heh heh. Good one, thanks!
Yup. You could see the difference as it went along… a little over 4 hours with the settings I shared…
Wow - I’ve done that on small sections when something got jammed in there…never occurred to me to just do the entire thing! I bet the dust that came out of the undertray when it was done was very fine.
Now I just have to not obsess over the non-printable area! ![]() The rest looks pretty much like new (and I didn’t get a new tray with my new machine last year…)
The rest looks pretty much like new (and I didn’t get a new tray with my new machine last year…)
Can you rotate it around and get more?
It’s scaled to the entire printable area at 250 speed - the entire bed of the tray can not be reached by the laser.
This is the current state for me - I just set up for a print for church and so I took a pic. The accessible print area is highlighted. This is the only tray I’ve had from the beginning. Note the tape with a line on it on the right - that’s the lowest I can print, I use it to align material. The stuff along the bottom fills in the “dip” between the tray “handle” and the front pass-thru slot, so when running pass-thru prints with cuts, they don’t get snagged up as I move the material down. I posted a thread here on that.
I’ve never done anything to “aggressively” clean the tray other than use my Dyson “dust-buster” on the surface or shaken the whole thing out over my fire pit.
I will apply finishes - paint, WBPU, whatever onto parts still sitting on the tray, or sometimes the lid. The lid I clean with a razor and IPA.
I found the thread on the passthru issue and my solution. I highly recommend it. I rarely use that feature but almost every time I did, the “gap” between the tray and slot was an issue…
I’ve done that too, it’s not as effective as I was expecting.
Not sure if you mean you’ve also run a print like this, or something else, but I probably should have taken a “before” pic that showed the entire tray was as covered in the same schmutz as the edges show in the pic I did take. It was full of little pieces from cuts, tape remnants from efforts to align stuff, paint and such from where I use it as a prep surface. Now it looks like new.
I don’t obsess over keeping the machine looking like new. I clean the optics, rails, and the top of the head.
The stuff on the front makes a huge difference when doing cuts that use the passthru. It completely eliminates the “step” between the tray and the bottom of the front slot.
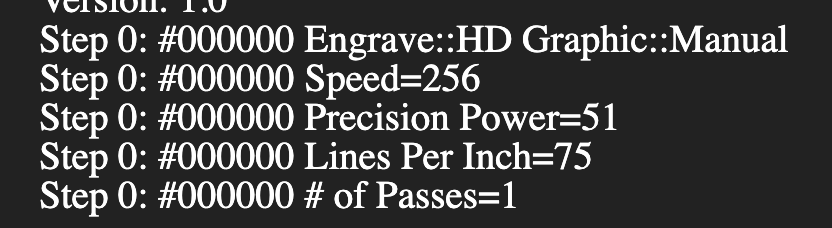
Just to clarify to clean the honeycomb tray you ran an engraving of the whole printable area of the tray? I see one setting was 250 but I don’t see any other settings in the thread.
Thank you,
Noel
Generally when you see something listed like this is an engrave setting for speed/power/LPI
It’s also in the file -
The precise speed and power does not matter - if you’re at the point where your tray needs a clean-up, you should be comfortable with manual settings.
Thank you for your help. The SVG to set the space would be the printing area, which is not as much as the honeycomb tray. Is there an SVG or how would you set just the print area?
That big black box in the first post is the .svg. Right click and Save As ![]()
Thank you.