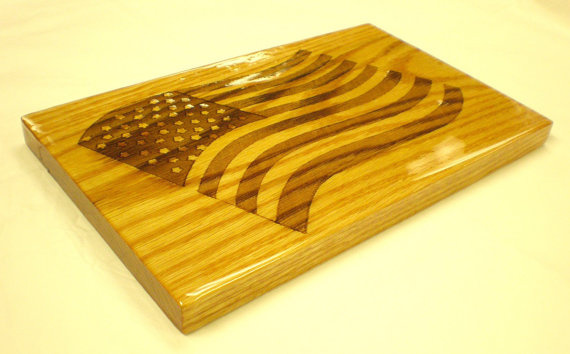
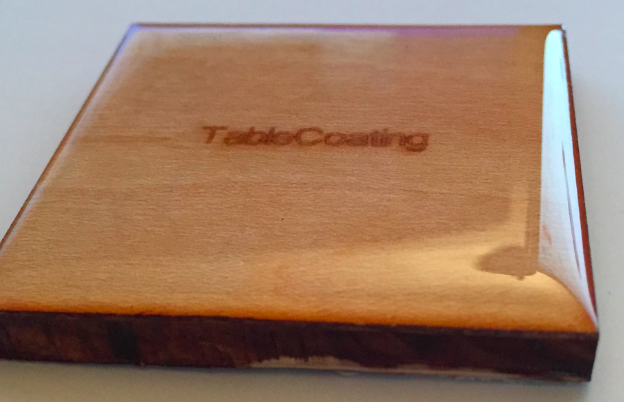
When I get my GF I want to create signs and game boards with a glassy, glossy finish as see in these samples. Can anyone steer me in the right direction?
I am specifically interested in doing this over inlay (similar to this recent thread) as well as etching in case that changes anything.
Again, my woodworking experience consists of: I have seen a tree. (At least, I think it was a tree–tall brown thing, green stuff on top? Maybe it was a cell phone tower.) Anyway, there is zero chance I have any of the right tools, chemicals or abrasives already on hand so I am hoping to find really detailed instructions including recommendations for specific products.
What you need is table top / bar top epoxy coating. It is readily available at HD, Lowes, and Michaels stores. I prefer EnviroTex Lite and use 40 to 50% off coupons at Michaels. Just follow the mixing instructions and set up for easy cleanup with old newspaper or cardboard under project.
The coating looks to me like an epoxy resin like Envirotex Lite. I have used it for covering wood boxes and even for my kitchen counters when I painted them (no budget at the time for new counters, the harvest gold was irritating me beyond belief.) .
There are actually a lot of finishes you can put on wood to get this look. Many will depend on how patient you are. For instance, you can add many thin layers of lacquer to do this, but you have to wait 2 hours (at least) between coats and you should sand between each coat, but eventually you CAN get to this kind of finish, BUT if you use any of the ones I listed above, you can knock out 40 - 50 (or more) layers of lacquer in one application (I’m referring to the thickness, I’m NOT saying Epoxy == lacquer).
I can keep going, but this is a good start to look at.
There are actually several ways to get similar results. Layers of polyurethane will do it. There is also a product called Stone Coat.
I personally have a preferred way of finishing my turned pieces using very thin coats of food-safe epoxy resin. My process requires the 24 hours of curing for each coat, then sanding and smoothing before applying the next coat. I put on 12 to 14 coats, depending on how thick I want the finish. The pictures you showed would require at least 14 using my process. 10 to 15 minutes a day of work over the course of two weeks.
I may have more time than good sense, but, darn I like how that finish looks.
Well best way to know if it takes water good chance it is a tree, another check it if the green things fall off as it gets cold and come back when its warm. (some freakish trees dont lose the green things)
if it takes electricity then good chance its a cell tower, or FBI / NSA is spying on you.
Epoxiy for sure on the second one, the flag looks like polyurethane. I use these guys a lot for epoxie and other resins, They are no frills on their packing and web site but are really friendly and helpful and their prices are great!
The way I use is lacquer. It isn’t hard like epoxy and tough like PU, but it gives probably the best smooth glossy finish possible when it is properly applied and polished.
I’ve been also learning about wood finishing techniques and another one you might want to investigate is called French Polishing. It’s a old polishing technique that uses shellac mixed with denatured alcohol applied with a small rubbing cloth and a touch of oil. You rub the pad over your surface (sanded smooth first) and as you go the alcohol evaporates leaving a very thin deposit of the shellac behind as you apply more layers you use less and less shellac and more alcohol to get finer and smoother layers.
It results in a very high gloss mirror shine and is often used on things like musical instruments. It’s also food safe.
It does take quite a lot of effort to apply and require multiple sessions with a day or so drying time inbetween to get a good finish. It’s also not as tough as a polyurethane type coat or something like epoxy but is relatively easy to repair. There are plenty of videos on youtube about the technique.
I’ve tried it on the glowforge tutorial test plaque and got a very shiny piece but a few surface imperfections which with practice I think I could get out (one advantage of the technique is you can always sand down the top layer and start applying a smoother one).
Or you could do it the way Japanese Monasteries do it on their wall posts and floors:
Slightly damp rag wiped over it every morning and evening for a century… smooth as a babies bum and a shine like you have never seen before.
Other variations on this theme are to use a cloth with bran or Japanese camellia seeds (Camellia japonica) sewn inside. IN both these cases the oil seeps into the cloth and thus into the wood
This person does a bunch of epoxy resin projects, and seems to approach the projects with a “I’ll get started and see what happens” approach. I figure that approach would be good for a beginner. Here’s a video I picked out mostly based on the thumbnail…
And here’s a video showing the French polish method… (@mattwarriner mentioned that there are many on YouTube, this is just one that I happen to have seen so it came to mind…)
Having both done a pourable resin (“Behlen’s Rockhard Varnish”) for our dining room table and a french polish for our coffee table, for the love of all that is holy, don’t do the french polish. It’s gorgeous but took significantly longer than making the damn table.
Pourable epoxy would be my personal choice, though.
I have also tried my hands (both of them cause one got tired) at French polish. It is a lot of work. Full stop. It is also easy to screw up and then you start over. On the other hand it uses relatively safe materials and is easy to fix if it gets scratched. As long as you don’t mind a lot of work. I would do
It again but not on anything large!
I work with Epoxy and Resin Both. A nice finish epoxy is “Bob Smith Industries” the 20 minute finish epoxy dries clear with no discoloration and is super easy to work with. The best resin I have found is from “Alumilite” - the clear and water clear are fantastic to work with. Again no discoloration, easy to work with, easy to sand or polish if necessary. The water clear I believe takes much longer to work with then the clear - the clear you have about 30ish or so minutes to work with before you need to not be touching it anymore.
Can’t really tell from the pictures the size you are working with, for larger products you will want a longer “working” time.