Hi! I have a pro, but I have not ventured into using the pass through slots until now. I have a friend wanting the word “Welcome” to hang on her wall. But she wants it roughly 36” long. I have only ever done 17-19” long because I have not removed the pro shields yet. I have also only used the machine maybe 15 times so I still don’t know everything about it yet.
I use adobe illustrator to create my designs I put them in svg format. Can someone help me to make this? Will the machine will pull it through itself? Will it stop and want me to push it through some to complete the design? Do I just make the design like normal or do how would I do it being that the camera only shows so much on the computer screen when printing.
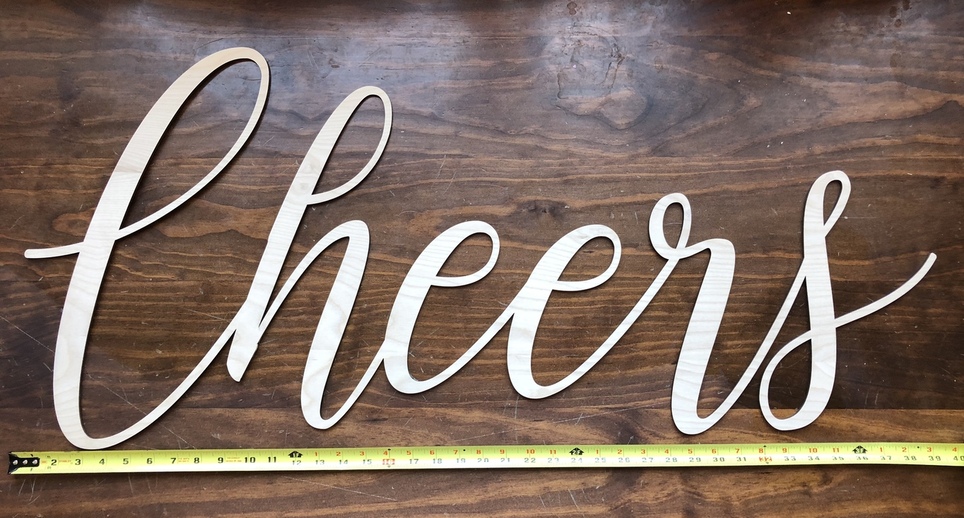
I just recently did a Cheers sign that was 18" tall by 40" wide and so I had to use the passthrough. I made the full sized design first and then just cut the design at intervals that fit on the Bed. I ended up with a C, he, er and an s. I overlayed them on each other but each being a different color and uploaded to the GFUI. I added a little score at each corner where a letter meets up with the next one and visually aligned them each time. I ran the score lightly to ensure proper placement, adjusted as necessary and ran the file. I had a couple little mistakes but all in all it worked well. I made two of them and noticed that my visual alignment was pretty spot on so the second one I did with purely visual alignment. Had an itchy trigger finger when cutting the h and so there is a little bump where it didn’t perfectly line up. The second attempt is pictured here.
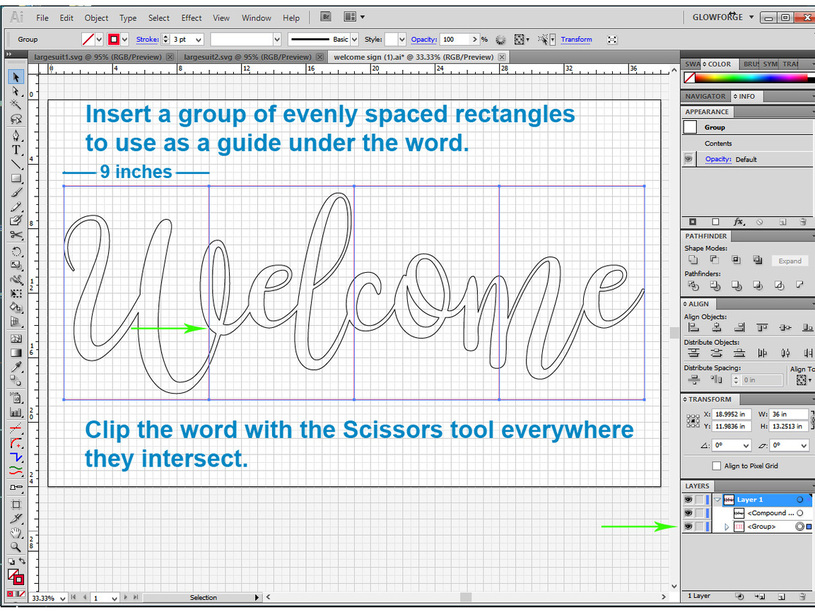
For your 36 inch long item, you are going to need to split the design into four parts and feed it through four times, (I’d space the breaks at nine inches apart inside the design, then they will be uniform). You can use something like the templates below to align the cuts inside the machine if you want…it might be a little bit easier to visualize what’s going on:
You are going to have one heck of a time keeping the material flat against the bed for something 36 inches long - make sure you support it on both sides of the machine and use the little Honeycomb Pins on it to keep it perfectly flat while you are cutting a section…those things are the !
Thanks everyone for the helpful very informative information!!! I’m going to read through the materials sent and see what I can do. I’m sure it’ll be a trial and error process but hopefully it’ll turn out great! I’ll be sure to post a pic once I complete it
@Jules I have done all the things you mentioned in the links you sent. So these are the issues I’m having.
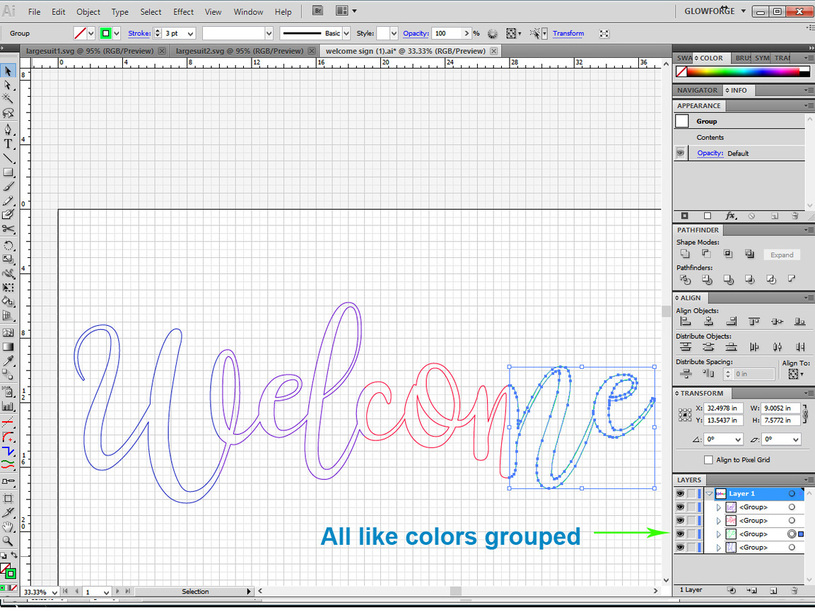
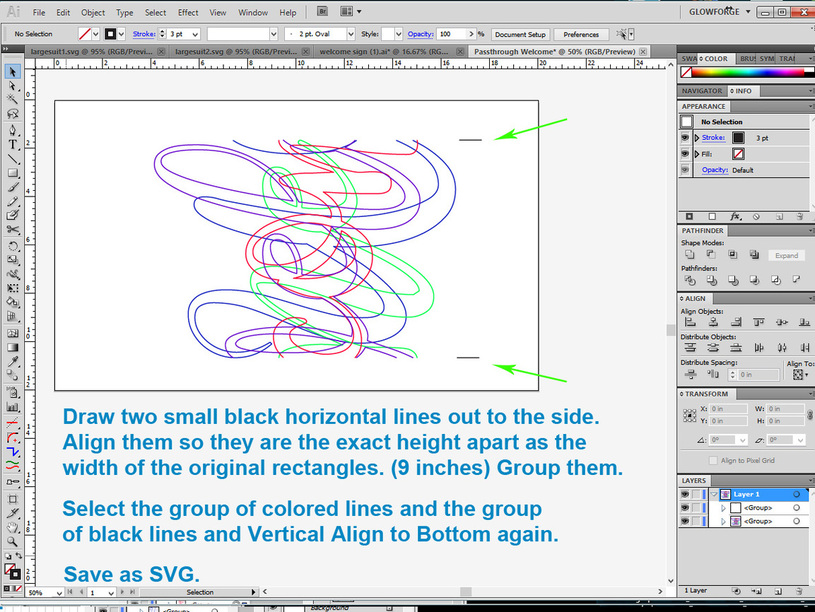
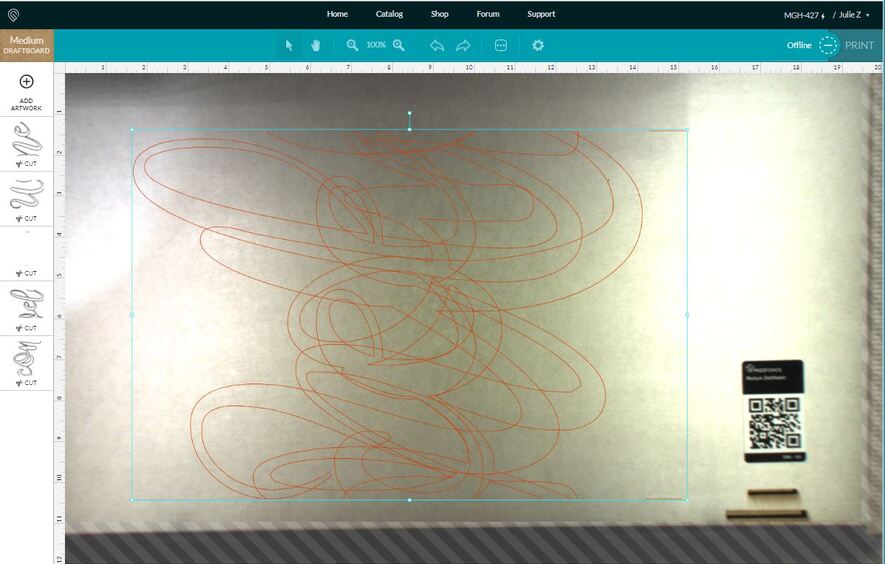
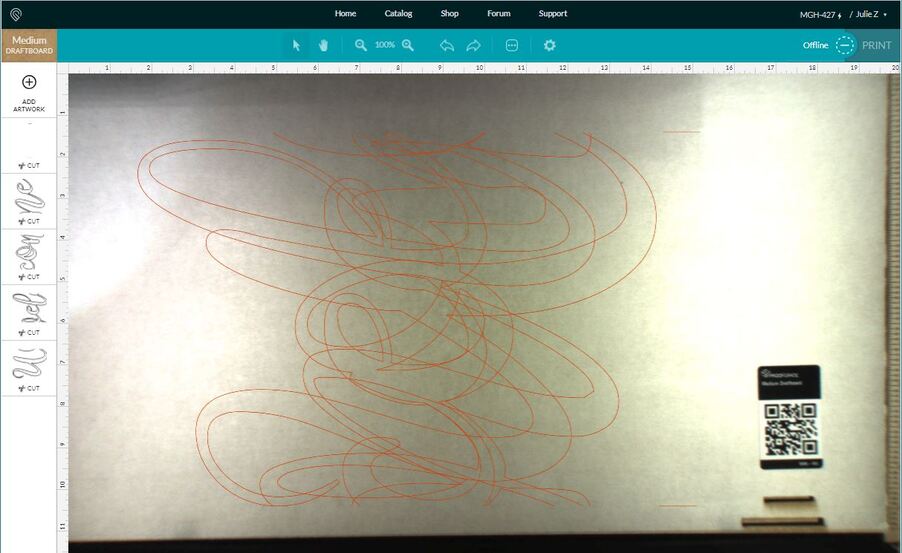
I created the word WELCOME in a pretty cursive. I made the Lines to “cut/stop” so that they fit in the machine. I used the scissors to cut it. Creating a W, ELC, OM & E. The whole word is roughly 11.5" tall by 36" long (instead of doing a 38"). I grouped each section and colored the outline a different color so that it would “stop” and I could move the wood to continue cutting.
My problem is…
When I saved it as a SVG and opened it on the app.glowforge.com link that I have been using to cut on it shows it all as one word, and wont let me do anything because it doesn’t fit in the cut area.
I’m not sure what I did or am doing wrong being that this is my first time using the pass through slots. I am new to Adobe Illustrator as well so I don’t know all the terminology/things in it. Am I suppose to be cutting using a app or program instead of the app.glowforge.com link?
I’m a visual learner/hands on, so your pics have helped a lot…but I am still lost
Did you remember to group the different colored lines together and then layer the different colored parts on top of each other? They have to all be registered to a single point.
If you want to post the SVG file, I can take a look at it or show you what I’m talking about. (Be sure to Zip it before you upload it here.)
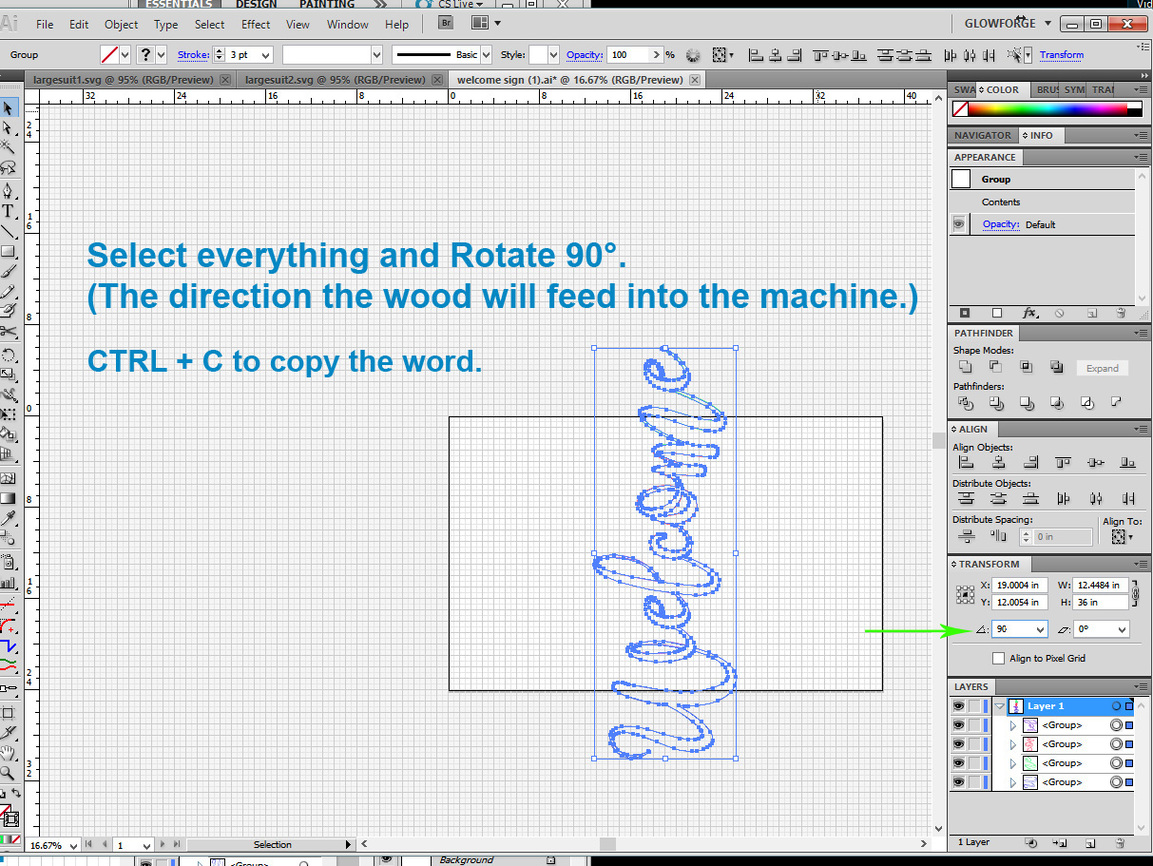
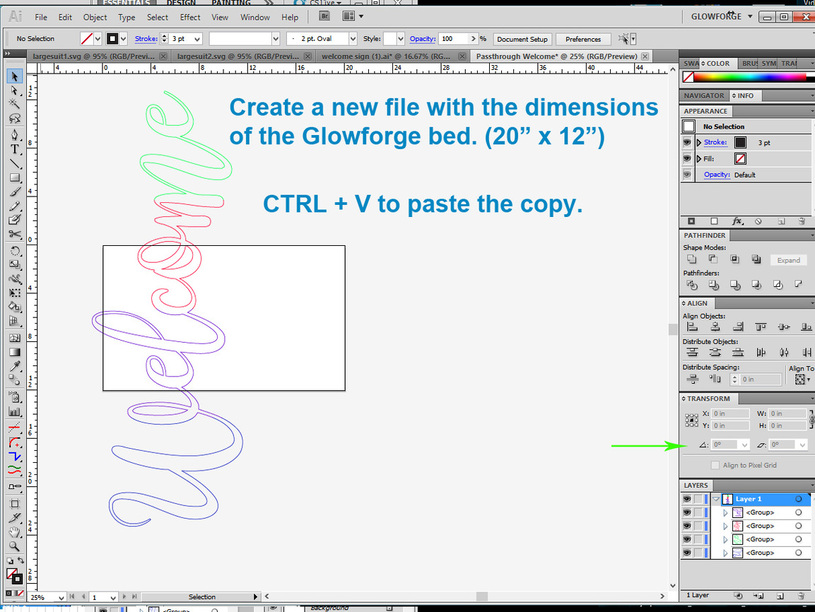
Oh and you will need to rotate that word 90° - to feed it through the passthrough slot.
Okay, so I tried everything you said. It still uploads horizontal on the app.glowforge page and is all connected together as the word welcome. I don’t know what else to do.
So I don’t have the experience Jules has, I use Inkscape, not AI, I don’t know what you’re seeing, but when I opened it in Inkscape what I saw was a horizontal Welcome on an artboard way bigger than the glowforge bed. The last time I tried to load something with an artboard larger than 20x12 inches was last August and it would not work. Don’t know what happens today.
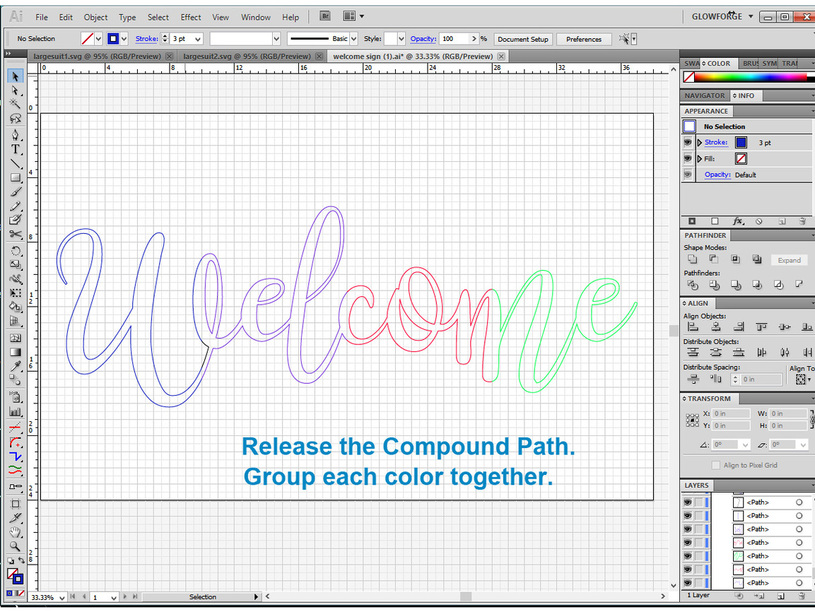
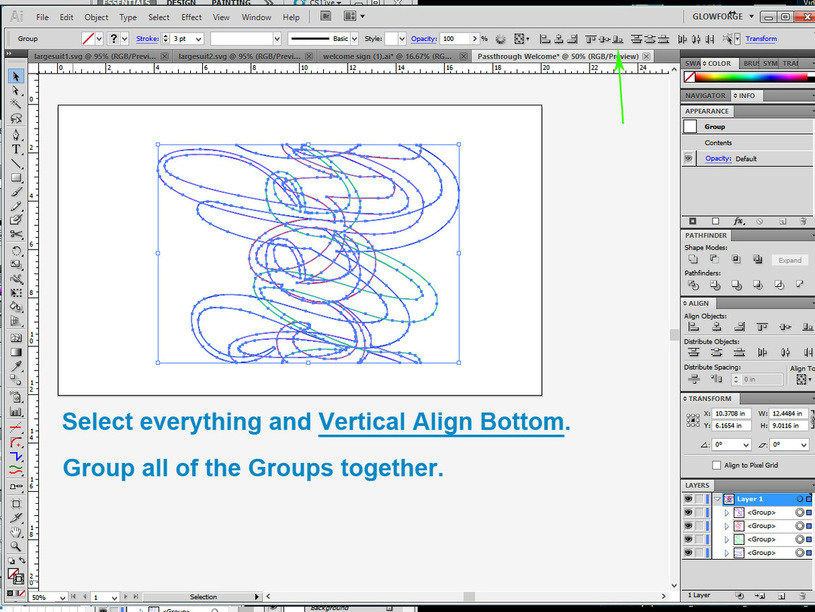
At any rate, I broke up the letters and arranged them so that they are what I believe you want. It looks like at some point the welcome was copied and pasted in place??? Or did you use a clipping path? When I uploaded the svg I posted below there was a warning about clipping paths so maybe that is something? What ever happened in this file’s history, the GFUI does load each set of letters as a separate operation, and if one were to precisely feed their stock through a pro they should end up with a nice welcome sign. VerticalWelcome.zip (13.9 KB)
Edit: Replaced original zip file. Had the colors in the wrong order. The principle is the same, but you cut the e first, om second, etc…
Okay @kyle.miller87, I put some screen shots together that might help.
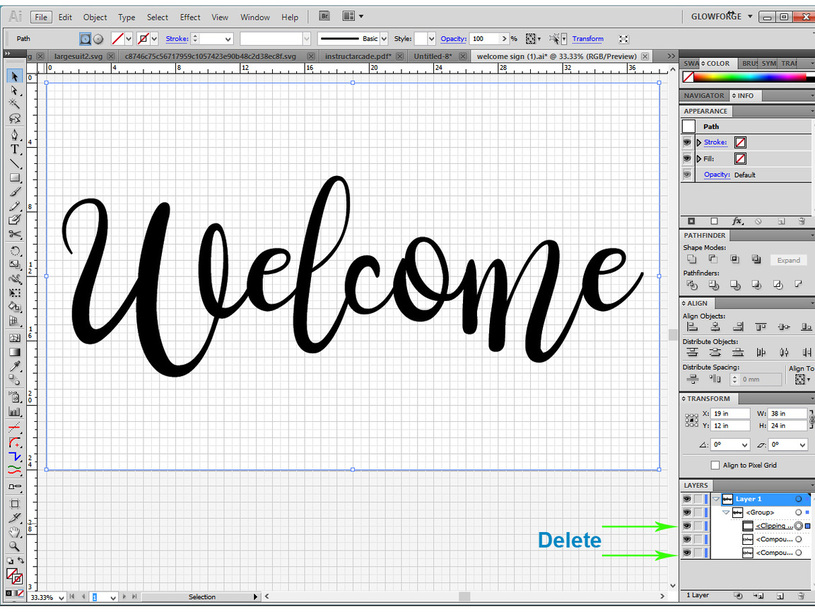
@caribis2 is right about the clipping path - you can delete that, it doesn’t translate into the Glowforge interface.
In addition when I broke your file apart, you actually had two instances of the same paths in the file, one with fill color and no stroke, the other with stroke but no fill color. you don’t need both for cutting, all you need is the stroke with no fill colors, so you can delete one of them with the clipping path.
Since you like visual instructions, I just did a bunch of screen caps for this as I walked through the process. I’ll include the zipped SVG file at the end of the instructions, but I want people to understand the process so the next time they want to do one, they can make their own and not have to wait for help. Let me know if anything is unclear.
When you feed it into the machine, for each step, you will Score the Black lines first, with everything else set to Ignore, and then turn only one part on for the cut.
One other thing to be aware of, if you do not correctly order your colors (and most people won’t, so I deliberately did not for this example) when the file opens in the interface, the thumbnail order is not going to be set up correctly to feed through.
It’s a good idea to drag and drop the parts of the word in the left thumbnail column so that the word reads correctly feeding in. (And I like to put the black hashmarks first up at the top so they’re easy to find quickly.)
Thank you so much @jules. That helps me tremendously being able to actually see it step by step since I’m new with any kind of program like AI. I will test this again and try to see if I can get it to work.
Thank you as well @caribis2 you have helped so much as well!!
I appreciate you both taking the time along with many others on this thread to help! Hopefully it will help other users if they have the same problem.
I just did a 36”+ sign but without the luxury of having the time to try to work through some of the passthrough workarounds. The sign was 15 letters, so I cut it in 2 layers. Layer 1 had the first 6 letter in one piece and the last 9 in the second piece. Layer 2 was reverse - first 9 then second 6.
It was a table top sign so it had a connector bar across the bottom of all the letters and that was only place you saw a seam. I placed the notches for the cross supports so that they were 19” apart, then placed a strip of the same-color acrylic over the front & back of the bottom connector bar between the supports so it covered the seam and reinforced the entire sign.
So if you can’t figure out the passthrough, or if someone has a basic and wants longer pieces, there’s options.