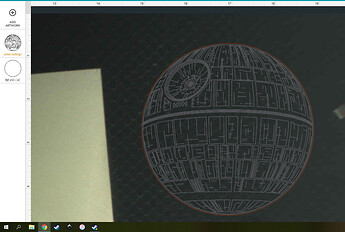
I’m trying to print on multiple wooden forks. I copy and placed the art on each individual fork and while it looks properly placed, they print off. Is it not focusing correctly?
Is there a way to get the focus better on the objects placed further to the edge of the bed?
You can try and run the camera calibration.
https://app.glowforge.com/maintenance/camera-recalibrator
but if you are placing 3d objects close to the outside of the bed there will be some distortion regardless.
One thing i do is in inkscape i create a cut out the shape of the thing i am going to engrave say like a coaster. I will make a circle the same real world size as my coaster in inkscape and plan my designes inside of that. you can then make the circles stroke a different color to separate them in the glowforge interface and cut those out out of some paper and ignore the design for the moment. once those are cut from the paper place your objects inside the holes you just created and you will be very accurate that way with your engraves. paper is cheap, wasting time and money on a botched print can add up quick.
Not sure if that makes sense or not im a bit tired atm so there is a good chance it is just gibberish.
I think your best bet is a jig even if you get good results from the camera calibration. The auto focus or set focus tool will only hit one spot on the bed. With irregularly shaped objects placed across the bed, this can be a challenge. Also, it is imperative that your set focus beam hits the material to be engraved. Keep using the tool until you are certain it is focusing where you need it to.
Printing on even one odd shaped object is a challenge. A jig in the center to hold one as flat as possible would do the job better one at a time than many all over the bed. If you have a bit of tape that you can score very lightly to “home in” where you want then the jig can do the work much faster than all the time spent trying to “home in” a dozen at once.
Thanks for the camera calibration link.
Thanks. Will give this a try.
Thanks. Can I use something like corrugated cardboard or mat board for a jig to hold the forks in place?
Yep! Just be sure to hold down anything light-weight with tape, magnets, pins, whatever.
Thanks!
I’m sorry your prints weren’t turning out beautifully! Thank you, everyone, for all the helpful tips and tricks! Did you have a chance to run the camera recalibrator as @primal_healer mentioned? If you run the camera recalibrator and continue to have issues with alignment please let us know and we will investigate this further.
Does having an uneven surface where one side is higher create an off center engrave?
If it is uneven. both where you think it is and where the focus height is will be off so it will not cut through, and it will not be where you expect.
@keahiskorner the autofocus can adjust the focus up and down by up to 0.5” (12.7mm). It will autofocus once at the start of your print. The print can succeed even if the surface is uneven. It can change by about 0.15” (3.8 mm) up or down and still work. That means it should engrave well in the center of your object, but if you engrave out to the edges, it may get blurry or stop marking the material.
Please let us know if you continue to run into trouble after trying the camera recalibrator.
I recently saw an older article about snapmarks and how it is unavailable now. This is exactly what what i want to help with problems I’m experiencing and what i’m trying to do. Is there a similar solution that I can do/use since Snapmarks has been removed?
If you are trying to print on multiple oddly shaped objects, the best technique is to create a jig for it.
(The Snapmarks require adjustment for varying heights as well.)
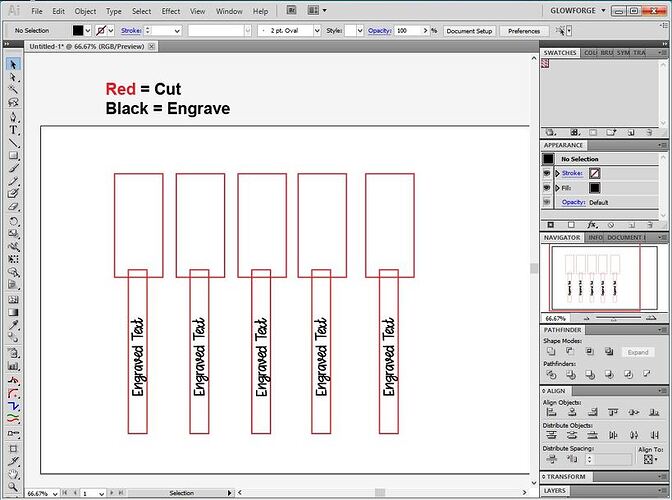
To do that, you would place several fork outlines in a design, the same size as the forks, and give them a cut line.
Then you place the engraving for the forks onto the file aligned with the cuts.
Something simple like this works extremely well:
When you bring the SVG file into the Glowforge Interface, you will cut the red lines out of a sheet of pinned down cardboard or other jig material. While you do this, set the Engrave to Ignore.
Then remove the cutout sections without moving the material on the bed, or the design image on the screen. Place the forks into the holes and close the lid.
In the thumbnail column only, change the Cuts to Ignore and set the Engrave to be processed. Set the height of the Engrave focal point (in the Manual Settings flyout) to be the mid point of the engraving area - particularly if it is curved there. That entry will over-ride the auto-focus, which probably isn’t going to land exactly where you need it to for engraving on thin fork handles, particularly with multiples on the sheet. It’s your chance to set the Focal Point correctly for the Engrave.
Then process the engrave on the forks.
It’s a bit of extra work, but you’re trying something pretty tricky with multiple curved objects on the bed. ![]()
(Alternatively, you could prop up the area where you are engraving to make it more level.)
Thanks @Jules. This is actually the best explanation I have read about jigs. I haven’t needed them yet, but I keep meaning to go back and search about the process for when it is needed in the future. I now have it firmly in my head how to accomplish this.
Glad it’s understandable! (I’v been meaning to write up a simple example for a while…just never remember to do it.) 
Thanks for that great jig tutorial, @Jules! I hope these tips and the camera recalibrator helped out.
As for this thread, I’ve moved it to ‘Everything Else’ so discussion can continue there.
Thanks. I was thinking about something like this but didnt know I could set setting to ignore.
Yep! Sure enough! Makes it pretty simple to use. 

