My niece is a captain in the US Army Field Artillery, and up until now was in the rocket artillery (MLRS/HiMARS) but recently is switching over to guns (howitzers) at her next duty station. She has always been like a daughter to us, and so I had to make something to commemorate this (as an office display gift for her). When I was a teenager I used to be very into scale modeling, and it was fun to get back into it, and so I made a diorama based around the M198 155 towed howitzer (mostly replaced in the US with the M777 we see in the news in use in Ukraine - which has the key innovation of weighing almost 10000lbs less to allow for much easier helicopter deployment and easier vehicle towing). The M198 debuted during the Vietnam war, but still is used under certain arctic conditions as the gun is completely manual versus the computerized 777 which likes ultra-cold less. This diorama was based on a wood base I got at Michael’s and then put down a 1/2" (12.5mm) pink rigid foam base and then used Sculptamold reinforced plaster (basically plaster with cotton fibers in it) with a thin layer of sanded grout to provide “soil” which then got covered in static grass (statically charged nylon fibers which stand on end) The edge looked as you can imagine a layer of plaster sitting on top of pink foam would look. So off to the Glowforge to use some draft board to form the sides. In addition I laser cut a cutting jig to cut the balsa wood for the pallet for the shells and supplies in the back (all of which I 3D printed on my Form 3, along with the propellant storage rack). In addition I pressed the rubber tires into the still damp plaster for the tire tracks, and I wanted the edge to sort of look like a classic army wooden crate. The stencil was the laser safe stencil material which I used the draft board score profile (the key is moving really fast before the stencil gets all melty) and then airbrushed with the right army yellow color). Yes of course I fixed that visible seam on the left and the gap on the right (it’s filled with more grout). The fun of making these is of course weathering with all the weathering paints (such as the mud with grass acrylic that gets stuck in the treads and wheels or the fuel stain lacquer running down the 55 gal drums and spreads out on the balsa of the pallet along with all the mud splatters since this is supposed to be a muddy field which is a mud paint that is splattered on via a tooth brush that you flick to make the mud splatter realistically (looks a bit less extreme than what the iPhone did with it).
Another small fun addition is the tiny swab bucket (filled with clear epoxy resin and I made a mop out of some scrap plastic and threads which are sunk into the “water”. The hesco barrier wall in the back are 3D printed boxes that get filled with sanded grout and then wrapped in wallboard mesh tape and then painted. Now that I have done one I realize one needs to lay the wall out while the grout is still wet so that the barrier lays level since in real life they are reinforced fabric boxes that lock together with still rods so can’t sit cocked like this but given the small the gaps are less noticeable in real life (note the entire diorama is 10" x 10" which is around 25cm square and about 1.5" tall for the base (~36mm). Originally I had planned to have figures manning the diorama but honestly after the first one felt it didn’t add to the story.
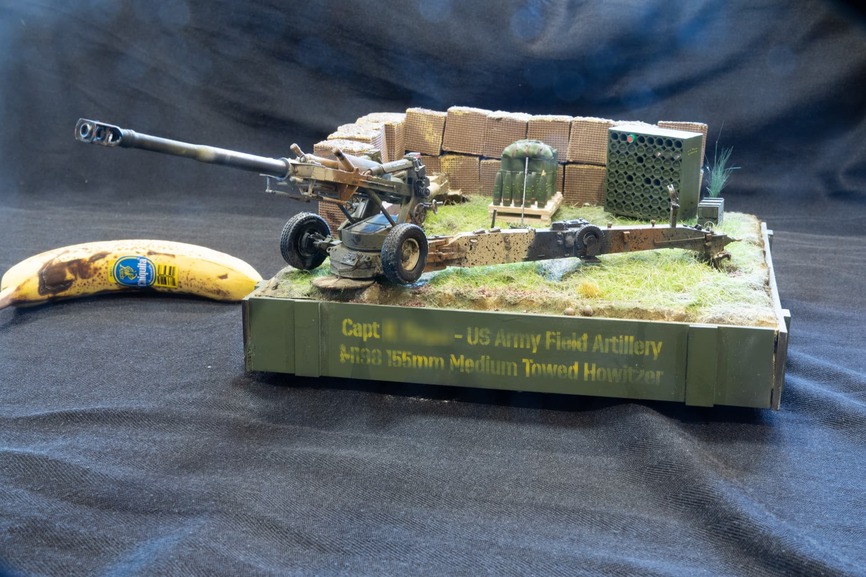
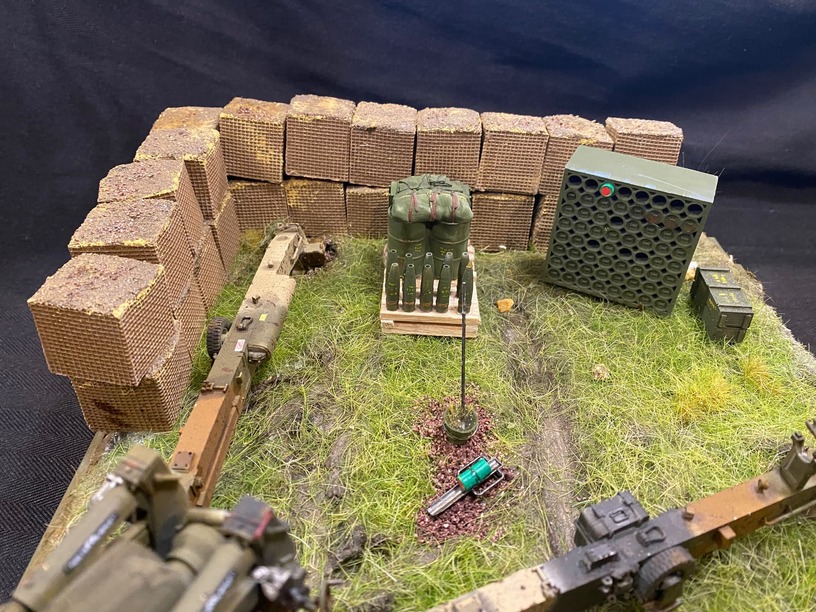
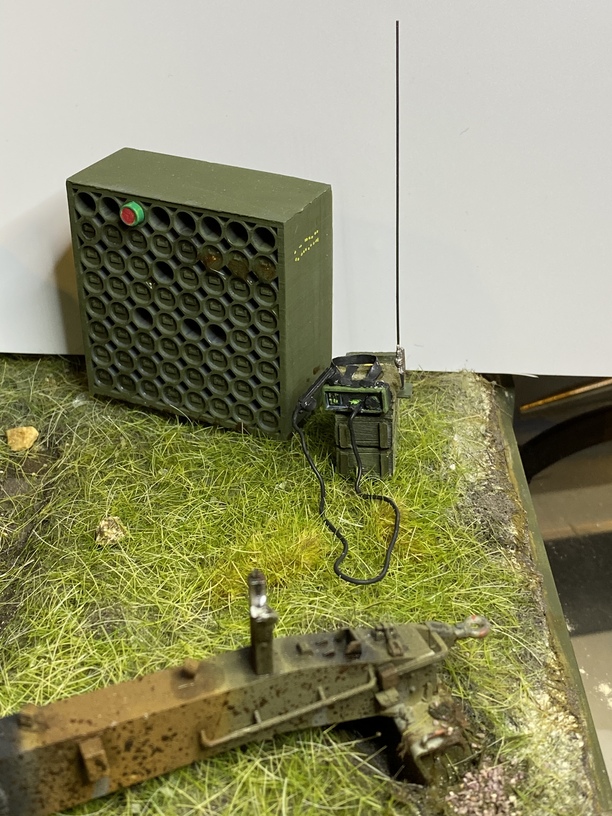
The “extras” I added behind the gun (all 3D printed on the Form 3) except the mop-bucket which is a Tamiya model. I love to research the things I’ve modeled and in this photo the propellant charges (red is the primer side) have different checklist call-outs in the army and marines, with army: “all clear, red to the rear” vs marines “I see red clear”. Note that large propellant rack in the back is one of the key logistical things that is helping the Ukrainian artillery keep supplied. The Russian army still ships charges in wooden crates (like the ones sitting next to the rack, like it is WWII, while NATO uses these metal rack systems allowing a large number to be loaded via truck and stacked in a warehouse and at a glance know your inventory as you can see ones where the tubes are empty. The bags are sewn together and can be cut apart as needed for shorter trajectories).
The artillery shells on the pallet are from this project linked below where I made her a full scale one (that was a huge object) but then scaled to ~3% size in the slicer which is 1/35 scale. In my CAD model I then simply based the charges, etc all from that actual size model. The separate fuses are absolutely minuscule (maybe 1mm wide and 1.5mm long which were a royal pain to cut the supports off of and paint - there are many on my floor somewhere ![]() ).
).
if you want to learn the techniques for making such a diorama, I would point you towards Andy’s Hobby Headquarter’s excellent YouTube tutorials on the topic: This diorama is most similar to the “mountain road” tutorial.