I am having difficulty converting patterns in illustrator to vectors for “cutting”. I have been able to make this work for engraves, but am having difficulty with cut lines. I am using object --> pattern --> make. I apply the pattern to my shape and then expand the fill. I found that I also have to divide the pattern for it to be recognized without a clipping mask in GF. However, when I use the radial repeat and then create a pattern with the same steps, it brings in the full pattern behind my shape (rather than trimming to shape) or if I convert my pattern from engrave to cut, I see some weird lines where the pattern repeats. I would love some simple instructions and have searched this forum and Adobe and haven’t found anything that really works. Thanks for any advice!
Yeah, unfortunately the GFUI does not recognize patterns. (So we do have to massage the results a little…)
What you are doing by expanding the results is one method, but if you use that, make sure that you are only dealing with Fills and no Strokes. If you expand a stroke, you get the two lines right on top of each other that can cause burning issues.
After expanding your filled shapes (again, make sure there are no strokes) then you can use the Unite tool in the Pathfinder palette to merge the shapes into one whole. No Groups, they either need to be individual filled shapes or Compound Paths for the Unite tool to work correctly.
Jules - thank you so much for responding. I have actually read so many of your posts and they are very helpful. I just tried your method and when I unite, the pattern shows up beyond my shape (just as it does in GF). I somehow need to trim/clip the part that should be transparent in the pattern, but anything I’ve tried doesn’t work and GF doesn’t seem to work with a clipping mask. Thank you so much for your thoughts.
Oh yeah, you’re still going to need to divide the pattern where it crosses the shape if you want to Score it without having the pattern score overlap. No other way to get rid of the excess lines. (The GFUI doesn’t handle clipping paths either.)
Or you could just score them as is…when you cut out the shape, it’s like cutting it out of a patterned background. That wastes a little more material, but not nearly as much as you’d think, since most of that is unusable anyway. You can create a weeding square around the pattern, and just cut the shape out of the patterned background.
(Unless I’m not understanding what you’re trying to make with the pattern.)
OK. Thank you very much. I just figured there had to be a better way! My only other work around was to rasterize and then trace as a black and white logo and expand. (By the way, we have a hedgie too.)
Oh , another person of discriminating taste! (There are quite a few hedgie fans on the forum…some folks have had multiples.) 
The Shapebuilder tool is the most intuitive way to erase the parts you don’t need in AI. 
https://helpx.adobe.com/illustrator/using/creating-shapes-shape-builder-tool.html
Thanks. I’ve used that tool, but I’m having a hard time accessing the portions of pattern that fall outside my filled shape to delete them after I expand the pattern. In some cases, it’s really not an issue (like Jules said). But, I am trying to get my pattern (intricate cut) to stop cutting at a certain point, rather than running outside my shape (so I don’t cut the edges of my shape). Appreciate the help!
Can you post a pic of the problem areas?
These are some test patterns I was playing with to understand the interface. Here’s a shot after I save as SVG and imported to GF. The top pattern is fine because it is a grid and fits within the shape I created. I can easily "ignore the gray rectangle and not cut it. For the other pattern, because the grid is offset, the pattern falls outside my shape . Somehow I was able to divide a portion of the repeated pattern and can delete them, but I can’t delete the ones that overlap the edge. In both cases, ideally I could cut the out shape and score the inner one around the repeating pattern.

Recently I have discovered that Gimp has some really cool tools for turning raster files into vectors. When making masks you can save the mask as a path and then export the path as an SVG, With many games available to play with the masks and a few more with the the paths. Lately I have been using little else to build svg vectors.
I will definitely check it out. It’s been frustrating as I’m learning Illustrator to try to sort out this little detail. Thanks.
Try this…
Shapebuilder can definitely take care of those overlaps. Select EVERYTHING including the rectangle of the boundary (ctrl+a) and switch to Shapebuilder (shift+m) and then hold down “alt” while you click over the parts you want to remove. “Alt” tells the tool you want to subtract instead of add/combine. Your cursor should get a little minus sign. If you’re on a Mac use command instead of ctrl.
Seeing what you want to do, there might be a slightly quicker way, but you need to work with filled shapes. (Which you need to do anyway with the ShapeBuilder tool)
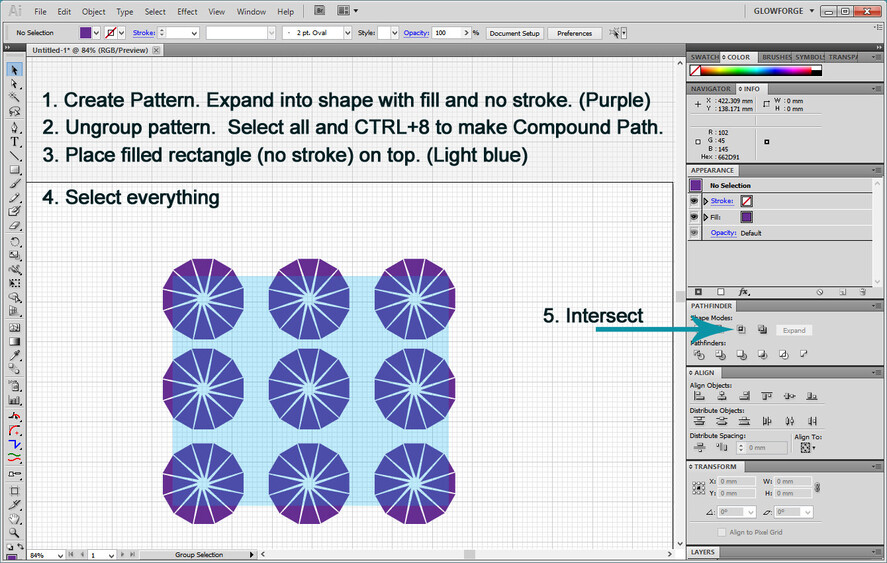

You can use any shape on top, it does not have to be a rectangle. You do need to combine the pattern into a Compound Path before the Intersect tool will exclude the outside bits though.
Thanks, Jules. I tried this approach first b/c it looks like the most straight forward. I have tried multiple times to follow your steps, but keep getting the error “Can’t make a compound path. A compound path cannot combine a clipping mask with an ordinary path”. When I followed similar directions from Adobe, I hit the same hurdle.
You have to expand the pattern first. (Object > Expand.)
Thanks. I tried this method. My pattern is currently in swatches - so I assume that makes a difference. I was unable to select anything with the shapebuilder tool in my pattern. Thanks for the assist.
Are swatches rasterized? (That might make a difference.) In that case you would need to do an Auto-Trace. (Getting a little more complex.)
I have expanded. I believe the patterns are “effects” so I have rasterized and then traced as a work around, but the quality isn’t great and there’s usually something weird that shows up in the design. This seems to be an issue if I create a pattern in the swatches or if I create a radial or grid “repeat” and don’t make a pattern. If I just make a pattern using the transform option, it’s not problem. I just wanted to have the ability to make some more detailed patterns and save them as swatches. These are the steps I found in the Adobe community, but I had difficulty when transforming the scale of the pattern within a shape. I have recently gotten it to work at original size and by pulling the swatch to the artboard and following the directions below before applying a shape to intersect. Hope that makes sense. So, hopefully the instructions below are useful to all. You just have to work with the pattern directly and I was trying to fill a shape first. (FYI- GF said I posted too often today and had to wait - since then, I was able to fill a shape and double click into the pattern layer to follow the instructions below, but you have to trim the excess).
How to make a pattern into a compound path in AI
- Object>Expand.
- Deselect all.
- Select>Object>Clipping Mask.
- Delete.
- Select all.
- Object>Flatten Transparency>Accept default settings (this will eliminate unwanted groups)
- Object>Compound Path>Make