Any cut placed within an inch or so of the right edge of my bed gets shoved over to the left and overlaps any objects near it, and I can never see the left edge of the material in the camera. I thought it was just a beta issue, but I have read of the problem from others and they had to return their machine.
… so laser head hitting and shifting the registration would be my guess.
Where is that leave your coffee cup in the machine feature if it can’t even avoid a fixed edge? How about a limit switch?
Please let there be a fix now. I really don’t want to be without a machine.
1 Like
That’s normal. The left edge of the bed image in the UI is the left cuttable edge (almost, it’s within a mm or so). So it is the UI design to show you extra image on the bottom and the right, but not the top and the left (when the material height is accurate).
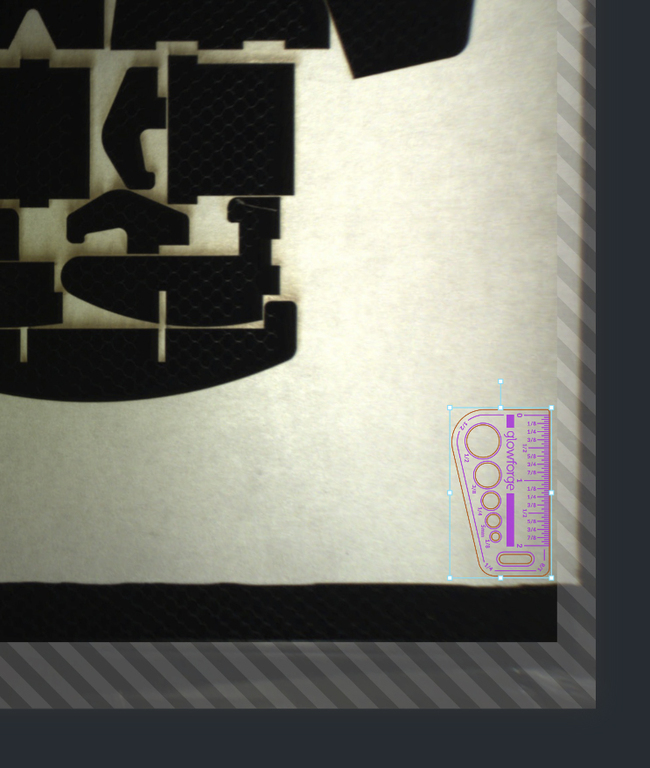
That’d be my guess too. Most of these that have popped up on the forum have been warranty replaced. Often they’ll ask you to print the Gift of Good Measure near the right side where you’re having trouble and post a picture of the result along with the date and time of print. The gift of good measure starts with an engrave that is narrow on the left and expands to the right, so it’s easy to see in the result when it hits the right side and loses registration.
1 Like
Also, we currently can’t cut the left 0.5-0.75" of 20" material so that’s why you can’t see it either (the UI crops and dewarps the fisheye camera image).
1 Like
This happened to me too, and it’s covered by the warranty. And, if it makes you feel any better…they let me keep my old machine until my new one arrived, so I wasn’t even a day without it. Dependant much? Maybe.  But I was working on a project that had a deadline for a client…yep, that’s my excuse.
2 Likes
Thank you for telling me that, my day just got a whole lot better.
4 Likes
Thanks for posting about this. I’m sorry your prints aren’t turning out quite right.
Would you please complete the following troubleshooting steps:
- Turn off your Glowforge (this is important to avoid damage to your unit)
- Check for small pieces of debris or dust
- Check the lower door to make sure it closes all the way. It may require some force to open, but open it, wipe any dust off the edges, and close it all the way.
- Remove the tray and clean any dust or debris from the surface underneath. Pay careful attention to remove all debris from the four dimples where the tray rests.
- Check the lid to make sure it closes all the way. Small particles of material, such as dust or debris, can prevent it from closing completely.
- Open the lid and, using both hands, gently roll the laser arm to the center of the bed, and then back and forth about 3 inches in each direction.
- Continuing to use both hands, gently move the laser arm to underneath the lid camera
- Gently move the head under the lid camera
- Turn your Glowforge back on
- We included an extra piece of Proofgrade Draftboard with your materials shipment for troubleshooting. Place Proofgrade Draftboard in the bed and print the Gift of Good Measure in the front right corner.
- Send us a photo of the resulting print.
Thank you!
Good news, I believe i have fixed the problem. As I was manually moving the cutter head to the far right it became more difficult to move near the edge. I initially thought the aluminum carriage must have been out of shape on that end but after more investigation I could see that the belt was not parallel with the carriage and was getting tighter on the end.

This is not an actual picture but a quick photoshop illustration to show what the problem was, I fixed it before I thought to take a picture.
So what I’m assuming is a press fit bearing, was slipped down about 3/8th of an inch on the vertical shaft farther than is should have been. It had either moved in shipping or had never been seated properly in the first place.
I pressed it back into place.

This is the an actual picture after I pushed the bearing back up.
Then I cut this.
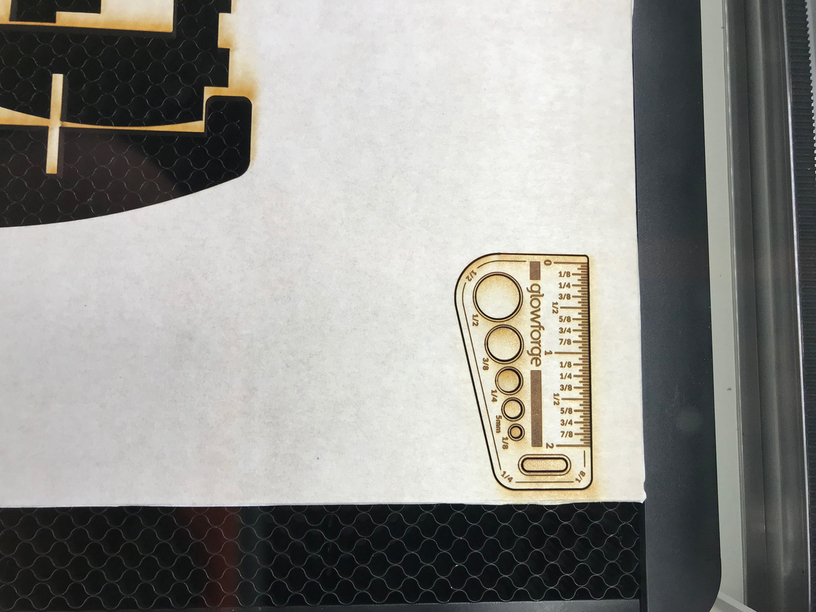
It cut perfectly and I had not been able to cut anything that close to the edge before.
Did I fix it?
Will that bearing hold (it took a fair amount of pressure to get it back into place) or just slide down again because there is a bigger problem?
11 Likes
Well, I’m impressed. 
2 Likes
Ditto what Jules said…impressed! I loved when I enlarged the photos, clicking on the first photo, then the second one and back again, made an actual animated sequence. Probably not intended…but cool.
2 Likes
Interesting. That had popped up on the forum, but the symptom being investigated was distance discrepancy near the edges. Perhaps it can also put enough downward pressure to cause a loss of steps like you saw. I wonder how many of the “hitting something on the right” were this.
2 Likes
I was wondering that also. If it vibrated down in shipping, lots of people could be having versions of the same problem… and if the vertical shaft isn’t perfectly aligned, the bearing could slip down with use. I did’t see any kind of snap ring or fastener that would keep this from happening.
The closer the head gets to that edge, the steeper the angle gets on the belt, and the harder it gets to move it. Mine could barely be pushed to the edge.
Thanks for updating the topic with your findings.
That is what I expected may have happened. I’m glad you’ve fixed it for now!
Since I believe the problem may reoccur, I’d still like to offer you a warranty replacement. I’ll be in touch via email to sort out the details.
2 Likes