Layers that go offscreen become inaccessible (no scroll bar?)

My husband tells me I missed a calling in QA, because I can break or otherwise find the bugs in software and web sites pretty much immediately. My first round of significant use of app.glowforge.com has borne out this observation.

Edited to add: all operations described are on Mac OSX 10.10.5 Yosemite running Chrome Version 61.0.3163.100 (Official Build) (64-bit). I use a Wacom tablet instead of a mouse, so I don’t have a scroll wheel.

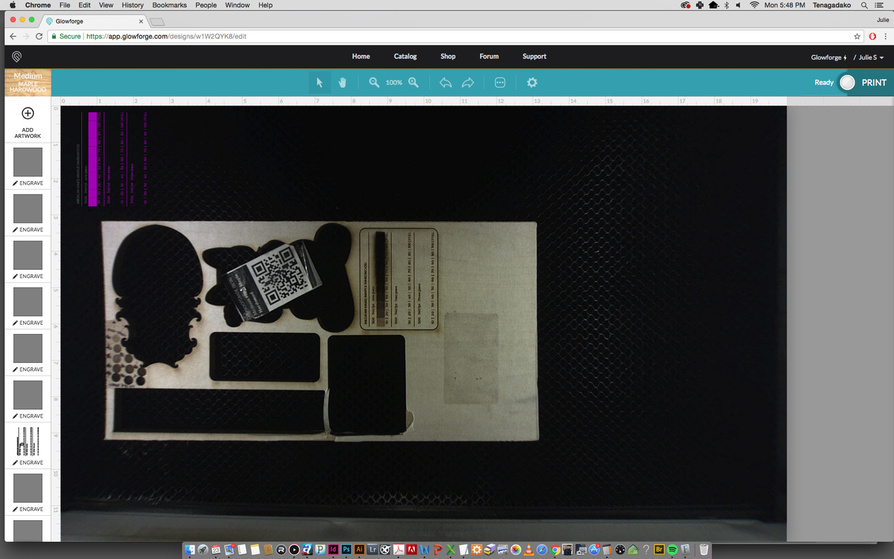
We just got our gf recently, and so this weekend I spent some time running tests on various materials and trying to get a feel for what settings give what results. In pursuit of that I set up a file containing 11 .25" squares, each a different layer, so when I brought the file into the app I got 11 layers that I could then apply various power settings to each square and print a test strip.

The results looks like this (yes, I know my text engrave wasn’t set high enough power):

ISSUE ONE:
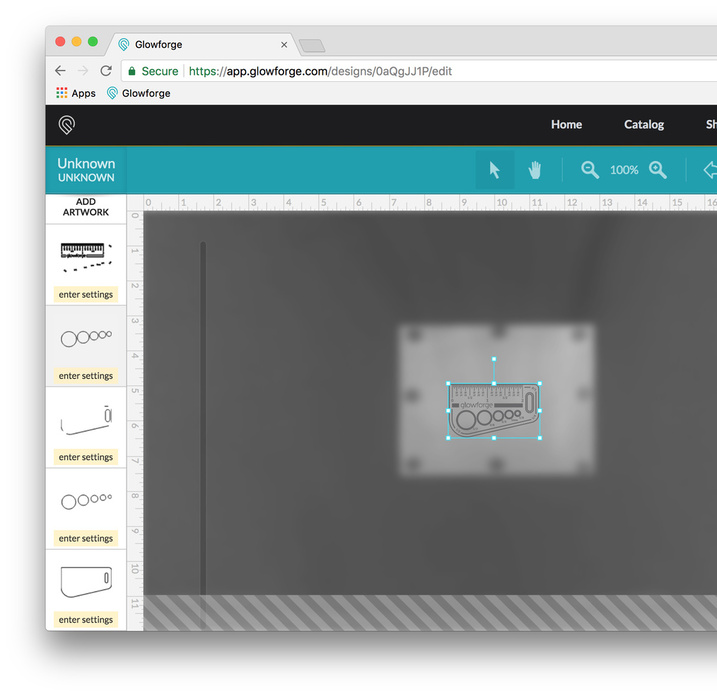
I was trying to do all three gradient strips at once, but to my dismay I discovered that if I had more than 10 layers they went offscreen and I could not access them. I was only able to print the 11-square grid by using my husband’s computer instead, which has a larger monitor than mine and would show me 11 layers at once, which was the bare minimum necessary to run this test as long as I brought cut line in separately afterward.

Am I missing something? Should there be a scroll bar or is there a layer menu somewhere that I can select the offscreen layers from? Or does the app really only allow you to work with however many layers you can fit on your monitor resolution? It just shoves the other layers offscreen at the bottom… they import and I see the artwork for them on the bed, but I can’t access the layer square to apply settings to them because they are offscreen and there does not appear to be any way to scroll to them or otherwise select them if I can’t see the layer square on the screen. Am I really the first person to bring in more layers than will fit onscreen at once?

That is my main issue for opening this post. HOWEVER. I have a lot of issues with the app, and some other questions that I hope I can just get answered in one place here since they all pertain to the same printing session/item.

ISSUE TWO:
I’ve seen people request that settings be able to be saved with files, which would be lovely. But even if I can’t have that, is it possible the app could manage to save settings on a layer for the duration of the time you have the file loaded, and not throw them away at every opportunity?

I was having connectivity error issues (see the error message someone posted in another thread) and had to refresh the app a few times (which I did without exiting the file I was working on) to re-establish a cloud link to be able send my file to print. Whenever I did I lost all my applied settings. So that was infuriating. Especially when instead of reloading with the file I had open at the time of refresh it would load the previous file I had open BEFORE the current file. :roll_eyes:

Then, after printing my 11 squares all three times I loaded an additional cut layer (which I had to load separately at the end, because 12 layers wouldn’t all be visible onscreen and would leave me with one inaccessible layer), set all 11 engrave layers to “ignore,” and ran the diecut. When that was finished I deleted the dieline layer (so I could once more access all 11 of my square layers) and planned to rerun the squares on a different material, but when I turned off ignore all my settings from before were gone. Is there no situation in which the app can remember settings… even if I haven’t exited the file it won’t retain them? I got so frustrated I just gave up doing test prints. PLEASE fix this issue, it is making use of the app a really miserable and fussy experience.

Bonus request: it would be awesome if I could select multiple layers and apply the same setting to all of them at once. After I printed the first set of 11 squares I just wanted to change the pass setting on all of them while leaving the speed/power alone. Would be great to select all and do it in one operation instead of having to click on / set all 11 layers separately.

ISSUE THREE:
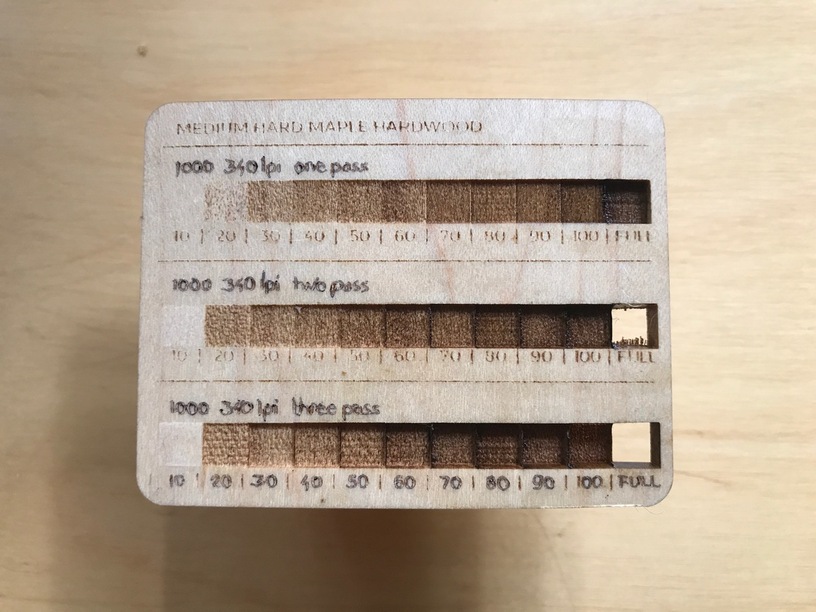
If you look at my image you can see there are ridges of material between each square. This image shows them better:

I had each square of the gradient butted right up next to the other. I expected this to result in a stair-step effect. Instead there is a ridge of uncut material between each transition. What is causing this and how can I fix it going forward? I can see myself doing engraves based on different power settings for different layers to get depth effects, which isn’t going to look nice if I get ridges between each layer.

ISSUE FOUR:
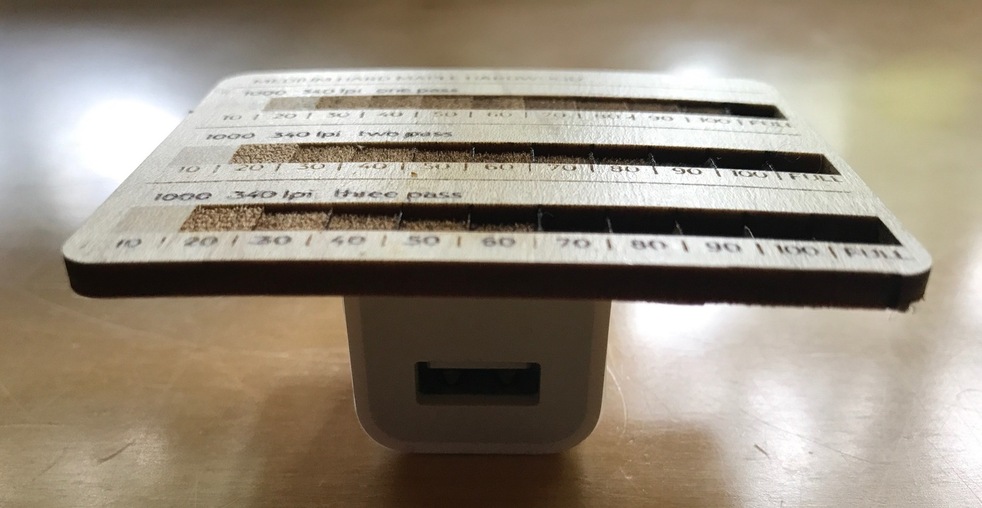
As you can see by that last pic above, my proofgrade material is warped. It didn’t start that way; here is a pic of an uncut sheet stacked together with this partially cut sheet:

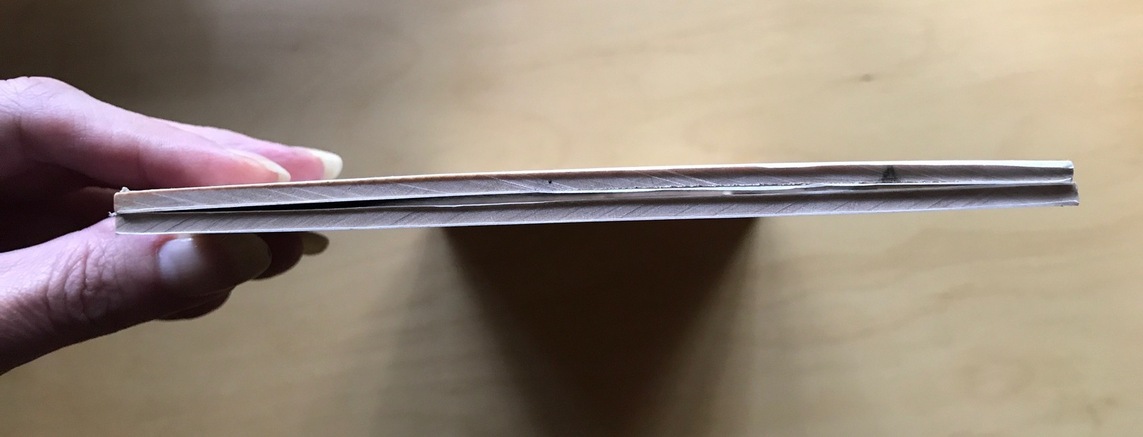
So it appears the proofgrade warps after multiple cuts, which kind of sucks, because I’m rarely going to cut an entire sheet at once, and if the remainder of the sheet becomes unusable after I’ve made a few cuts on it, that is kind of a waste of money. These sheets are both stored flat in the same location, so the only variable is the warped one going through the cutter a few times.

I suspect there’s no “solve” for this one, but I wanted to make people aware it is happening. This warped sheet is maple hardwood, so if it’s going to warp then I don’t see the allure of paying a proofgrade premium to buy this material going forward. Right now my impression is that the only proofgrade material that offers a significant and measureable quality improvement over non-proofgrade materials is the plywood, because of the quality control on the interior layers of it.

If there is, however, a solve, I’d like to know what to do to keep partial sheets from warping.

Thanks in advance,
Your friendly neighborhood breaker of software.

14 Likes

I don’t have authoritative answers for these, but here are some points to ponder…

Issue 1: You didn’t mention what OS/browser combo you’re using, so it’s hard to say for certain, but I am able to scroll the operations/settings using the scroll wheel on my mouse (and/or swiping gesture) in Chrome & Firefox in both Win 10 and OS X.

Issue 3: Again, I can’t review your file, but it would appear that each square is actually separate. Depending on what editor you use, you may try ‘view borders’ (or equivalent) to reveal all lines.

Issue 4: Warped PG isn’t necessarily ruined. All wood warps. I keep all my ply (including partially-consumed :proofgrade: ) stored flat with new stock on top and pull from the bottom (FIFO inventory).

HTH, best of luck!

3 Likes

Edited the post to add OS/browser info (Mac OSX Yosemite/Chrome, but on a Wacom tablet not a mouse so I wonder if that is affecting things?)

I’ll review the file to see, as well as another piece of artwork that I got similar ridges on. I wasn’t sure if this might be an issue because of the power settings changing between squares.

I’ve got some weights I use for pressing artwork, maybe I need to leave one on cut proofgrade sheets.

Great and thorough test! I look forward to your continued testing and reporting.

The scrollbars are intentionally hidden by using CSS to position them underneath the bed preview image.

This has become quite popular on a number of websites but it’s a usability nightmare for people with certain disabilities or who are using a mouse that doesn’t have a scroll wheel or a trackpad that doesn’t have scrolling gestures.

Glowforge should probably at least have an optional setting to show the scrollbar.

5 Likes

Oh, and under certain conditions Chrome sometimes shows the scrollbar anyway, at least on macOS.

Here it is with the style of scrollbar that macOS uses when you have it set to always show scrollbars:

And here it is with the style of scrollbar that macOS uses when you have it set to use iOS-style scrolling where the scrollbar appears only while scrolling:

(I’ve never seen this happen in Safari; it appears to be a Chrome-specific bug.)

4 Likes

Oh my god you have got to be kidding me. The time I spent and the procedural gymnastics I went through to get all the layers printed that I needed to, and there were hidden scroll bars the whole time. Dead. :weary:

5 Likes

I guess I have been taking the scroll wheel on my mouse for granted. I just spin the wheel and access all thumbnails below the bottom edge.
As @dwardio said all wood will warp, I will usually orient the material with the crown or camber down and use the rare earth magnets to pull the sides down. If it were a situation where the side I wanted to use was crowned, those magnets above and below the engrave area can pull it flat.

1 Like

If your Wacom pen has a “middle” button configured, that should let you scroll (I think).

1 Like

Yep. But it’s not possible to use it unless you write some custom CSS to move the scrollbar back to where it’s visible. The bug in Chrome that makes it (very briefly) visible on screen only happens while using a scroll wheel or the scroll gesture on a trackpad. And even then I don’t know if it’s actually clickable.

It actually has one of those programmable circles on the side of the tablet, which I never use. I just clicked through the options for it and one is to use it as a scroll (which I had turned off on purpose because cats). I turned it on to see if it works, and yeah, it scrolls them.

So I guess that one is “fixed” as long as I leave that on, but this is still terrible UX.

There is no visible sign whatsoever that it is possible for that sidebar to scroll on my system:

Alright, it appears this one could well be operator error-slash-laziness. I aligned my squares allowing Illustrator to snap them together, and in wireframe view it appears they are exactly aligned. But, if I zoom in to AI’s max zoom there is a tiny fractional gap. I should have positioned numerically!

I’m going to reset them and try another strip. I had this same issue to a lesser degree on another piece of art I engraved in a similar manner, and due to the way it was set up I know its layers were aligned, so, we’ll see.

1 Like

PS request to support: would be super great to have the barcodes on little squares of card stock instead of as stickers, so I don’t have to peel the label off to avoid cutting into it, and also to have something to use for back side printing.

1 Like

Argh… I usually use my laptop with no mouse DUH
Guess time for another wireless mouse…

The head has the ability to read UV, and the intent is to eventually have the codes printed directly on the mask. Right now the proofgrades are beta.

1 Like

Ooh, good to know; thanks! That will be nice.

Ok, so, how about in the meantime letting us download a PDF of all the barcodes, so that I could just print them out on card stock on my laser printer and not fuss with peeling them off like this? The peeled sticker is curly and wants to stick up above the material; I’m afraid the head will catch it. (Have been taping it down, which is also fussy.)

2 Likes

You can click on the name of the material at the top of the far left column and the values will pull up and populate the fields automatically. Has a Search, or you can just enter the material thickness in inches for Unknown Materials.

1 Like

I remember struggling with that issue when using an iPad and trying to scroll down through the operations that appear on the left menu.

There have been some robust discussions about how to efficiently access the operations thumbnails on the left column.

As a side note: I have noted that people refer to them also as layers. I understand that this comes from using design software that puts different objects in different layers and also I believe from how other lasers might call the different objects and operations.

For what it’s worth, my preference, and what has been most common on the forum has been to call those thumbnails as operations and not layers. It might make it easier to search the forums for previous references to this issue.

2 Likes

Yeah. It’s funny. I always call them “objects.” Can get really confusing if you think of, or refer to them as layers.

Yep. The tricky thing is that one operation can have many separate objects or discrete shapes that are treated as one object as far as selection goes.

The left hand thumbnails are referring to the settings that go into making a discrete operation when you press print. As you know, (but those who don’t have a GF might not) they are applied to whatever object(s) are are of the same fill color or stroke color.

For the warping issue: try using magnets to hold the piece down, if you have some blank room on your substrate.

2 Likes