Regarding thickness and warp: The calibration process takes 36 measurements of the height of the surface of the material. With this data, it creates a 3D surface map of your sheet of material, which it then uses to process the calibration.
In theory, this should enable you to use anywhere between very thin and 1/2" thick material. In practice, we’ve tested it extensively with flat, medium Draftboard, so that’s what we recommend. (Also, you can’t adjust the power settings, so whatever material it is has to work well with Draftboard score settings).
If you had an unsatisfactory calibration on warped material and then a great calibration on unwarped material, that would be interesting for the team to look at, so please let us know in this thread!
Suggestion
Maybe the Set Focus option should clear any existing objects and plop down the precision preview target image on the bed automatically. Doesn’t make sense for everyone to have to download it to their local storage only to upload it back to Glowforge again. And, if the image needs to be updated by the mothership again, folks will automatically be using the latest and greatest with no need to make another announcement.
Thanks Karl! Many folks use Set Focus frequently, not just for the precision preview test, so it might be inconvenient if we kept plopping it in their workspace every time they wanted to use it. (Personally, I use it for every print; it gives me extra precision for layout that I appreciate).
Want to know how amazing lid calibration worked for me?
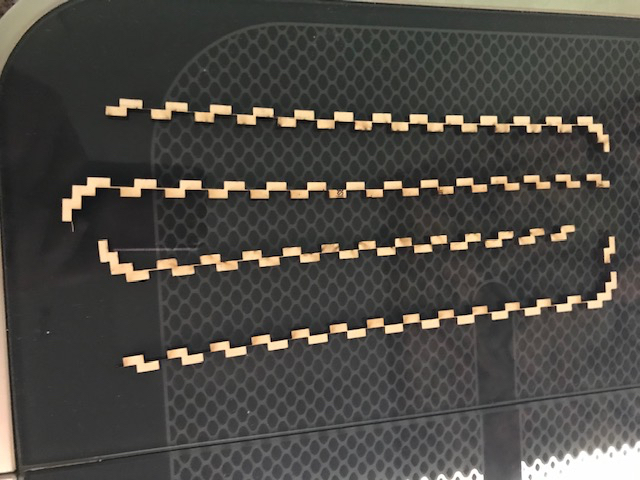
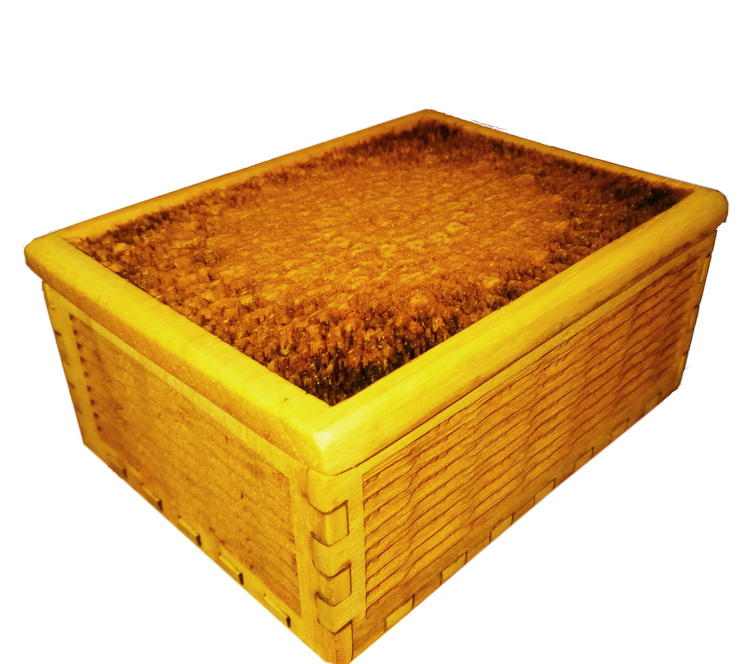
I didn’t notice the engraving on a box lid had shifted until printing was done. I still needed to print the bottom of the box though, so I thought I’ll give it a try and line up the bottom over the wrecked lid - see how well that worked out!!! I would have never attempted this before… I just used felt to cover the failed engrave that now decorated the bottom of the box. Nothing wasted.
Clarification: each strip shows the the lid tabs on the outside, and the bottom tabs on the inside. The lid fits snug on the box.
So, if I understand you correctly, you set focus on one area of the bed, align some objects there, then set focus someplace else and align other objects there, etc.? Not sure if that’s what you meant.
The first time there is usually a mm slop available but after that even a small percent of a mm can mess up the drawing so I sometimes take several tries trying to get it just right.
Thanks for letting us know about that, @donna (and I’m sorry for the delay!) I’ve rolled your unit back to its previous calibration, and we’re looking into this on our end. I’ll follow up by email when I have more information. I hope this helps to get you back to printing in the meantime, but please let me know if you’re still running into trouble.
I’ve just done the calibration process and it got all the way to 98% then told me it failed. Kind people on another thread suggested posting it on here so the glowforge team can look at my logs?
While this is frustrating it could be resolved by putting in a second piece of proofgrade draftboard if it weren’t my last piece and I didn’t live in the UK.
When oh when are you going to start shipping proofgrade to the UK? AND why did you make it need proofgrade for the calibration if you’re not able to send it to all your customers?
Given that the super-flatness of the material is paramount over it being ProofGrade and that the surface be LIGHT COLORED so that the camera has enough contrast to read the score mark, I’d think the more-resourceful might try a custom-cut 12x20" piece of glass from the hardware store, spray adhesive, and a roll of paper from the craft store? If the calibration fails, it certainly can’t be blamed on warpage from the glass… particle skewing it from underneath maybe. Scrape the paper off, and give it another go.
Sure finding the problem is good. But since you can’t get Proofgrade in the UK you will definitely need a masking paper for many different projects. I would say most projects. Widely available via Amazon UK. Here’s one.
Might be better deals or better options. Just make sure you don’t get Clear.