Hi there, I am seeing that this may be a fairly common occurrence, but I haven’t quite found a solution on the community support that has fixed my problems. I’ve had my GF for a few months now and have cut a total of probably 15-20 hours. Up until this week, my cut lines have been super consistent, super fine, cutting all the way through my 0.125" Baltic Birch with zero issue. Prior to this week, I’ve masked it, pre-painted it, all with no problems. Flash forward to this week, and suddenly it looks like one of my kids is using a sharpie to draw border lines for shapes and it won’t consistently cut all the way through the same material.
Things I’ve done to troubleshoot:
-Cleaned EVERY surface, mirror, lens, etc with the Zeiss wipes
-Ran the camera calibrator tool
-Changed settings to what others had recommended (170speed/100power/0.114" thickness)
-Slowed down my cutting speed (slowed it enough to where it was lighting the wood on fire, full power, and wasn’t consistently cutting through)
-Fiddled with my svg files, tested to see if line stroke makes a difference (spoiler, it doesn’t)
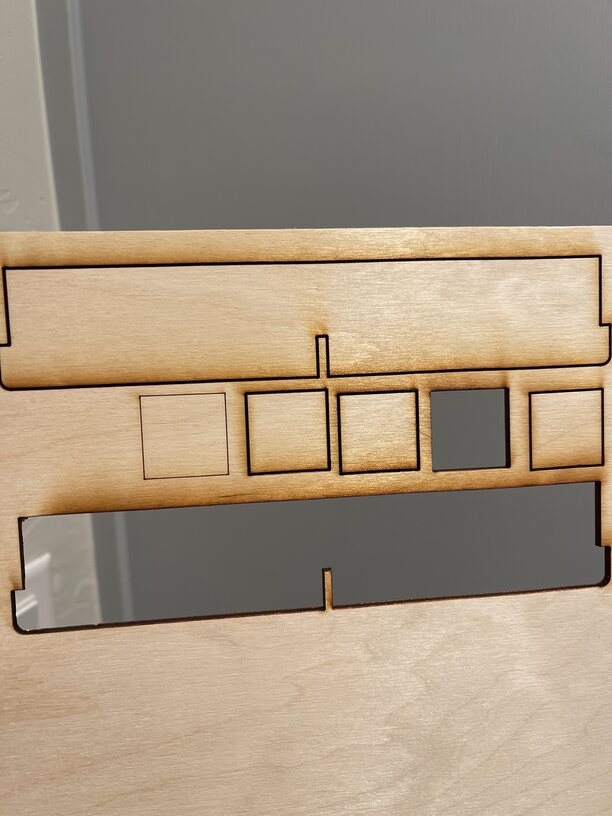
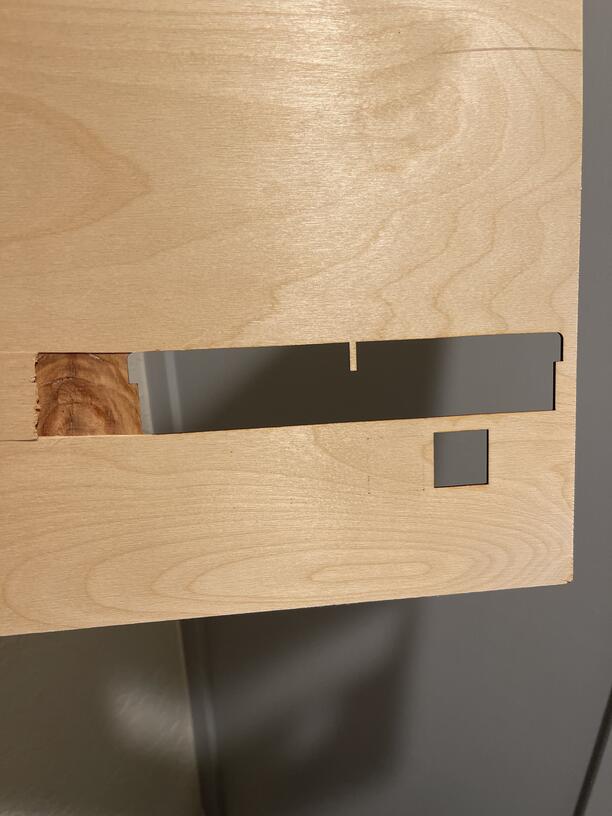
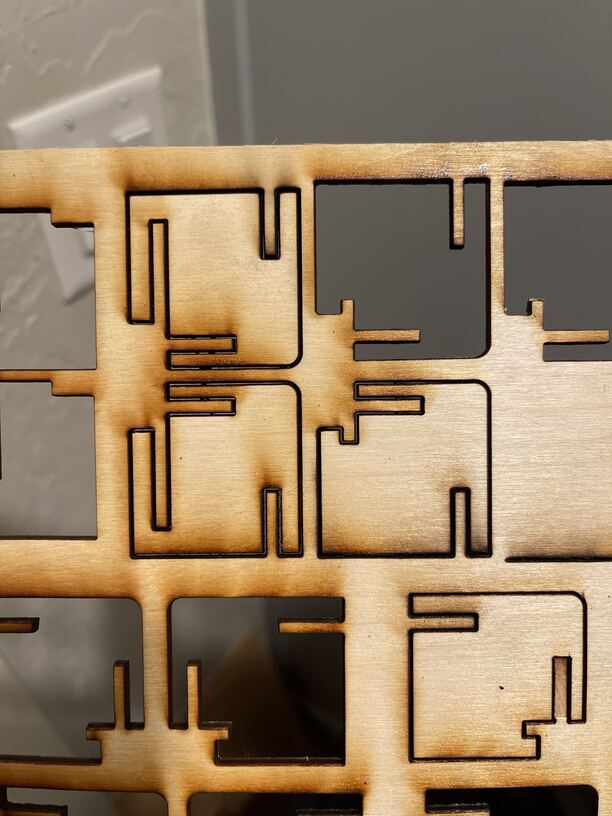
I’m super frustrated right now and am at a loss for what to do. I’ve been using the same cutting settings for many MANY cuts, and this week, I’ve had to progressively scale back speed to get any cuts to work at all, and then am still using a knife to cut out from the remaining wood. It’s gotten worse and worse each time, it’s really weird. Any help would be much appreciated! Some pics below:
I have been experiencing changes as well, not with the lines but with my engraving. Before my engravings on my nonproofgraded material would have this nice matte “fine sandpaper” finish to them. In the past couple of days now they look glossy/melted and instead of a fine sand finish it looks more like a leather finish. I have been using the glowforge over a year, probably at least 10-12k pieces I’ve made. I am super familiar with the machines. Something for sure that was done recently is affecting the outcome of the pieces I am creating.
For example, one piece would take me 13:58min and now all of the sudden is showing 15min. Same settings, same material… it is just weird.
On the other hand, looking at your pictures it seems like your belts may be a little loose
As you undoubtedly know, support limits each ticket to one machine. If you wish to open a support ticket for your issue, you will need to start your own individual thread.
Check the board weight, if it feels light, it’s going to burn more readily. And you can look at the uncut edges to see how dense the filling is on plywoods. You might need to adjust your settings if you want to keep using that supplier, and run it faster with a second pass. There will be a lot of char, so masking is going to probably be a must.
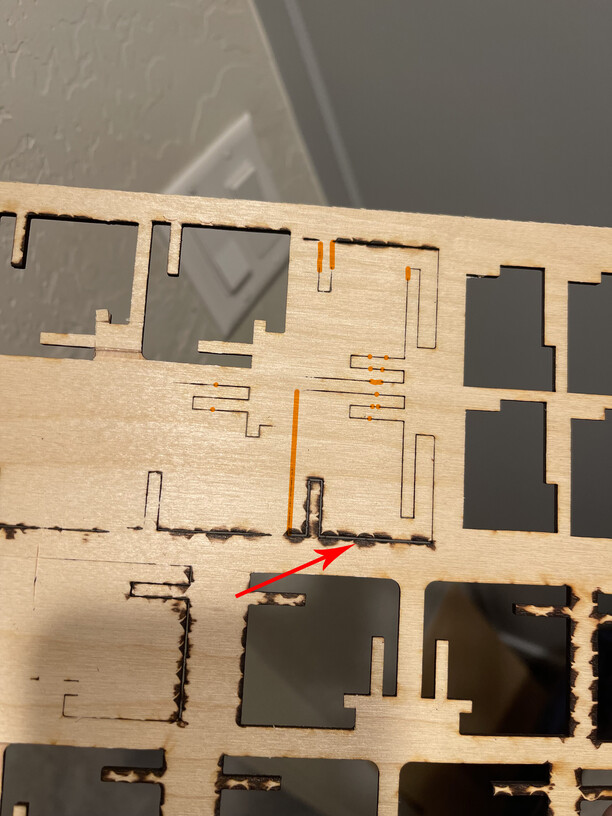
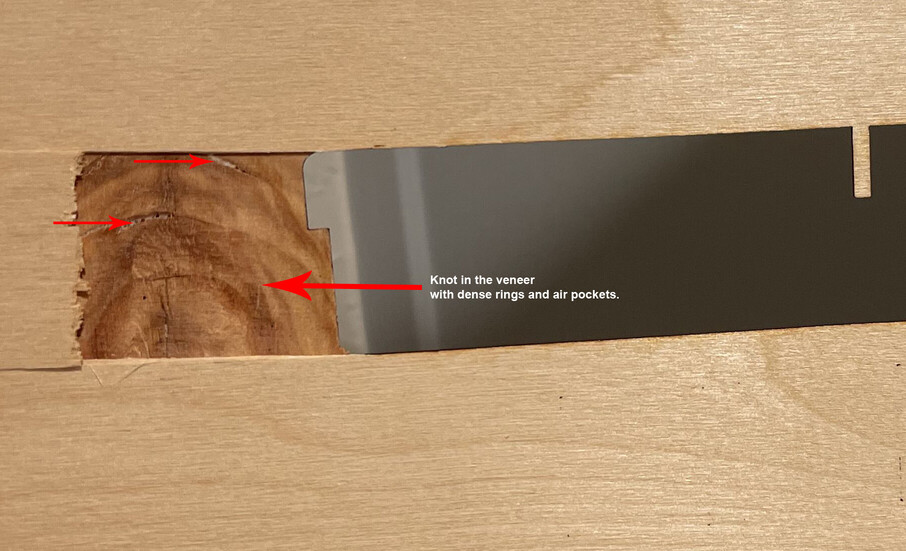
The little orange spots are air or dense fill pockets inside the sheet…they don’t burn deep, they burn wider, and char a lot. The dark patches on the back are flashback…they happen when air feed gets underneath the sheet, so it might have had a little warp there. Make sure the material is flat on the tray…sometimes they can be a little warped and they’ll cause issues with burning on the back.
You might want to use that up and then find a different source. Or try shining a strong light through the sheets from the back to see any vugs and dense spots in it, then mark them on the front to avoid it.
(And that’s not in the veneer, it’s in the fill layer, (but I don’t want to redo the diagram ), so you won’t see it on the outside without that light shining through. No way to know just from looking on the outside…that’s junk wood. Great for cutting with a saw, not so much with a laser.)
What are we looking at here exactly? What were the settings for these cuts; while they look very out of focus, it could also be because of the very slow settings.
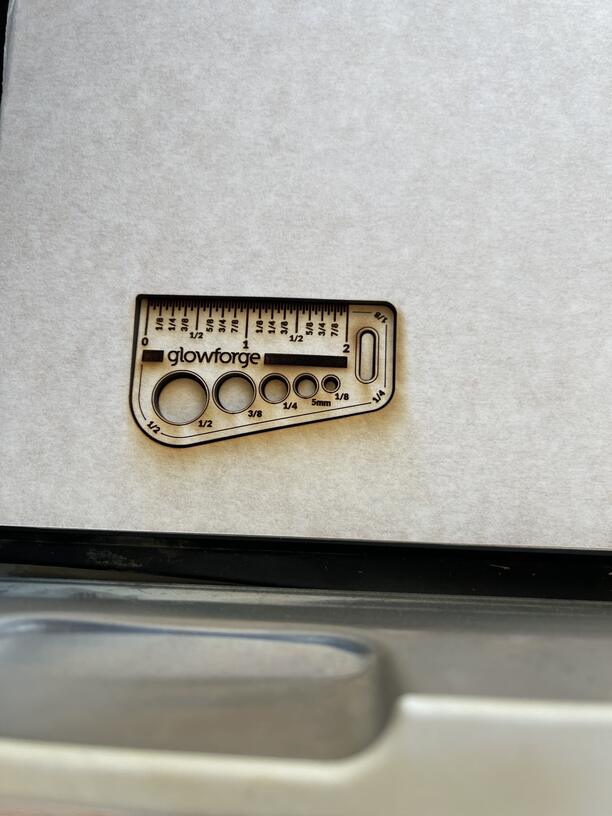
What does just a cut on draftboard with the gift of good measure look like? This is a really useful test because it rules out file errors (which probably isn’t the case here unless you have duplicate cut paths). But it also runs through each operation with pre-determined settings (cut, score, engrave) and there is a frame of reference built in since it’s a ruler and has small fonts - which makes it really easy to identify focus issues.
It could be a number of things - your set focus could be hitting a hole, your windows on the bottom of the head could be very dirty, or the auto focus isn’t working properly, or the head has an issue and it’s not moving the lens properly.
I gotta go with Jules’ analysis. It’s a crummy sheet of ply with knots and/or voids in the inner layers. It’s the most likely explanation for “it worked on the last sheet and it doesn’t on this one”.
I would bet the OP has some scraps left over from a sheet that cut cleanly. I’d make some small simple squares and cut them from that older piece of scrap to see what happens.
If it cuts clean, then for sure the current problem is a bad piece of wood. If it cuts badly, the GF is busted.
Hi there. I’m sorry to see that you had some trouble with recent prints cutting through with some thicker cut lines and not completely cutting through. I saw the photos and some great advice offered by other Community members.
There are several things that need to be checked if the laser doesn’t cleanly cut through the material. You may have already gone through the following, but wanted to confirm just in case:
@Jules Great insight, i’ll look into all of these details. I will say that all the ply sheets i’ve been cutting are from the same shipment, and so far they’ve cut just fine. This has been a progressively worsening issue, not one that happens from one sheet to the next, sadly. I can see how the core layer might affect cutting on a single sheet, so those are REALLY good details. Thank you. I’ll do some more testing.
@jbmanning5 I’ll give that a try later today if i get a chance. Makes sense for testing purposes. I’ll post results when i do it. I have cleaned everything very thoroughly, including the windows on the bottom of the print head.
@randy.cohen I’ll test with some older scraps to see, but as i said before, this seems to be a progressively deteriorating cut issue, not so much sheet to sheet. But really, I could just have a bad batch of ply (fingers crossed that’s all it is!!).
I forgot to mention that i use the crumb tray "T"s to keep everything laying as flat as possible, especially if there’s any warping in the ply.
@Brandon.B Thanks for the tips, though I can confidently say i’ve checked all those boxes prior to posting. I will definitely be doing the gift of good measure cut to test and I’ll post photos.
Thanks all for your feedback and insight, I’ll update soon!
Yeah, unfortunately progressively worsening makes sense. There is a manufactured wood shortage right now, and I wouldn’t be a bit surprised if some suppliers are using up junkier cuts inside the sheets to try to meet demand.
Good luck, but do plan on checking any non-PG sheets going forward. (And if you still have the problem on the PG sheets, give it a good cleaning as Brandon suggested and make sure it’s pinned down flat.)
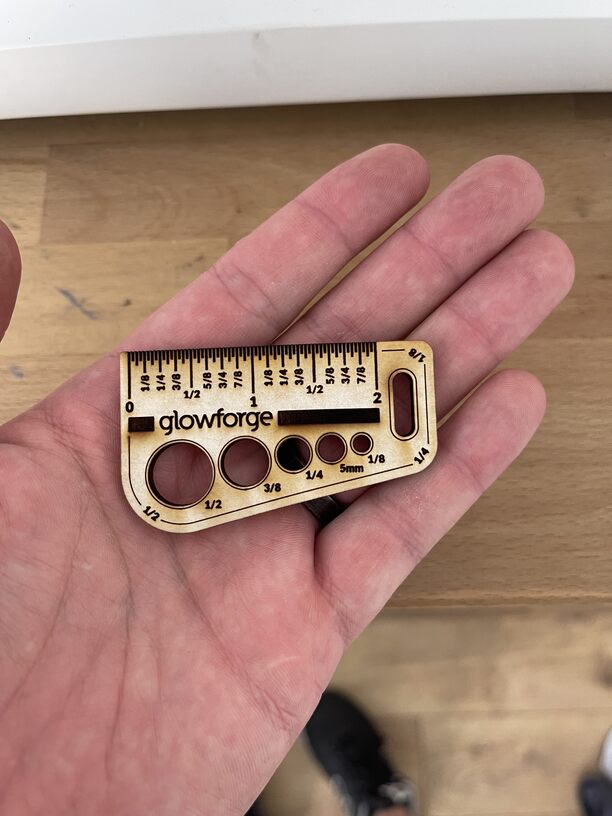
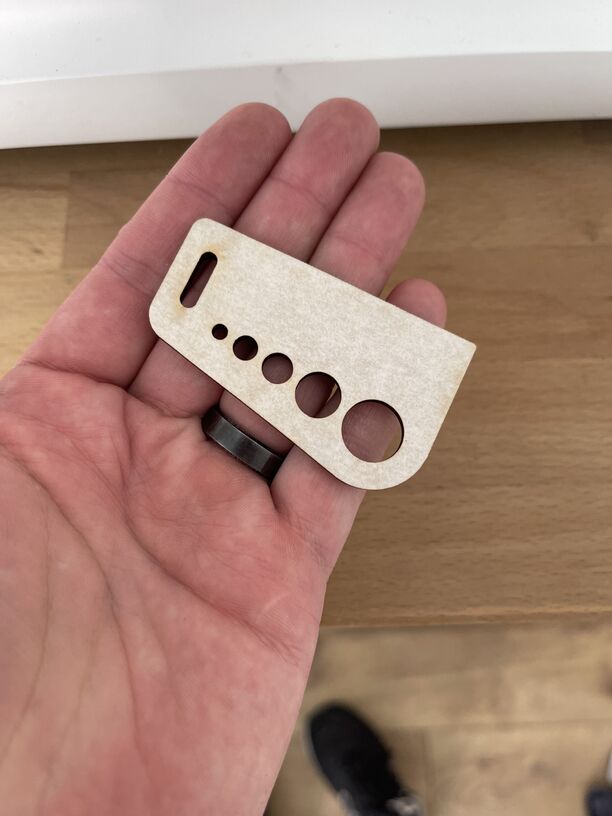
Ok, so the test with Gift of Good Measure cut worked perfectly, so that’s a great sign. Pics below. I’ll definitely be checking the quality of each piece of plywood before cutting from now on… @Brandon.B can you see any issue in the screenshot of the alignment after cutting in the first pic?
Ok, so I finally have time to make some more cuts. I’m being more picky about the pieces of wood I’m using and I’m still having the same issues. one thing of note is that looking down the length of the cut on a longer stretch, it’s angled. as though the cut is in the shape of a wedge. that doesn’t seem normal to me, it sounds more like the beam is out of focus or something. So, my next question would be, how does material height settings on non-proofgrade materials affect how the laser cuts/focuses? I have 1/8" baltic birch, so I’m setting at 0.125". But that’s also what I’ve always done and only am having issues as of a couple weeks ago…
The laser beam is focused, that means it has a conical shape tapering to the smallest point at the apex of the cone at the focus height of the laser. The beam diverges again beyond that point. So the result is that the Kerf is tapered like the beam and the edges of a cut are not square to the faces of the workpiece. That is normal.
I think the material thickness (Uncertified Material) setting is only for the camera. When you start a job, one of the first things the GF does is a focus operation for the laser beam itself (you’ll see a little red dot as the laser focus runs). You can override this autofocus and tell the GF what focus height to use. But if you’re not already doing that, the laser should be correctly auto-focused and the material thickness you entered doesn’t matter.
@randy.cohen to your point about the laser focus height, what is boggling my mind at this point is that I’ve never had this issue. All previous cuts appear as though they’re perfectly vertical, so this conical type cut is brand new and part of the problem I feel like. is there some way to refocus the laser height?
and good to know about material thickness. I was hoping it might help with laser focusing issues, but sounds like that’s a big no…getting frustrated with how much my GF has changed in just a couple months. It’s almost to the point where what I’m producing is unusable. I’m having to use a knife to remove just about every single piece I cut and then do a ton of sanding work to make it all look a bit better. again, never had these issues before…
If you haven’t cleaned your optics, and you’ve been using the machine for a couple of months, you’re due.
If you have cleaned your optics, the obligatory “make sure you put the lens back in the right way around” comment would come next.
When you click a tile on the left side of the GFUI, and then click the “>” on the right side of the pane that opens up, so that you’re looking at the laser’s settings for the operation you’re performing, you’ll see a “set focus” control at the bottom, which defaults to “auto”. Switch it and put in the thickness of your material there, and see if it makes a difference. And note, doing this you can also set the focus a little below the top of the workpiece or above the top, which can change the way cuts and engraves turn out.
Definitely have cleaned everything, multiple times. And haha yes, had to make sure I didn’t flip the lens, that would have been quite the rookie mistake!
as for the laser focus settings, I haven’t yet tried fiddling with it. it’s always been set to “Auto” which is why I’ve been so confused about things changing out of nowhere. I’ll try setting it to my material height to see if that makes any difference.
only thing I can think that it coincided with was the massive heat wave we had over here on the West Coast…my GF had been in my garage, which tends to get as hot/cold as outside temps, and it hit 113 where I live. Obviously the GF wouldn’t operate during the higher temp parts of the day, but could that have damaged the laser itself, just by being in such a high temp environment, when off? I’ve since moved it to an air conditioned room so I can cut throughout the summer, but it got me thinking…