Did you clean it really thoroughly before lasering? (I wonder if body oils or other contaminants might cause that kind of banding?)
To determine if it is a machine related issue, you could probably run the test on something a little less “permanent” than your macbook - I’d try that design on something like a sheet of Draftboard to see if it is lasering more weakly in bands - you should still be able to notice a difference, and it’s a lot cheaper. (Posting pics here after will give Support something to look at.)
I’m so sorry your print didn’t turn out the way you expected. Thanks for letting us know about this. We’re looking into it now, and we’ll follow up in this thread once we know more.
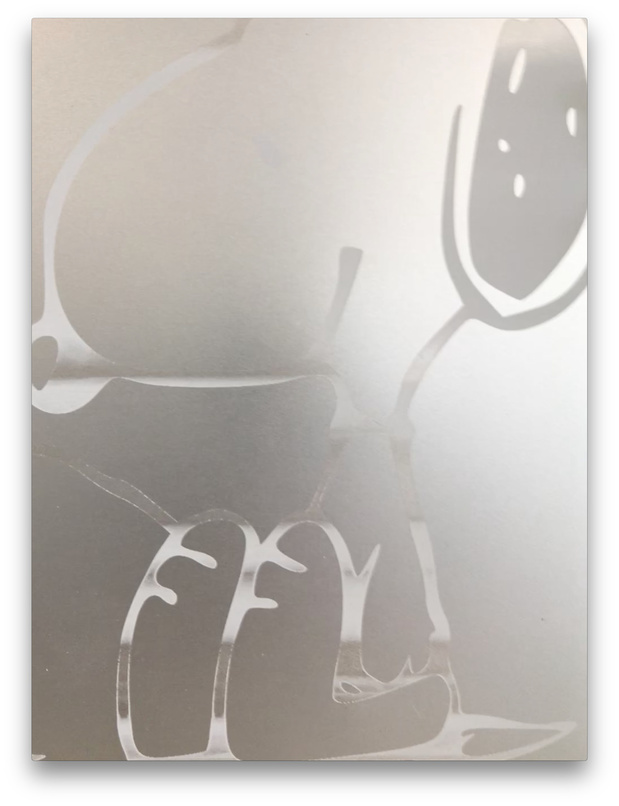
This is a good thought, and although the MacBook looked very clean, I didn’t do any extra cleaning of it before lasering. Interestingly, I did re-print it 2 or 3 times to try to fill in the banding, but it had little effect. It made me wonder if there was a support beam substructure underneath those parts of the lid, but after seeing other MacBooks online with smooth etching, I think it must be something else.
I did run a test print on wood, and didn’t see any banding, but the wood is probably not near as finicky as the aluminum. I’m curious if it has something to do with the size & time length of this print - it takes 1 hour and 11 minutes.
Yes, it is a solid vector shape, set to etching (a vector not a rasterized image). I wouldn’t think etching from a vector should be different than from a raster (probably internally converts to a raster anyway), but not sure.
Does it have a Fill color in the vector shape already before you save the SVG file? Or is it a stroked path that you are converting to an Engrave in the interface?
(Just trying to track down the potential source of any banding…if you are converting it to an Engrave in the interface, you can try Filling it with color before taking it into the interface…remember that any non-colored areas inside of filled shapes need to be subtracted out, not left as white fill - those will Engrave just like black fill for vectors.)
Or you can just rasterize it before saving the SVG - that will treat it the correct way too.
Yes good thought. I just double checked - it is a vector shape with a fill & stroke color set (black). It did seem to be filling correct on the pre-test on wood, but it might be a good test to try rasterizing first and etching from that.
The GF treats strokes as cuts and fills as engraves by default. You can convert in the app a stroked fully enclosed shape into an engrave. But there have been issues before with specifying both a stroke and fill on the same object. Not sure if it’s still a problem but it’s worth noting and trying to avoid. Even if you’re trying to have it do an engrave and want to follow up with an outline score to clean up the engrave edges, you’d want to do 2 objects - 1 just filled with no stroke and one with no fill and just the stroke defined so you could specify the order & settings separately.
Just as a side note: I do not believe it converts a vector asset to a raster asset to perform an engrave. Or, at least in a way that is comparable on our end. The reason behind that logic, vector object engraves are single power, always-on operations - the laser either fires or doesn’t, and when it does it’s at a constant power. A raster image will be either dithered (a pulsing of the laser to simulate shading/tonality where darker has dots closer together, and lighter has them further apart) or vari-power, where the beam power adjusts to the grayscale value of a pixel.
That said, the Proofgrade settings for a Silver MBP are 1000/Full (on a Pro). I noticed that you put 100%. Some people use 100% to indicate full power and some mean it as precision power (which is less than Full).
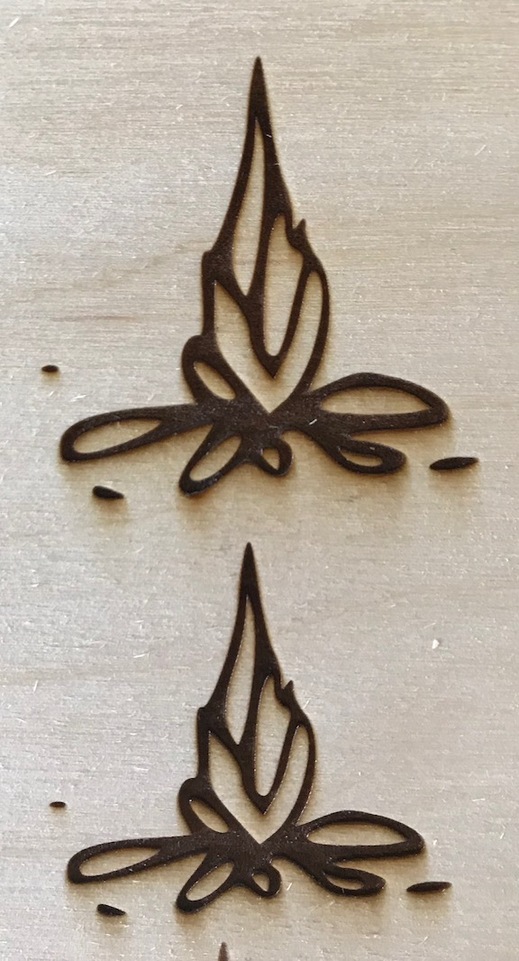
quick test - Medium Maple Plywood preset, one with Stroke&Fill color, top one with only fill color.
I am suspecting that wood will not reveal this banding issue very well - these two look very close to me. I am running this same test on a piece of aluminum next.
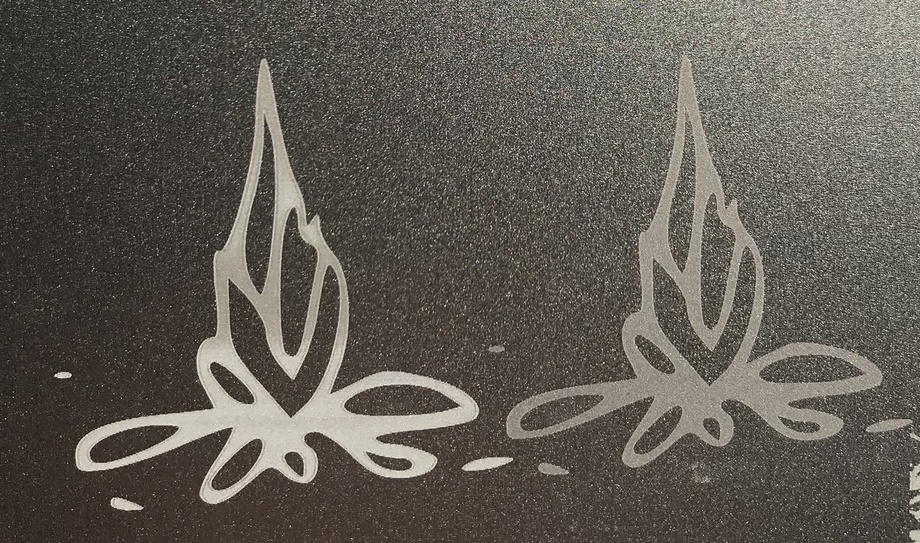
Might be just losing my mind. Ran a another test on aluminum (side panel of an ancient Mac Tower). image on the left was done last week and shows issues, and I’m kicking myself for not writing down the settings. On the right I just printed again, using the MacBook Pro preset, then change to manual engrave and changed the focal length to 0.3125 - Full Power, 1000 speed, 450 lpi. It looks nice and consistent, but not as white as the left print.
Not sure if I learned anything from this yet
The Macbook is thicker at 0.50 inches - I think what you are seeing is the result of a defocused engrave on the second one. The Focal Point has been set above the top of the panel. (Not as white, less material removed.)
This was on an aluminum panel 5/16" thick (sitting on the tray) - so I set the focal height to 0.3125 in the manual engrave - this was the second print. Was there something incorrect with this? Does specifying the Focal Height in the manual engrave settings override any material thickness specifications in the MacBook Pro preset?
Manual override is just that…anything you hard code into the settings for individual operations overrides whatever Automatic settings or pre-set settings get loaded in there.
That’s so you can set the focal point wherever you want it to be for advanced operations.
Now that I’ve re-read your post again though, it might not have actually been defocused - if you changed it after you loaded the MacBook settings, it adjusted to the new height. (Sorry, I misread that the first time.).
Just experiment with it a little bit, increasing the LPI might give you a whiter result, if that’s what you want with it.
Great, I really appreciate the help.
Yes, I had set the MacBook Pro preset, then changed the Focus Height afterward.
I am happy that the engraves today are consistent, but I am confused what was happening on the first, much larger print. I am thinking I should try a large one. The first print took 1 hour 11 minutes, while these last tests were only 5-10 minutes. I don’t know if it makes sense if the laser could have power fluctuations after running for longer periods?
Also, the brings up the question of laser lifetime. I had read somewhere the the laser was estimated at a couple of years. Do we have any idea of what ‘old age’ looks like from the laser?