Love that one! (Really clear and sharp.) 
3 Likes
Did you do anything special to the original photo in order to get such great results?
1 Like
I’m not a wizard, no, but I’ll often run one through a photo editor to clean up or brighten.
What you start with is the biggest thing. I’ve had to tell customers that this photo will not come out satisfactorily and they found better ones.
4 Likes
Awesome photo! I’m amazed at the result–didn’t know that was possible!
1 Like
I’m a bit late to the party but what Dan was hinting at above with the G/S conversion is that you can fine tune the contrast. Photoshop and Lightroom have 8 or 10 sliders for various colors. As you slide them back and forth you will see parts of the image change.
You can use this to really punch up the contrast for better engraving. While brightness and contrast will adjust the overall image, G/S conversion will let you focus on specific color ranges. With some practice it will make a much more dynamic image. A straight G/S conversion will look flat by comparison.
It is worth playing around with.
7 Likes
Of course a RAW file would be better than a JPEG but I don’t expect anybody to bring you one of those. 
3 Likes
Not as far fetched as you think. I have a simi pro photographer wanting a sample so he can offer them!
I’m playing with GIMP and Paint Shop Pro. Lots of possibilities out there. A little tweaking helps but over do it and…
Like any tool it takes time to master.
1 Like

I did this today to expand my range. It is original art by a friend of mine. I just wanted to see if I could adapt it to laser engraving. After I showed it to him he wants to send it to the model as this was a concept drawing and she never sat for the full painting. He hopes it will change her mind.
Yall have created a monster!
12 Likes
Out of control! (But sweeeeeet!) 
2 Likes
Very cool.
2 Likes
Very nice. Keep it up. Your bar is getting higher all the time.
3 Likes
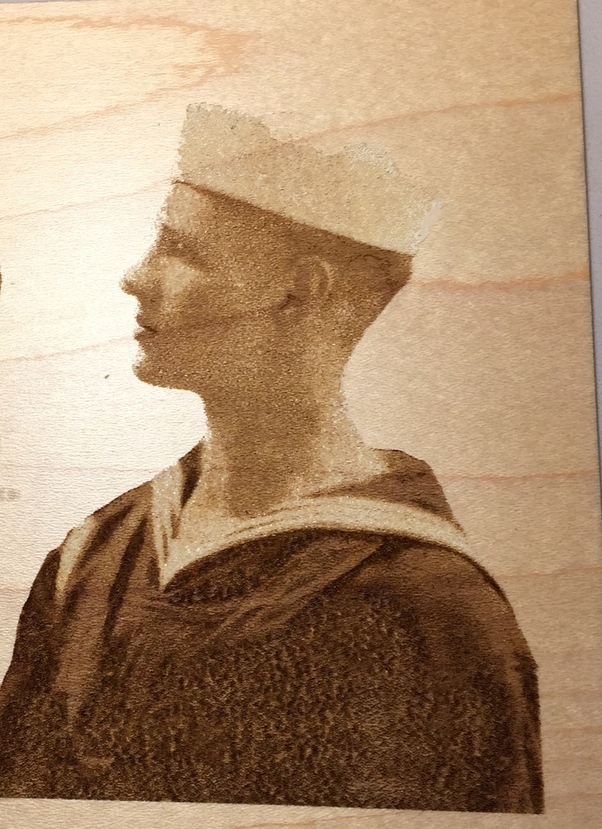
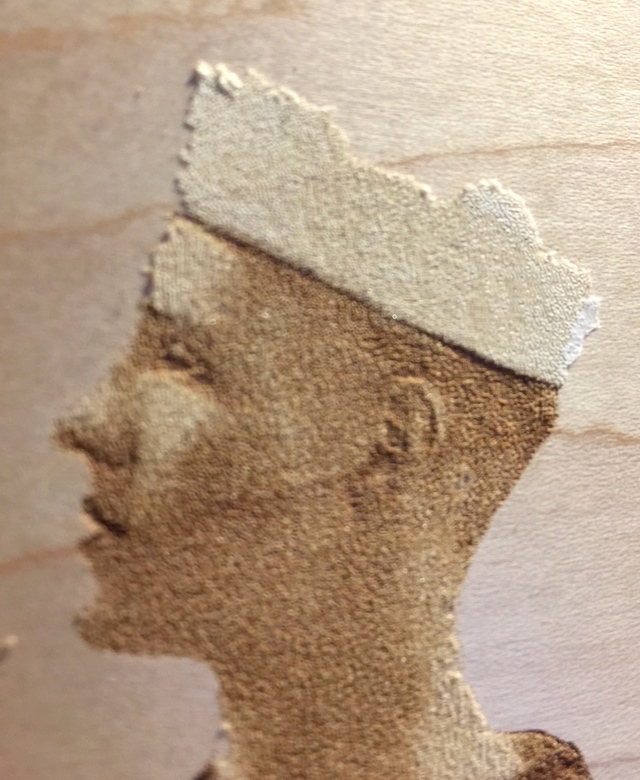
Decided to come back to this thread to keep the subject matter contained a bit. I’ve been fascinated with your photo work, Mark. I did this one last night and though it looks pretty good, you can see in the close up that the masking on the top part of my dad’s hat has just sort of ‘dissolved’ away. This was from a colorized photo of my dad in 1919. I changed it to BW, upped the contrast, and removed the dark background. It’s on maple and done at medium color. This is pretty close up, so doesn’t look as good close up as it does in proper perspective. The piece is about 5x6. The main thing I’d like to find out or figure out is how to deal with the white parts, as in his hat? There must be some setting I can tweak to deal with that, yes? I’d appreciate some ideas from anyone who might have a clue.
15 Likes
Is there a filter that can outline the hat?
1 Like
Had you considered doing a very light background engrave? Otherwise you’re always going to need to darken the whites, and the curve will be really finicky…
1 Like
This would be a good candidate for removing the background manually in a program like Photoshop in order to preserve the shape of the hat. It’s white, against a white or light blue background, and anything you do to try to grab it with one of the automated tools is going to be pretty rough.
(Unfortunately we don’t have a tutorial on that, it’s an advanced function that uses Bezier paths.)
You could try carefully erasing the background with the eraser tool set on a hard brush…it’s going to be easier than learning the Path tools in Photoshop.
6 Likes
The engraving looks amazing. How did you colorize it, because the colors are perfect. 
1 Like
Not sure what that would be…nor how to use it. I’m using Affinity Design and Affinity Photo.
That might work. I could add a light background. The original had a very dark background.