I’m trying to figure out how to make some quality puzzles.
As weeding 200 pieces can both be extra effort and also potentially damage the artwork, I’m trying to cut all of the horizontal lines first, then de-masking, followed by a vertical line pass. My first attempt was a fail - I was forced to reboot the GF and also re-load the artwork and had to align my second pass by eye which didn’t give a good result.
Questions for those in the know:
Is there a “correct” way to open the lid without aborting the job?
How can I delete a step? Usually, I can select a stroke in the group and hit delete, but for whatever reason, this puzzle SVG does not allow it. I’m surprised that you can’t delete the cutter settings to skip the step (e.g., 0 passes for example). I don’t want to re-cut the horizontal lines in the second pass and don’t want to reload or reposition the artwork.
Is there any way to get exact X/Y positioning of a piece of artwork (and ideally any transforms like rotate and scale)? When I had to reposition it, this would have been nice to have.
Any clues as to why I got these errors? I have 2 groups, setup one to cut, did the cut. when job finished opened the lid and weeded. Closed the lid, scanned, centered, etc… and then gave me these errors (not much help).
Is there a “correct” way to open the lid without aborting the job?
No - opening the lid always aborts. BUT. If you close the lid and select the other operations without moving what’s in the bed or bumping your laser head it will cut in the exactly the same place (even when it looks off in the camera)
How can I delete a step?
Set it to Ignore
Is there any way to get exact X/Y positioning of a piece of artwork (and ideally any transforms like rotate and scale)? When I had to reposition it, this would have been nice to have.
Yes - make your art board 20x12" and the art will load based on its location on the art board
Any clues as to why I got these errors?
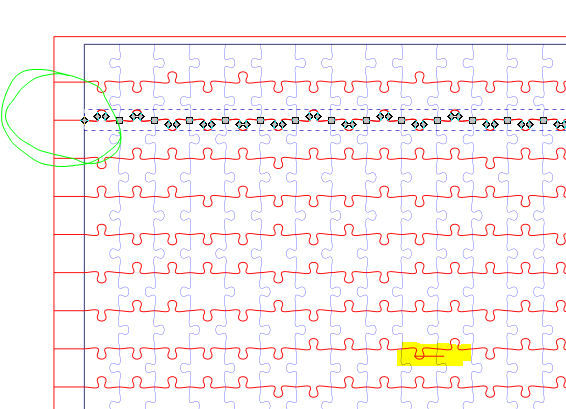
Often those errors come when the design is complicated or confusing to the laser. In this case you should merge all your coloured items together - right now the line is all one object, but each of the extenders/edges are separate - which makes way more steps.
Thanks @deirdrebeth for the tip on “ignore” - should have figured that out.
I can definitely merge those “extenders”, but can’t believe that the 40 or so strokes, given this job, pushed GF into a “too complex” zone.
I’m a bit confused on the artboard comment. So, I’m cutting an 11x14" image into a puzzle. The SVG is going to be a little oversized because of the mask perimeter cut.
Is the “artboard” that you’re talking about in Illustrator? I can do that, but it’s going to setup the placement of the cutlines in a specific location relative to the abstract artboard. But, given that both my paste-up of the photo (and its borders) and my placement on the crumbtray is analog (and in this case, about a degree off square), I need to place my artwork visually to line up with the medium. Since I had to reboot and restart app.glowforge.com to clear the errors, it lost the X/Y/Scale/Rotate of the artwork.
I anticipated this, and took photos of the 4 corners to see where the artwork was relative to the material scan, and got close-ish, but would really like to have a high-confidence way to “repeat” the placement of the art. Maybe this doesn’t happen often and I just tripped into this rare error.
If you mean something else about the artboard, please expand - I’d love any recommendations on registration / alignment / 2 pass stuff. I’m very accustomed to multi-step jobs in the shop and with printing where I use registrations marks, but given the “drift” seen by the wide-angle lid cam, it’s difficult to put marks around the extent of a job to re-align if you have to bring in another layer between a lid access operation.
Good eyes on the floating stroke. I found it when I saw the laser cut it!
The “easy” answer to this is to make a jig - but that means you have to pre-cut the exterior of the puzzle so it’ll fit into your jig.
Yes, the artboard in Illustrator (or in my case Inkscape). Each of our machines has an absolute maximum size that’s somewhere in the 11.5x19.5 range - but the machine knows it has a 12x20 bed so if you start your design on a 12x20 “blank piece of paper” and your design in the top left corner then it’ll appear in the top left of your . Which means that even if you have to restart your machine should (should) cut at the same place each time. If you weren’t cutting out the exterior it would be harder, but since you are…
All that being said - have you run the camera calibration on your machine? I ask because it’s not guaranteed, but most folks end up with sub-millimeter placement after doing so. Obviously you still need to use set focus to aim the camera at the right place, but when you do hitting a prior line is MUCH easier.