so im totally new at this and im so con fused so im used to the cirsut design space witch i can see that this one is noting like this i thought u had a bunch of imanges to choose from but i cant seem to find them all i see a few but thats it
When you complete basic set up, it guides you to the “first three prints” tutorials. Have you completed those?
1 Like
Welcome, Heather.
There are some images you can use while the premium trial is in place, but generally you would create your own designs in your design program and then import them. Most people use something like Inkscape, Adobe Illustrator, Affinity Designer, and the like. The user interface really isn’t meant to be a solution for creating things, it’s primarily for setting up the cutting and engraving.
Have you completed the “first prints” tutorials? They will save a lot of frustration while you’re getting started. You can find them on the support website, here: https://support.glowforge.com/hc/en-us/articles/360033633354-Your-First-Prints
1 Like
yes i tried to do a picture but i cant seem to find how to put a bordor around it and i also wanted to upload two different photos but cant seem to figure out how to do that either
Click the + and enter border or frame in the search field. When you find one you like, double click it and it will load onto your workspace. You can adjust the size after selecting it. As for uploading pictures, you click the Create button and choose upload. Engraving pictures is not a beginner project, so maybe start with something a bit more basic until you get more familiar with the Glowforge interface.
I’m sorry for the challenging start! It looks like you’ve already received some great advice from other community members. Thanks folks!
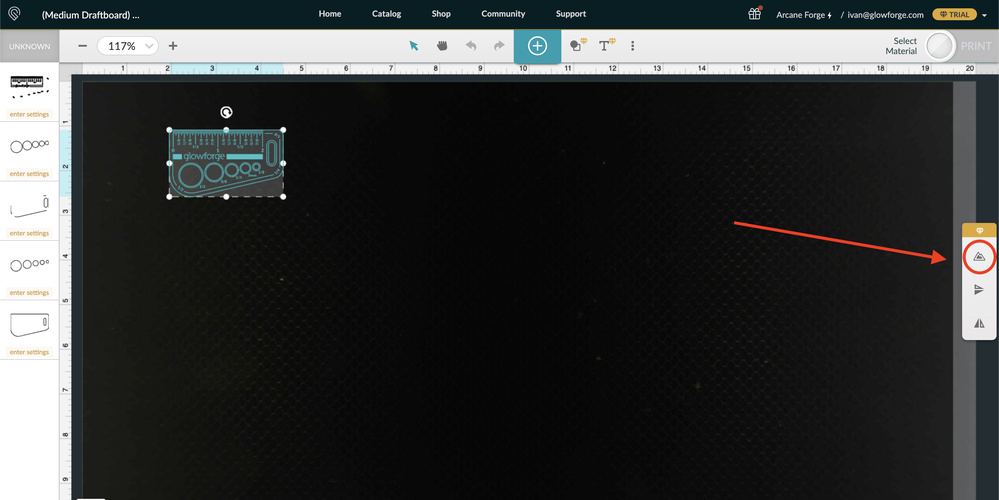
I’ve included a couple of screenshots to add a visual guide to what some of our community members have shared. In this first one, once you’ve clicked on the “+” button, you’ll find options to upload additional artwork into your design.

The second screenshot shows some artwork in the bed which has been selected. After an object or picture is selected, the beta outline feature will appear on the right side of the app. You can then select the button to add an outline.
Please let us know if this helps! Also, the learn by doing guide which @geek2nurse mentioned is a great resource to look through as well.
Now i finially got a chance to get back on but the teal button isnt comimg on what dose that mean
The teal button only comes on once, when you set up your wifi. After you set up your wifi, you prepare a project and when you click “print” the machine processes your design and when the Glowforge is ready to print the button flashes white. You then push the flashing white button.
ok thanks im still trying to get it set up to wifi
Press the button and hold it until it turns aqua - sometime between 10 and 30 seconds. Here is a video that I hope will help you.
1 Like
so i finially got the wifi up and was ready to print so when i pressed print it started the count down but nothing happen i let it go for 10 mins or so but it still did nothing so why is this im so confused on why i cant get it to work
I am sorry you are having a hard time. In no time you will be making things. When the count down started and nothing happened, what were you trying to print? After you got the wifi working, did you have to click on a box that said “accept”? Can you share a screenshot of your user interfaace so someone can help you get your 1st print done?
i waas trying to engrave and cut out a photo of my kids
i dont have a screen shot i took a video on my phone i will try to upload it
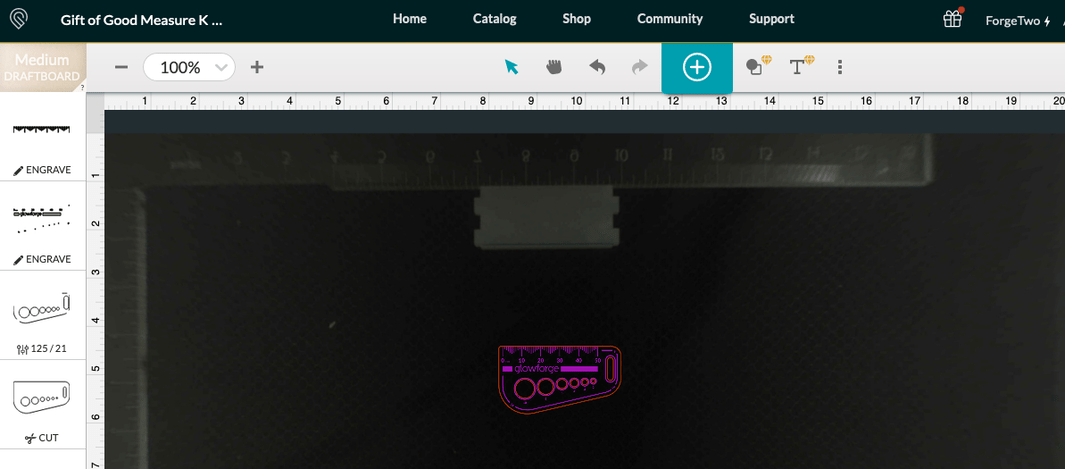
You need to print the Gift of Good Measure for your first project. There will be plenty of time once you get acquainted with the interface for photos of your kids. This is what you should see:
1 Like
i know i just didnt want to waste any of my meterals
Put the artwork for the Gift of Good Measure in the lower right hand corner. You won’t waste much material and it will test whether or not your machine is working properly.
1 Like
None of the first three prints projects use much material - the basic operating concepts you’ll learn by doing them will far outweigh the couple bucks of draftboard and help you not waste materials later 
3 Likes
They provide a free sheet of draftboard specifically for that purpose.
You’ll waste a lot more valuable material trying to wing it instead of taking some time to learn by following the tutorials.
1 Like