“Thick and super dark” are symptoms you would see if the lens was upside down.
You do want to ensure you keep all the optics clean, both windows, the lens and the mirror in the head. Reinserting the lens, remember “Cup goes Up”.
I recommend you pull the lens just to see if there is any “fog” on it. Infrared is heat when it touches something, and enough build up gives the beam something to “touch”. If the energy isn’t transmitted it is deposited. You can burn the lens or other optics if they are dirty enough.
Yes, you said “didn’t engrave properly.” That doesn’t mean anything to those of us who can’t see what you’re seeing. You need to either give us more details, or show us a picture of what’s happening, or (preferably) both, so we can help you figure it out. Is it too deep, too shallow, in the wrong place, skipping elements, upside-down, too big, too small…?
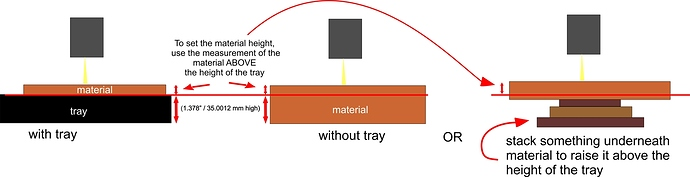
First of all, if you are engraving on something without the crumb tray in the machine, you need to have the cutting board propped up into the correct engraving range. That means measuring the thickness of the board and then propping it up on something that will make up the difference in the height of the surface so that the Set Focus tool can land on the surface and take a correct measurement.
Are you engraving on the board on top of the crumb tray?
Have you propped up the board?
How thick is the board?
Did you use Set Focus?
Sorry but these are all important questions that we need answers to before we can give you good advice on what to do next.
There is a diagram by @kittski below that explains the concept of propping the engraving surface into the correct range. While you can use Set Focus on the top surface, you need to make sure it falls into the range shown. The surface to be engraved has to be above 1.4" from the bottom of the machine and below 1.9" from the bottom of the machine.
Okay, once you have the surface in the correct place, then you would follow the instructions I showed above, except instead of seeing Cut you will make sure “Engrave” is highlighted in Blue on the top row of the popout, then click on the words Proofgrade Engrave to set the little blue checkmark. That will load the default settings for whichever material you have chosen…in your case, the Proofgrade Maple.
But without setting the correct focal distance first, you’re always going to get the default of 1% power.
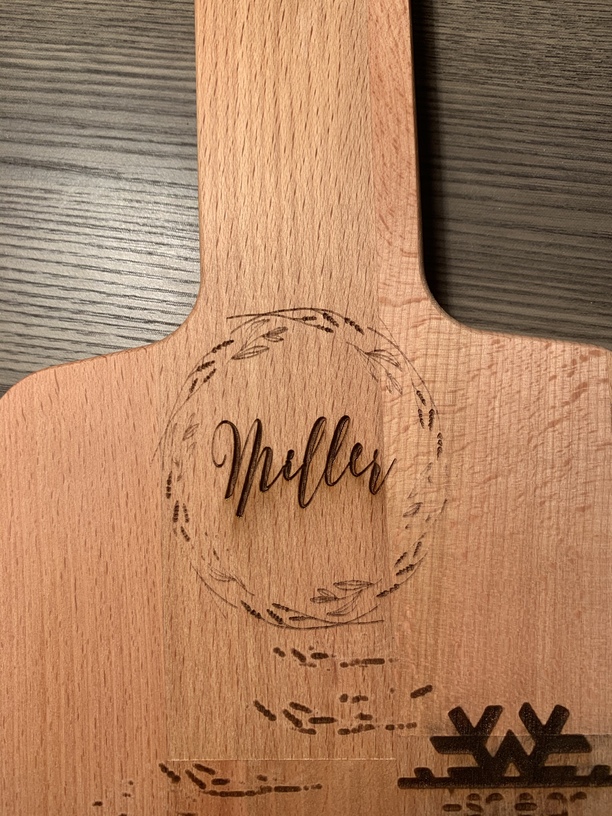
I originally took the crumb tray out because my masking paper popped up and pushed the board over. I layered the board 0.60 on a piece of cardboard 0.23 and hit set focus. The focus had to have been way off after reading what you wrote so I stuck the board back in with no mask on top of the crumb tray and finally got a result from SD setting 1000/full/270. Which still doesn’t seem like the GF default setting for maple plywood. The result was much lighter than I want (the wreath specifically).IMG_2495|375x500
The proofgrade options I get are draft, hd, sd and photo. I posted some more details to Jules with a photo. I finally got something but it still doesn’t seem right. This is exhausting who has time to adjust the settings for this machine for 6 hours (sorry venting). Appreciate you trying to help me.
Would you be willing to post your art? It looks like that board is made of 2 different kinds of wood which could lead to some issues, but it also seems that some of the art is filled and others are outlines so that gives very different looks…
That’s what you should get. What were you expecting to get?
And I still don’t know what that means. What is it about the result that you don’t think is right?
EDIT: Okay, my browser just caught up. I was able to get your photo to load, and it looks like you’re running into issues with variations in the material, which is pretty common.
I think @deirdrebeth might be on to something with the wreath engrave…if that consists of outlines, the best way to handle the wreath might be to change that wreath from an Engrave to a Score. You’ll get darker deeper lines if it’s set up to do that.
If you want to load the file here so that someone can take a look at it and tell you for sure, just drag and drop the SVG file onto a new line in a reply post. (Hit Enter first, or it will tack itself onto the text.)
Wasn’t sure if you saw the message in the Private Message you sent, you can try zipping it first…sometimes the forum messes them up if they’re not zipped.
If the board is .6" and is on top of the honeycomb tray, it is too close to the lens and could result in thick burned areas. I suggest taking the honeycomb tray out and putting something about one inch thick under your board, then using the set focus tool.