Opinions and Advice are appreciated! I have missed my GF!

MY Glowforge Family!! Oh, how I have missed you so! It has been far too long! I have been M.I.A. due to some pretty scary health issues I have/had going on. This is my first time back in my shop in quite some time. I am so glad to be back up here though!

I had a friend ask me to make a gift for her to give to her friend. What she asked me was to do a business logo sign for her business. She showed me the logo that I stole off of her webpage which is here:

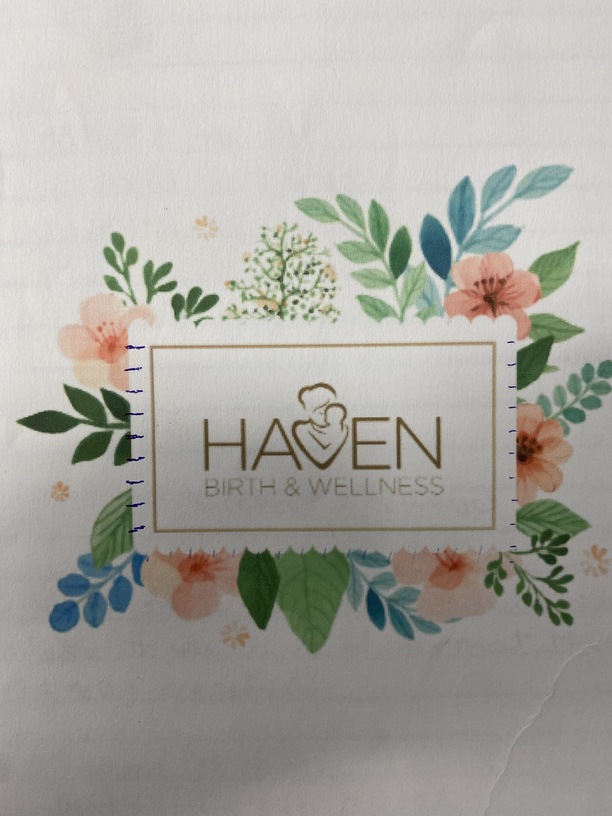
She says “if you can just make it come alive, that would be Awesome!”

My first thought was to make the top piece out of plywood, of course with wooden letters glued to it:

(Please disregard the piece of the inner frame that is not glued down yet) and then build paper flowers out of cardstock to put behind the logo. Then, have all of that attached to the main backboard, which would be framed. But I didn’t have a clue as to how I would attach the logo board up high enough to have the paper flowers behind it.

Next, I decided to do the make logo board, cut the letters out, and glue them to that, just as my first idea. Behind that, I would cut the outlines of the flowers out of plywood instead and paint them accordingly. Lastly, glue those to the backboard. Ultimately creating four separate layers ( 1-framed backboard 2-flowers 3-logo backboard 4- letters/logo). Here I have a representation of what I am talking about. Only in this picture, the flowers are cut out of card stock.

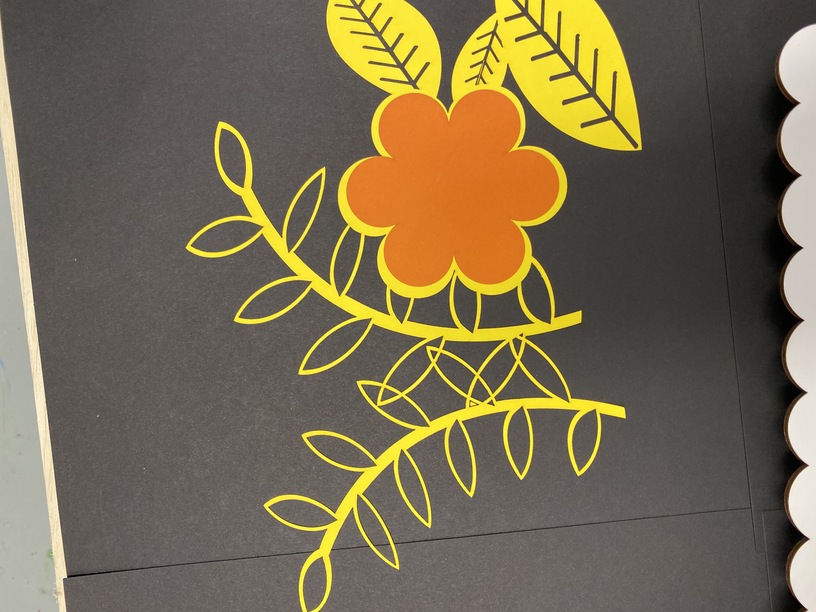
I decided to Merge the touching pieces of the flowers together in Illustrator. I am not so sure that it turned out that great due to a couple of reasons. After I cut the flowers out of wood and try to paint them to match the logo image, the paint will be turned brown due to the burn marked edges. I am not sure how I would paint them before cutting, not knowing where to paint the wood in what color. Here is a screenshot of the first Illustrator proof --when I was still brainstorming, followed by parts of the merged proof.

Okay, now that I showed yall bazillion pictures and probably have you scratching your head due to confusion, (Hopefully not) do yall think there is a better way? My fear is that the flower cutout sections will not look as good as I will need them to, specifically where the flowers/leaves/greenery merge together.
One section that I cut out of paper looks funny where the different leaves merge together. At least it does while it is cut out of paper and the paper being all one color.

On the parts that I merged, where the pieces merge, I was aiming to make one of the pieces (that touch) disappear into the background so that it would look better, but I am not that “Illustrator smart”. YET. I am learning. And will get better with time. But as for now, that’s all I have.

Another issue, which is a pretty enormous issue is painting the pieces to match the logo image. If I do the painting after each piece is cut, the paint will end up fading to ugly brown-faded edges. I don’t know of a way to paint the wood before cutting unless I could find a way to do all of this without merging the different parts of different flowers.
OR… if there was a way to print each floral piece out, from Illustrator to my Cannon ink printer so that it prints out on paper to be the exact size that it is in illustrator. If I could do that, I could do my best to paint each section accordingly. BEFORE CUTTING. And that is if the floral pieces will look ok merged.

*Will the merged pieces still look funny once they are cut out of wood and are painted accordingly? Or is there really no solution to my whole sha-bang that I have gotten myself into?
*Is there a better way to get the floral pieces close together and sometimes overlapping in Illustrator?
*Better idea on painting each piece afterward in order to avoid paint discoloration?
*Or just any advice or opinion at all??

This is honestly one of the most important jobs I have done on my GF. So any opinions mean the world! Or advice. Because I am at a standstill!

My GF people always have the best advice and guidance! And I am very thankful for that. I never would have made it this far without all of yall’s help! I wouldn’t have made it past my first print! And I appreciate it so much!

It has been so long since I have even laid eyes on my GF, much less get to touch it! So I am thrilled to even be here right now. But I surely don’t want to spend days being stuck.

If only I could come like a thief in the night and borrow some of the genius’s brains to absorb all of the “Illustrator Smarts” and then return them back to the rightful owners. Oh, what a wish!

@Jules did you know that you/your screen name are a tag option in the tag option box??? LOL

5 Likes

for the background, take a piece of “background-color-painted” draftboard, or MDF/plywood with protective mask on it. Make a very light score setting, and add registration marks to the file [on a separate layer, and with separate color]. (I’m assuming you don’t have Snap Marks; if you do, then get them into your file and operate accordingly.) Registration marks should fall into the space that will be waste/cutoff of the final piece

Score the background design, use it to tweak Illustrator file if needed. I think to get a proper merge of the leaves, you need an interior fill. Otherwise, you get these odd outline intersections.

Make sure the initial score includes the registration marks. Now you can selectively remove masking shapes and paint various leaves & flowers. You can also do it the way batik cloth is colored: remove mask for first color, paint, let dry. Re-mask those spots, then remove mask for next color, Wash, rinse, repeat. Once the painting is done, remask the registration marks.

Put the background board back in teh GF. It helps if you placed jigs/guides the first time so the board is pretty much hwere it was before. (If you have Snap Marks, then don’t worry about this part.) Do another light score of just the registration marks and adjust the board until the last score is right where the original was.

It may not look “right” via the camera view. Don’t worry about it; if your reg marks are perfectly scored after the painting, then set them to Ignore, and do the final cut or cut/engrave sequence.

There are probably other ways to do this, so don’t think this is the way. It’s just a way.

7 Likes

Another thing to think of: I’d recommend using teh logo as a guide, not a mandate. Even using colored card stock in the background would look nice. Or, use watercolor paper as in: make one sheet a green-green variation, another yellow-yellow variations, etc. Laser cut the same-color parts from each sheet, then assemble w/glue. Oh, use a spray shellac on the sheets after painting-before cutting, this should help prevent char getting into the paper pores.

2 Likes

THANKYOU!!! Definitely looking into all of that. I believe I do have snap marks. But I honestly don’t know what they are or what they are used for. But I am definitely about to look into it and see what that is all about, how to work them and use them. Thankyou!!! I am looking to see now! I appreciate it!

I am really wondering how this was done!!! This wood be a great idea, if I just knew how it was done!! So cool! The description says it was laser cut and then printed on the brooch! Check it out y’all!!! I am really interested in how this was accomplished!! These

Lasercut colored printed Brooches!

are so stinkin’ cool!

2 Likes

Looks like it could be sublimation and then they cut it out with a laser.

1 Like

Welcome back! Happy to hear you’re healthy enough to play with your :glowforge: again :smiley:

The at-home version of sublimation if you have an inkjet printer…

8 Likes

Wow, I like that! I have a sublimation set up, but I haven’t wanted to splurge on special wood or the coating…I could probably do that with my inkjet…though I think I will probably make a huge mess a few times, I’d need to practice.

2 Likes

Yeah, for the first time in like 30 years I don’t own a inkjet and now I find out about this!

3 Likes

I don’t own a laserjet. But I do have an inkjet. I’ve been thinking about the laser printers, but they are so expensive and unless I start making t-shirts and want to use that ez-weed heat transfer, I don’t have the need for one.

I got my inkjet printer three years ago on sale at Microcenter for less than 40 dollars. I love it, it’s the second Canon Pixma I’ve bought. The first one died after 6 years, and I spent 100 on it. This new one I’ve had for almost 3 years, and it’s pretty much the same model as my old one…but the sale was something crazy…25-40 dollars.

I just looked it up…I don’t know what improvements they made to warrant such a price hike, but when it came out, the normal price was 50, and I bought it for less, but now when I looked up the model number it’s crazy expensive…Canon pixma mx922.

Doh! I do have a laser (black and white) what I need is an inkjet for this :slight_smile:

1 Like

If you have a design with text, or it has to be ‘facing’ a certain way, make sure to reverse the image before printing, so the ink on wood has the correct orientation.

2 Likes

If you use something like Baltic Birch (not regular birch) plywood it is possible to clean off the goop (that is evaporated wood condensing back on your work) and then paint it. Many good ways to dissolve the goop will also dissolve MDF.

Alternatively, I would spray it with a clear acrylic that will fix the goop there, and then white (even gesso) to sharpen the colors when you apply them, and then some sort of UV proof clear to protect it if they have it in the sun.

Ok…so you are saying cut the flowers out 1st, out of Baltic Birch Plywood, and clean it with something, or spray it with something and wipe it or soak it? And then spray it with clear acrylic, and then spray it with white, then spray it with color, and then a UV proof clear spray paint?

Did I get that right?

Do you think that the pieces of leaves and branches and flowers will look ok the way that they are merged? Or should I find a way to do something else with the way that I am having to stack them? Or maybe it will look ok once painted ?

THANKYOU SOOOOO MUCH!!! I am looking all of those things up now, to see what I might have or could go get!! Thankyou!!Thankyou! Thankyou!

1 Like

I can’t tell you your own aesthetic, but If you have encapsulated the crud and provided a white base then hand painting the shapes should get nice clean colors, and a protective layer if they end up in the sun.

If you want the wood grain showing then cleaning is needed instead. I use hand sanitizer but from ammonia to Simple Green and more there are many ideas,

1 Like

Thankyou @deirdrebeth I appreciate that!!! It feels good to be back up here. When I was asked to do this, I almost said No because I just hadn’t been able to get up here. So it was out of reflex because of my new normal. Which consisted of not leaving the house. But I just couldn’t say no. So I am glad that she asked me. Because there is no telling how much longer it would have lasted.

So Thankyou for my welcome! I am hoping I can ease my way back to normal. I have been out of contact with life! Not just people, but life!

2 Likes

Welcome back to the fold, Mandy. I can only imagine how thrilled you must be to feel as you do now.

2 Likes

My intention was aimed at cutting the flowers out, and then painting them. But since I have been gone so long I have forgotten all the do’s and dont’s and a lot of stuff actually.

I said yes to this before I was even was actually able to get back in my shop. Then her baby came a lot earlier than originally expected. So now, I am in a bit of a time crunch. I know I will not lose my friend as a friend or lose that “go to person” title I have with her on doing things like this. But I don’t want to let either of them down due to my absence, and losing some of my knowledge. If that even makes sense. Lol.

1 Like

Yes!!! I am! I felt like a complete newbie the first couple of hours, LOL. But I am trying to make it all start coming back to me as fast as possible! HaHa! Thankyou!! Thankyou!!!

1 Like

Does the hand sanitizer work pretty well at getting rid of it?

I bet there came a time when you had second thoughts of using something that suddenly costed $50 a bottle that was once $2.00!!! Haha!

Even though I was not that paranoid about the Covid19 stuff, I know I probably would have!

Man, it really has been that long! I have been gone since right after all of this mess started!! WOW!

2 Likes