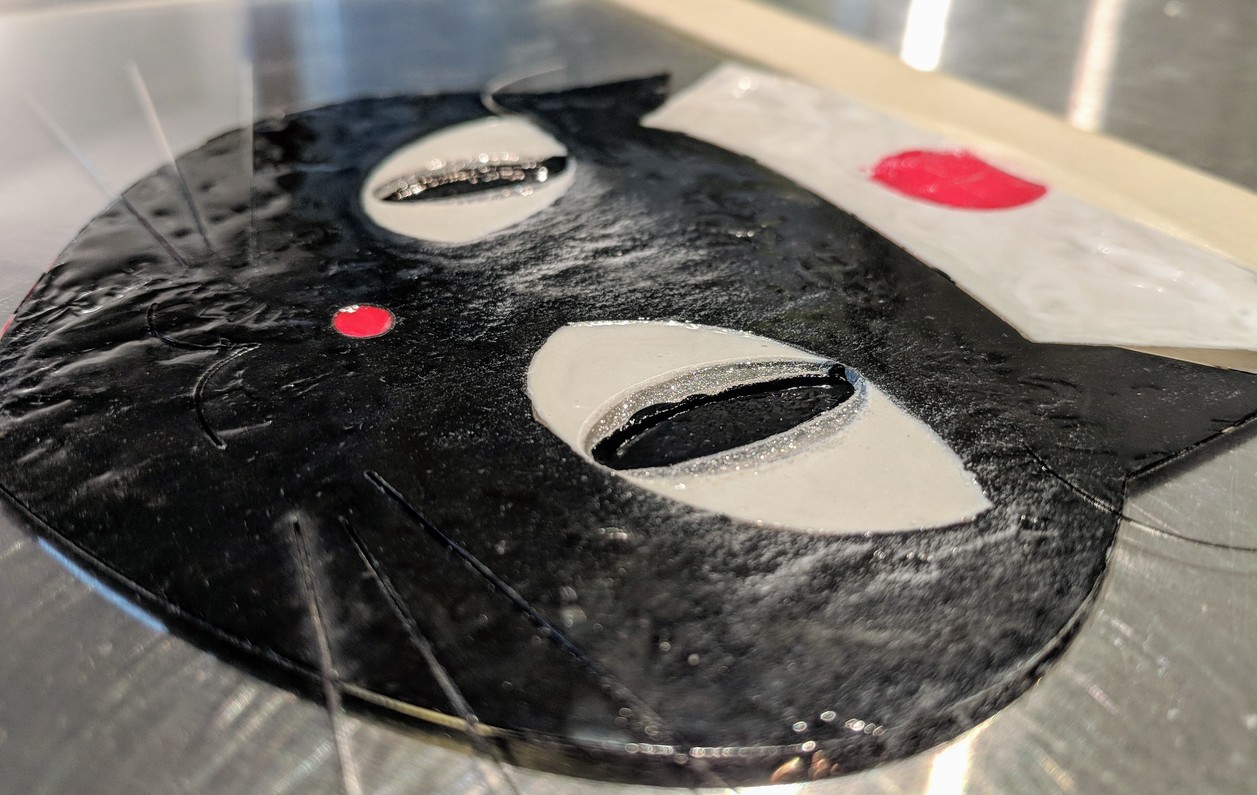
I wanted to make a countertop display sign for my friend’s veterinary practice, using her existing vector artwork. The Glowforge made this project possible for me by using it to score the masking on a piece of Proofgrade acrylic, since I’m not particularly good at free-hand painting.
This is the first full-size run of this project, after using some scrap to figure out the burn order and to tweak power settings:

Materials are Proofgrade thick acrylic, medium walnut hardwood, and Sharpie oil paint pens.
The masking material on Proofgrade acrylic works exactly as desired for masking off areas to paint. By reversing the image and working on the back side of the acrylic, I could layer the paint without damaging the final image.
I used an engrave pass to make certain sections, the badge, pupils, nose, and scarf, stand out more in the finished work. I slightly reduced the score power for cutting the masking and slightly increased it to make the finishing details pop. The surface tension of the oil paint prevented it from running into the score lines, giving a nice highlight effect between areas of paint.
Since this piece was coming in and out of the Glowforge for each paint pass, I used a three-point magnet jig for consistent registration. Hooray for the ferrous crumb tray.
I did wind up needing to edit the original artwork to remove any overlapping paths, e.g. where the hat meets the top arc of the head to prevent unwanted score lines through already-painted areas.
If I do another sign like this, I’ll add some notches to the base of the plastic so the feet can be exactly positioned and try using acrylic model paints to get more even paint coverage. The paint markers are easy to use, but I had to keep going over the body to get consistent coverage. I’d probably also use a series of three engraves to make the eyes, working from the outside in, to remove paint and add additional surface texture.
Update 2018-09-04
I have scaled this up to a full 12x18 panel of Proofgrade Medium Acrylic and have refined my approach along the way.

I switched from Sharpie oil-based pens to using acrylic paint mixed 50-50 with a pourable acrylic medium that I layered into a series of engraved wells. The pourable medium results in a paint that’s easy to spread with a brush, but that tends to stay in place. Thinning the paint with water was unsuccessful, since the result tended to bead up and streak on the acrylic panel.
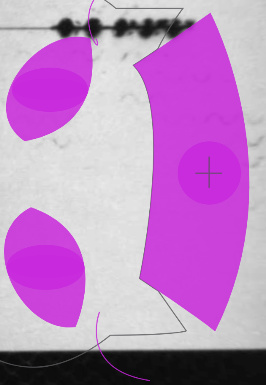
If we look at the above photo and screenshot from the GFUI, you’ll notice a series of overlapping ellipses that represent:
- Body (Black)
- Nose (Red)
- Sclera (White)
- Irises (Metal flake)
- Pupils (Black)
- Irises (Metal flake)
- Hat (White)
- Badge (Red)
The individual engrave operations were ordered going from shallowest to deepest. Each engrave pass was run at 1000 / FP / 195 LPI / 0.4". Then it was just a matter of painting each layer of the panel, working from deepest to shallowest. The body was only scored and then painted directly on the surface, using the as-supplied masking material. This approach let me lay down all of the paintable areas in a single job, which was followed up with some additional detail scoring after the paint had dried to add whiskers and other embellishments.
I probably should have lowered the focus height a touch for the innermost well, there wasn’t a whole lot of height difference between the irises and the pupils.
