PG Draftboard (fail) - [EDITED]

EDITED - SOLUTION FOUND
TLDR: Trying to engrave a project found that random letters were dropping out of the copies of the coin across a grid of 112 iterations of a single image. Looked like possible GF failure as source file was fine.

Solution: Source was Corel Draw that was Saved As an SVG. In the save, Corel’s translator dropped random letters.

Result: For non-native Inkscape users, your source file for the GF is not your AI or Affinity or Corel file, it’s the SVG that gets saved. When troubleshooting open the SVG in Inkscape to identify if it’s file based before looking at GFUI as possible issue.

Other problems noted with preview rendering and size of usable cutting space remain unresolved.

END OF TLDR SECTION; BEGIN ORIGINAL DISCOURSE (removed superfluous processing that seemed to point to continued issues with the GF rendering of the coins so future readers don’t get hung up on the details)

Trying to make some giveaway souvenir coins for our upcoming Mini MakerFaire and had an odd failure. The coins are 1.25 inches diameter and have some vector text on each side. I setup a sheet of 14x8 coins on a 20x12 artboard. The coins take up 19.125" by 11.05" centered on the board.

The front consist of engraving the text and cutting the coins from the full sheet of PG Medium Draftboard. The coins are flipped and the obverse side is engraved only.

The entire project was loaded into the GFUI and all rows and columns were present. I set the engraves to “dark” and the cut was the default. I set the obverse side engraves to ignore. Pressed Print and it gave me a 2:12 (hrs, minutes) countdown. I pressed the glowing button.

After the job was done I noticed a couple of issues. Two columns - the far left & far right did not engrave or cut. They were simply disregarded. They do not show on the GFUI as being outside the permitted work zone. They just didn’t process.

The top row also failed to process despite not being shown as outside the permissible print area.

So instead of getting 112 coins (14x8) it only cut 84 (12x7).

Then random coins starting about halfway up the stack also started to randomly lose letters - not partials or skipping engrave lines but whole letters. All of the coins were simple copies of a single one and they were all grouped before saving the SVG. In the picture below you’ll see the coins that worked I’ve flipped over to do the obverse and the ones that didn’t I left to show it’s not like the laser misfired on a horizontal pass on the engraves.

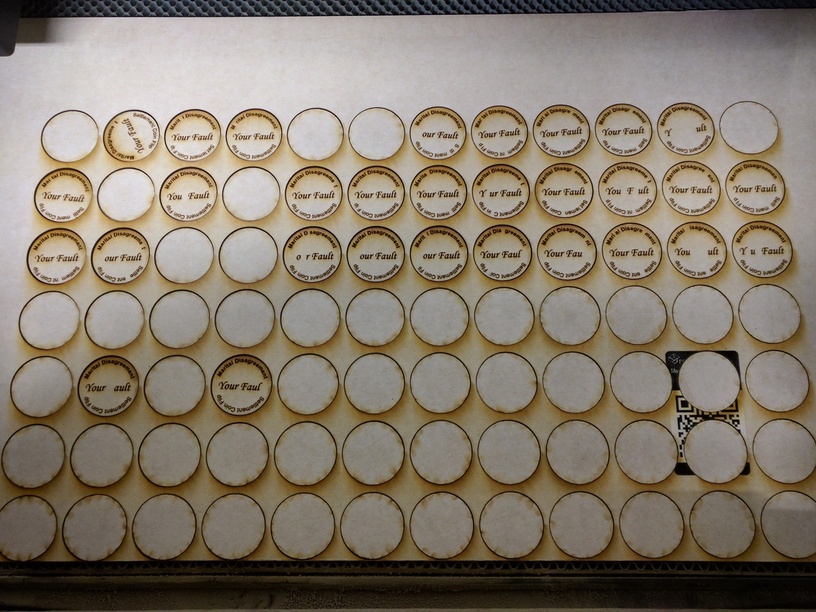
The close up shows the randomness of the letter drops. I had started flipping them over before I noticed the problem so they’re not entirely lined up correctly but since it’s not a problem skipping whole raster passes but one where it skipped letters that it did not skip in surrounding coins the picture shows that.

Of the 84 that cut, 40 were misengraved and useless - nearly a 50% failure rate.

They’re also randomly placed in the rows although most are in the upper rows. The empty spots are where the bad ones were.

IMG_20170930_163225

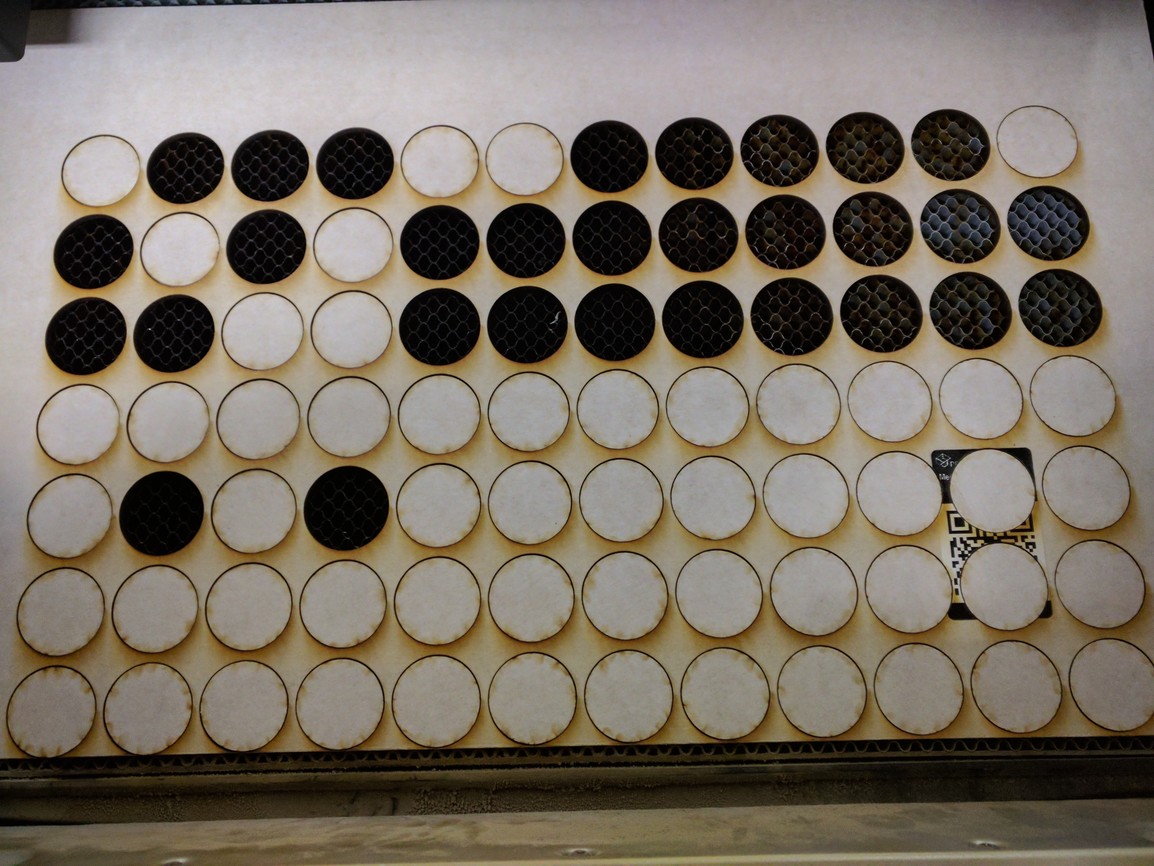
So I pulled the bad ones and put the good ones in the lower 5 rows hoping I’ll be able to get good obverse engravings. I reset the obverse from “dark” to reduce the LPI from 340 (default) to 270 hoping if it’s a size issue for the job I’ll be able to salvage the half that were okay on the front. I set the cut to Ignore and resubmitted it for print. I also deleted the two and a half rows that were now vacant since the fronts were bad - no sense in wasting processing on blank bits of the honeycomb. This time it came back with a 1:12 runtime.

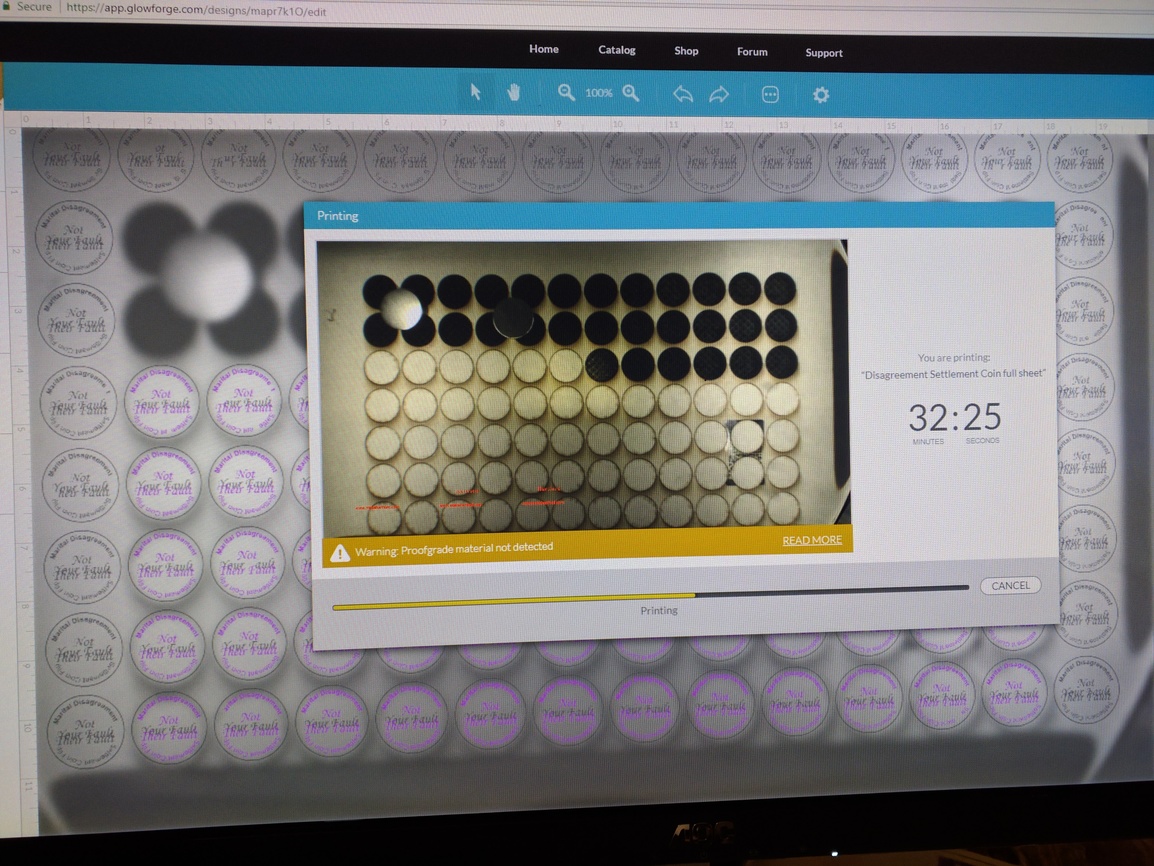
The red progress view does not show the real progress but the coins are processing all correctly for this batch.

IMG_20170930_172517

Temperature in the room is 72F, RH 38% and the time was approximately 1pm Eastern. No temp alerts or cooldowns observed.

The problems were:
o Failing to process 2 columns & 1 row despite showing within the cuttable zone
o Random dropouts of individual letters (not raster lines) in random coins across the top half of the bed
o Inaccurate rendering of the progress in the pop-up window

18 Likes

this is a very serious issue - please keep us updated with fix

4 Likes

They will pick it up as a ticket here so we’ll all see the response :slightly_smiling_face:

I’m nowhere near my GF and can’t easily log in, but if I remember correctly the useable area is smaller with an engrave than a cut. Might also be speed dependent. If I layout a design and then change from cut to engrave the useable area has bit me before. Not saying this is related but something to keep in the back of your head.

3 Likes

Correct. That’s why I set the material first (it picked it up off the QR code) then I set all my cuts & engraves and then I move it. But because I thought I was safe with under 19.5/11.5 actual design and the artboard was sized to spec I didn’t have to move anything.

Nowhere have I seen anything posted that it’s in the 17" wide arena vs the 19.5" so it never occurred to me that I still need to be cutting down full sized sheets of PG and creating smaller designs to account for a radically reduced cuttable area. :slightly_frowning_face:

3 Likes

They seem to use very low acceleration for the head when engraving. It doesn’t look much heavier than a typical 3D printer extruder with a NEMA17 motor, driven by an NEMA17, so that is surprising.

The useable size is supposed to grow over time. We’ll see. If you had cut plain circles everything should have fit. With the engraves it’s smaller, can’t remember by how much. I had posted the dimensions months ago when they made a change to increase it but it’s not like anyone can remember 175,000 posts.

1 Like

The list of features that I had to agree with in order to get my Pro had this in it:

Work Area
Ample work space to create large projects from sturdy materials.

Done?
The material rests on a 18” x 20” working bed. The printable area is 11” x 19.5”. The maximum thickness of material with tray installed is 0.5”; the maximum thickness of material with the tray removed is 2”. The focus range is 0.5”.

To Do:
When the laser is moving at maximum speed, it needs room to slow down near the top, bottom, and both sides. We’ll be updating the software to compensate for that so it can give you more working space - up to 11.5" x 20" for slow movements like cuts; less for faster motions like engraves.

Bonus:
Our original specs for thickness were only 1.5” with tray removed - we were able to increase that to 2.0” for you.

So I read it that fast engraves are nowhere near 11x19.5 yet, and while they’ll get better, it’ll still be bigger for slow cuts and fast engraves may not reach 11x19.5.

1 Like

Yeah, that doesn’t talk about the current S/W limit for engraves. It’s smaller. To be improved someday.

With 1000 engrave speed, I see an approximately 5/8" no-go area on the left margin and approximately an 1 1/4" margin on the right.

At 500 speed, I have approximately 3/8" margin on left, and 3/4" margin on right.

If I change the engrave to 100 (slowest), I have 0 margin on the left and I have a 1/2" margin on the right.

Just for thoroughness:
Approximately a 1 1/16" margin on the bottom for all engrave speeds.

4 Likes

Weird, doesn’t it engrave in both directions? If so it should be symmetrical.

Thanks. I’d have to recalculate the power settings and this would take near forever at lower speeds so it’s a trade-off between material use and time (& can’t bump against the 3 1/2 hour buffer limit).

But at 1000 (PG default) I’m seeing more of a 2.5" reduction in left side and 1.5" reduction on the right. That’s a lot more than you. Perhaps because it’s a PRU.

But what I expected to be a 4 hr job has turned into a 5 1/2 hour run plus fiddling and re-rendering time. It’d be even more but the subsequent runs are faster because I’m dropping all the first side fails out before running the second side.

I sure wouldn’t want to be on a paid job clock for this. Material costs doubled vs estimate to get half the number of units in 150% of the time. :astonished:

But I am on a personal clock because I’m trying to get all my MakerFaire stuff done this weekend because I’m heading to New Orleans for a week on business and getting back the night before the MakerFaire.

Not going to have everything I wanted ready even with a couple of all-nighters (which will endear me to SWMBO) :slightly_smiling_face:

2 Likes

The dropped letters part is just plain weird. I’ve had some pseudo-dropped letters where it came back and engraved them later, but this is clearly a different kettle of fish. Ugh.

I do wonder, though, whether “rendered” is actually rendered. I cut something this evening where the text took several addition minutes to show up in the engrave preview. Didn’t print until it did.

1 Like

The full drop of different letters vs just dropped raster lines does seem to point to a rendering issue.

Thanks for taking the time to publicly document this. I have not had dropped letters in text before. Very curious.

2 Likes

Honestly - I’m rather curious about the file. It’s not like it had problems processing it once, but multiple times. Could you post the file, @jamesdhatch?

1 Like

Thank you for posting this. We are so sorry your coins aren’t coming out as planned.

Like others have pointed out, the Glowforge Basic bed can accommodate materials measuring 18” x 20”. The maximum printable area is 11 x 19.5”, and it’s reduced somewhat when the laser operates at high speed, as it can take space for the laser to decelerate.

As for your dropped letters, we’ll investigate and get back to you when we know more. In the meantime, would you check your original design and make sure all the letters are present? In cases like these, sometimes we’ve seen parts of the design missing from the original file.

Again we are so sorry your coins didn’t print well. Best of luck with the rest of your preparations!

3 Likes

Any details on how much “somewhat” translates to? I lost several inches in both the X and Y axis.

That was the solution.

The original is a Corel Draw X8 document. The coins were created from a single coin (good) that were replicated into the grid using the Step & Replace function (create X number of duplicates Y distance apart).

In Corel all of the resulting coins are fine.

The file was then Saved As an SVG 1.1 format. One of the options (the default) when saving as SVG is to convert the text to curves/paths. This is enabled. However, it looks like something hiccuped in between Corel and the saved SVG. The SVG when opened in Inkscape shows the dropped letters in random copies of the original coin that map to the random drops in my executed job. Apparently there is a flaw in the Corel to SVG converter (using File|Save As).

Here’s the solution for other Corel users.
Corel sourced files that exhibit letter dropout when the file is saved as an SVG and run on the GF should have the SVG checked for proper conversion.

12 Likes

That is really awesome to find out! Thank you for posting what the issue was.

Looks up Coral, sees the $500 price tag, nopes back over to fusion 360

4 Likes