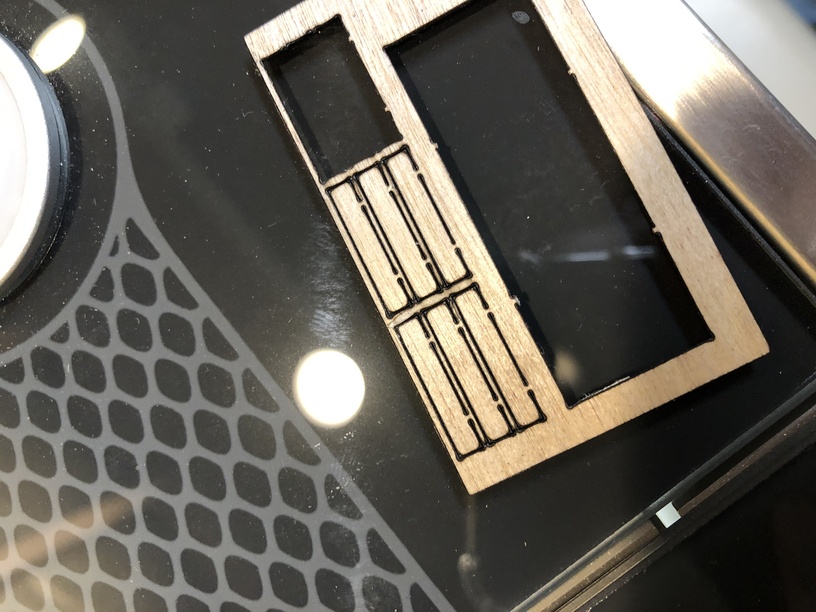
Hi All! New to Glowforge and the forums. I purchased a library of plans for very detailed, very intricate wood kits making models of buildings and such for model railroaders. I’m converting the plans from ancient formats to .svgs, and that’s going fine. When I print parts, though, I get pinhole issues in the corners of smaller bits. See below:
Any rules of thumb y’all can offer on how to avoid this? I’ve tried faster / more power and slower / less power and every combination in between. Stats:
This is very thin (1/64) birch plywood, so not proofgrade material (they don’t make it that thin)
My manual settings (Glowforge Pro) for this test were Cut @ 300/70
It’s because the laser has to slow to go around the corner, so it stays in that one spot longer. Rounding the corners a bit helps a lot, and using the lowest power setting you can. Sometimes it’s worth doing two low power passes instead of one high power one.
If you do a forum search on “corner burn” you’ll probably find additional information.
one thing you can do with some of those edges/corners is have the lines cut slightly past the corners. if it changes directions on the corner, you’re going to get overburn. if it runs past the edge and then starts a new line not on the corner, there’s no pause as it changes direction. that doesn’t work with everything, but it looks like it would work with your example.
Nice! That’s a great thought, too. We will tinker.
Anybody have a rule of thumb to share for multiple passes? For instance, if 300/70 cuts through in one pass, is it as simple as doing 300/35 for two passes to achieve the same effect? Or is there more to it than that?
Okay. Thanks! We’re using some thin chipboard to prevent flashback on the thin stuff, and that’s definitely helping. Sounds like we need to slow down, decrease power, and try multiple passes.
I never used more than 200 speed on anything thin. Even then I could see the corner issues but it was as slow as I was willing to go. Still only did single pass though
I was going to suggest around 150 speed and find the necessary power.
Going faster definitely won’t help, it only means it has decelerate more and depending upon how intricate the designs are, it can lead to different results in very intricate areas vs non-intricate/straightaway areas.
Don’t know if this will help your problem or not, but since i’m a model railroader i make my own building from plans I purchase as well and turn into SVG’s. One thing I noticed is that when you zoom in on the corners and look at the paths there are two nodes on each of the corners. I delete one and then straighten the line between the two ends nodes. This stopped mine from creating the pinholes at the corners.
Hard telling because the part is so small but it does look like the burn lines seem a bit wide for such thin material. Is the focus set correctly? Lens in correct. Just eliminating possibilities in addition to others.
If you have the chipboard behind the 1/64" ply, then your material thickness should be the both of their heights added together. And both should be measured with a calipers to get actual dimensions rather than nominal. With such small pieces and thin materials, differences add up quickly.
Have you physically watched the cut? Another thing that can contribute to the observation @marmak3261 made is multiple passes. A lot of times, duplicate lines get stacked on top of one another and the Glowforge just thinks, “woohoo, another line to cut!”
Autofocus should be (unless you’re manually changing the focus height) taking a reading and setting itself accordingly (provided the measurement beam is hitting the material, etc.). It’s hard to get a sense of just how big the burn channel looks because it’s definitely a close-up image - but they do look very dark (which could be just the picture too).
First thing to do is put the wood on masking material. You will still get flash back but it will be on the masking material. If you are double burning any actual burning in the joint between two materials will maintain itself easier.
The second point is only partially useful but a straight line where the laser turns on and off does not slow down and make the pin hole. So if a series of straight lines are connected and then the space between opened the laser does them all as one line without stopping turning the laser off and on instead of continuous. You will still get pinholes where it stops but even then you can often have those places beyond the work . Doing this is a great deal of work but if the result is worth the effort…