As I set up a means of high accuracy I had made many cuts from the same location over several hours the apparent place of cutting was over a half inch below the actual place of cutting so I made the adjustment and was able to run several prints of proof grade maple and PG MDF as well as some HD plywood. Then just as a new cut was starting we lost power for ten seconds.
The Glowforge halted in place and when power was restored went through its routines as it had just been powered up the computer went to its own battery so did not lose power but the internet was dropped and took several minutes to restore meanwhile the Gfui continued to act like it was actually cutting something stepping down the timer while the Glowforge was waiting for instructions.
I presumed that restarting the cut would continue as before but while bit had been a half an inch off suddenly is was printing where it said and ruined the design and also the tile being used to set the point. But I am still having trouble getting even a cartoon photo engrave to show a decent range of shades beyond a few close browns.
The countdown was just your computer continuing it’s already loaded info. The GF was knocked completely offline and after calibration waited to be given new info.
Yes you point up a good design suggestion of enough battery yo keep the brain alive for a few hours so as power is restored it is able to pick up as it left off.
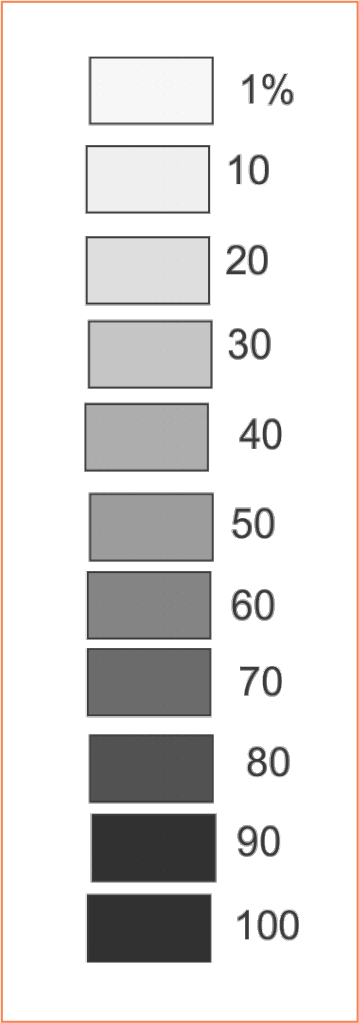
I saw this when I did some engrave tests using % greys. The differences only showed when the power was kept to 100 versus FULL. (on a PRO)
FULL showed almost no shade shift from about 50% up.
Several shade files to choose from on this forum, most do more than mine did, but it was easy to do.
I will include my file in the zip under the picture below. It was useful for setting up some 3D engrave power settings for a few wood types I had gotten hold of. (ignore the orange cutout if just running multiple tests back to back)
I have had a similar problem. I thought I remembered this being a specific benefit to the glowforge; that it would resume exactly where left off once reconnected.
The alignment drifts a little bit every time you do a print. Over time and many prints this ‘little bit’ accumulates into a noticeable drift. Rebooting resets everything. Here the post that dan points out the issue:
And here is a post that discusses this in technical detail:
Once the motion path has been sent to the GF it doesn’t matter if you have the internet connected to the unit. It will continue doing it’s thing without a connection. But if it loses power then it is the same as your desktop computer losing power. Reboots and remembers nothing.
OK, so if the part of the house with internet loses power but not the part of the house with the Glowforge everything is fine. Cool if that ever happens. The computer has its own battery being a gaming laptop so will only notice if the power is off for a few hours not the fraction of a second as is common here.
Thanks for reaching out. I’m sorry about your print.
Most print jobs fit in memory, so you only need the connection to start the print. If you lose your internet connection while printing it will finish. However, if you lose power your Glowforge will restart like @rpegg said.
Regarding the alignment issue you experienced, the software on your Glowforge is responsible for ensuring that the print lands on the material in the same place as the preview. When you’re done with a print, let a new image load. If the print appears on screen far from where it was supposed to go, you may have an alignment problem.
Most alignment problems come from the material being closer or farther from the camera than expected. While the software is still improving, you can take these steps for the most accurate alignment results:
Use Proofgrade™ materials.
If you don’t use Proofgrade materials, use a precision set of calipers to measure your material, and enter the thickness in the “uncertified materials” dialog.
Use material that is not warped or tilted.
Place your design near the center of the bed.
Clean the area underneath your crumb tray, particularly the four indentations on the floor.
Reboot the machine. Alignment can drift over time, particularly if you bump the head of your Glowforge while removing material.
Let me know how it goes! Should you finish all of these steps, and find that you have an alignment error of more than 1/4", please contact us so we can investigate.
I have done all these things and still the alignment drifts. If the design is complex I put a rectangle around it and score that very lightly( 10\500) As the head slows at sharp corners the four resulting dots are useful and not obtrusive.
I suppose that the next design might be off more as a result but it does seem to repeat fairly precisely for that run that I frequently do each part separately as I often wish to run the engrave a second time if it is too shallow the first time or not a strong enough definition.
Could you send me some screenshots that show the alignment drifting over time by doing the following:
We included an extra piece of Draftboard in your starter materials shipment for troubleshooting. Please place it in the bed and open the Gift of Good measure.
Set the Score and Cut steps to ignore and just print the Engrave step of the design.
Without moving the design or the material, take a screenshot of the Workspace that includes the design, the print, and the rulers in the app.
Mac: Press Shift-Command-4 and click and drag a box around your image. You’ll find the screenshot file saved on your desktop.
Windows: Click on the Start Menu and search for the Snipping Tool. Open the Snipping Tool > New then click and drag a box around your image. Click the Save icon and name and save your file.
Set the Engrave step to ignore, then set the next two steps to Score and print the design.
Repeat step 3.
Set the Score steps to ignore, and set the last two steps to Cut and print the design.
To recreate the problem I would have to plan a power failure and have it occur in the middle of the print again. I now realize that the scan resets on reboot as I did not realize at that time and so even if it happened again I would know and make the adjustments. It was a large change, especially at the middle bottom of the work area, but I have not seen that extreme since.
I’m sorry – it sounds like we misunderstood what happened. I’m going to close this for now – if you have another question, or if I’m missing part of this one, please post a new thread and we’ll reply!