I wasn’t the one with the problem, I don’t use AI, but they said they had issues with scaling in SVG which is why they had to use PDF. I just told them it was a known issue with a workaround, to the best of my knowledge.
1 Like
It’s called “outline stroke”. (Object/path/outline stroke)
As @shop mentioned you can actually skip all the SVG and PDF issues since you’re using AI. Just copy/paste artwork from AI into the GF dashboard screen using keyboard commands. There are no sizing issues this way.
2 Likes
The GFUI has to interpret what you want it to do with complex vector images, and if you have clip paths, overlapping paths, or open paths anywhere in the design it’s going to throw an error. The program can’t read what the intent is.
Your file has both overlapping paths and open paths…I’m not sure if you can see it in this closeup, but look at the blue outlines:
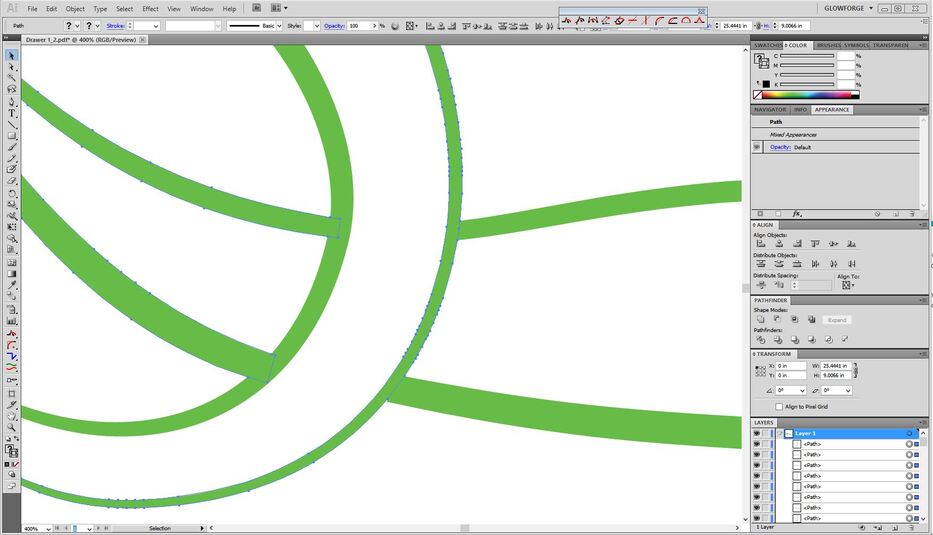
You can make that work by closing the shapes, then filling the shapes and creating a joined Compound Path in order for the GFUI to be able to interpret it…BUT, by far the easiest way to deal with a complex vector engrave is to rasterize it before you send it to the GFUI. That way you get to make it do whatever you intended. It generally does not add error to the raster image, and the GFUI is going to rasterize vector engraves once it gets them anyway.
It’s just the fewest number of steps to fix the problem.
2 Likes
Agreed on the raster. Does take longer to run, but fewer errors.
It’s possible that some of my issues with this print process (not b/c of it being vector or raster) has to do with my Glowforge. Just sent it back to HQ for some (unidentified as yet) repairs.
Jules I did my first print on the pass through but for some reason the system would not recognize the approve material and even though I kept putting the material somehow it still did not cut all the way. Do you h e any recommendations or is my Beta software not working. I sent a message to support however they said to log on to this feed to see if I find someone with same issues  was so excited to do my 1st big pri t and got super stress
It’s probably a good idea to get some cardboard to test your first prints on…it can be expensive to run tests on the large sheet proofgrade. (You are going to mess up at least a couple dozen prints learning how to use it…guaranteed.)
If it is not cutting all the way through, you might have to make adjustments to your settings…slow the speed down by about 10 points…because we don’t get a second chance with this. Using the passthrough is an Advanced function. Run some tests on the wood first, in a corner somewhere, and make sure the beam always cuts through the material. (I automatically slow the speed down by 10 points to be safe.)
Also:
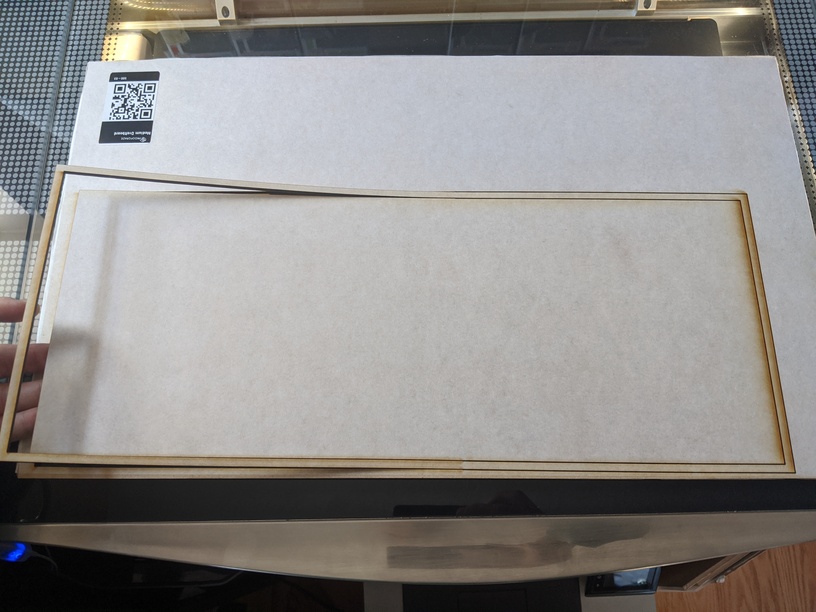
First: This one is critically important - start the print with the material pressed flush against the left lip of the tray, and keep it tight against the left lip during each transfer. If you are working on something that is skinny, you can use a spacer bar against the left lip to bring the material out into printing range. But do not start with the material against the right lip of the tray. Place your design against the left edge also. The mechanics of the way the system works and what the camera can see in each stage, can make it fail in the final stages if you have the material too far over to the right, and the design runs too close to the right edge.
Second: Make sure the material is pinned down flat at all times. Use the Honeycomb Pins not magnets.
Third: Be sure the weight of the material is supported both in front of the machine and behind the machine. Once partial cuts are in place, the weight of the material hanging down will cause parts to pop up in the bed, and can cause shadows that will confuse the camera. (In addition to ruining some of the work if you are going for a complex design with multiple operations.)
Fourth: The way that the alignment works is that the camera is matching before and after pictures…sometimes you have to leave center cutouts in place near the match point in order for the camera to recognize the match point. Easiest way to do this is to just remove interior cuts below about an inch or two underneath the match point, but then tape the ones near the match point with a strip of clear tape before shifting the section, so they don’t get hung up while shifting the material.
Those are the most common causes of alignment matching failure, so if any of those are applicable, make some adjustments to the way you’re doing it and see if it helps.
The most common cause of flat out “fail-to-print” errors are file errors. Get into the habit of testing them once on cardboard if you’ve never run that particular file before.
Passthrough cuts require a lot of user interaction and thought up front, but they are tremendous time savers overall. You just need to get familiar with the process. 
I have the Pro - using the beta passthrough (not for the first time) and trying to cut through PG draftboard. I have cleaned the machine, and it cuts perfectly when I am not using the passthrough. My material is flat, but it looks as if the machine isn’t focusing correctly as the lines are thicker and charred. I’ve checked to see if the lens is loose, it’s not. I’ve read through the tutorial multiple times and that did not resolve the issue either. I can’t think of anything else to try. Please help! 
Last cut attempt was 8/31/2020 at 8:03 pm
1 Like
Okay try setting up a Custom setting and using these numbers for Cut through on the Medium thickness material : 165/Full/Focal point 0.14
Make sure the material is pinned down flat with honeycomb pins…do not rely on “it looks flat”. You have to pin it down.
And watch it while it cuts. If it looks like it is flaming up too much you might have a different problem.
There have been instances where prints have behaved differently when using passthrough.
If you note the date/time of the print, they can check the logs to see what settings were actually being sent down to the machine during your print.
Thanks! Ok, tried that. Still didn’t cut through and no flame ups.
How thick is the material? Do you have a set of calipers? Take a few measurements and see if it has gotten swollen from humidity. That setting should get you through the Medium draftboard, it’s slower than the default.
My calipers say about .133 - .137
That might explain part of the problem…the material defaults are set for 0.125" thick.
You can try slowing it down a little bit more, but those settings I gave you should be getting pretty close to getting through material that is in the 0.134" range. Maybe try 5 points slower on the speed.
Did you get the email on the settings tuning that was sent out to affected users? If so, you’ll need to wait anyway…I don’t think they have rolled it out yet. (After Sept 2nd.)
It will cut on the first pass but not on second or third passthrough. It looks by the thickness of the lines that it’s engraving not cutting. I have cleaned lenses but I only have this problem on passthrough mode.
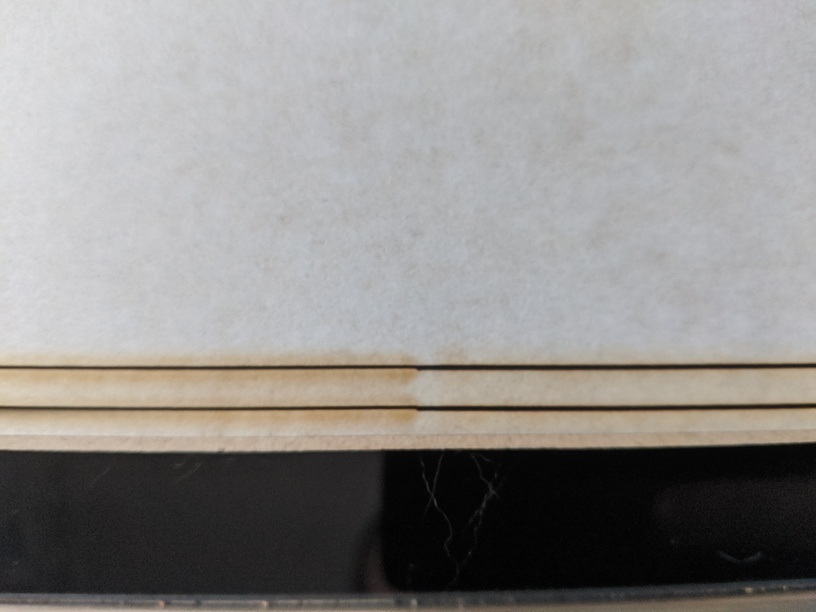
looks like yet another change in focus or power issue. This bug/issue keeps popping up.
1 Like
The thing is… a focus change is a very deliberate action - and there’s no reason for it between steps in a passthrough print.
The lens is pretty much “locked” in position unless there is a commanded change, and it takes a few seconds to change it.
1 Like
indeed, which is why it amazes me that this has not been sorted.
I’m still using the workaround for the cutting issue I’ve had since I got the beta. I manually input focus height to .01 inch and it cuts everything perfect. If I let it auto focus or set focus, it won’t cut anything.
This is a quickie primer on how to adjust settings slightly to get cut through if you are having trouble getting it to cut completely through.
To make the machine cut through, you might need to adjust your settings. If you haven’t figured out how to do that yet, you need to get comfortable with changing settings. It’s best to do that while NOT using the Passthrough though, so run a few tests on scraps of the material that you want to use in the passthrough. If that is Medium Basswood Plywood for instance, you will do this:
- Put a small sheet or scrap of Medium Basswood Plywood in the machine.
- Create a small design like a 1 inch square to cut. (You can use the Insert Shape tool in the toolbar at the top.)
- Make sure you have chosen Medium Basswood Plywood from the dropdown behind the Unknown button.
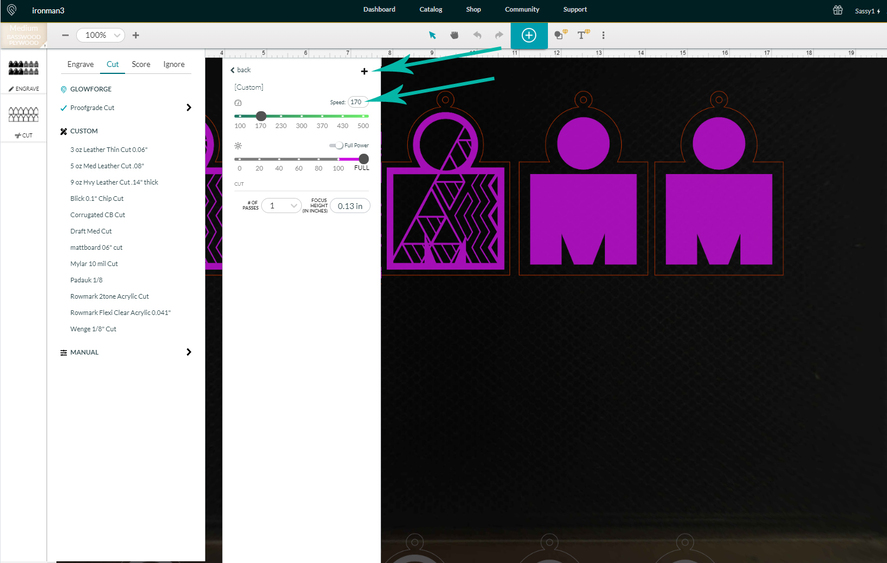
- Click on the CUT operation in the thumbnail column. Then click the Carat to the right of the Proofgrade Cut.
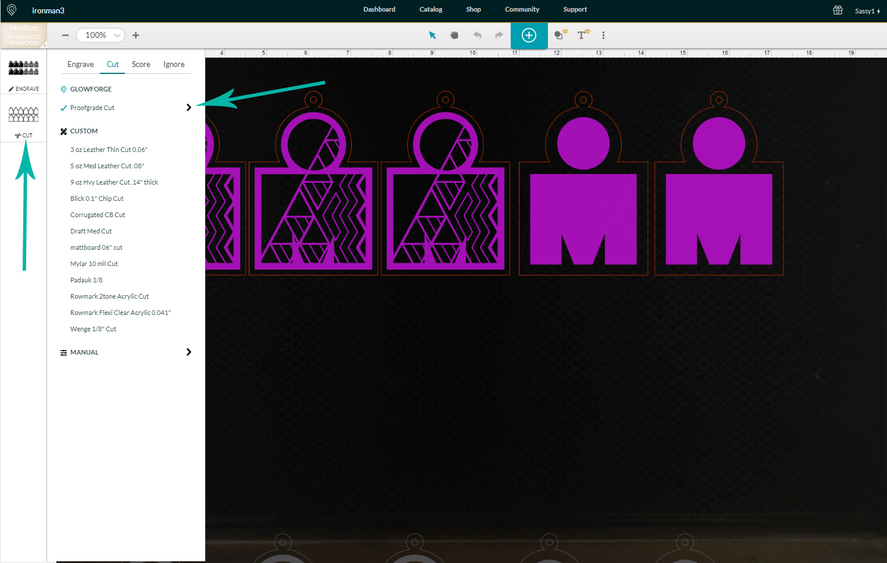
- The settings that pop out will be the default settings for that material. Lower the Speed Value shown by 5 to 10 points…no more.
-
Click outside of the box to close it, and Print the square. If you get a good clean cut all around, that will be the setting you want to use. If not, lower the speed by another 5 points and run another Print. Repeat until you do get a clean cut through the material.
-
Open the settings again. Click on the little Plus sign above the Speed Value. (shown above)
-
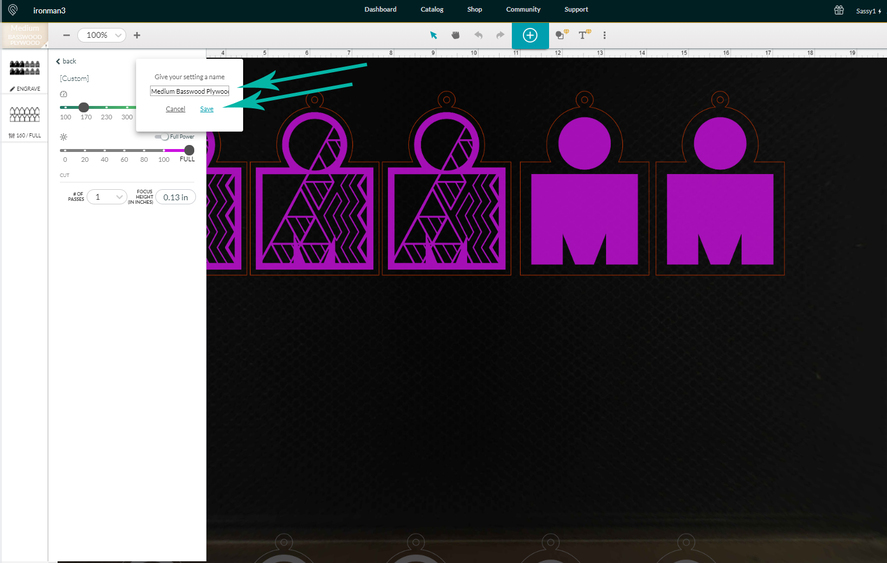
Give the Setting a Name and Save it.
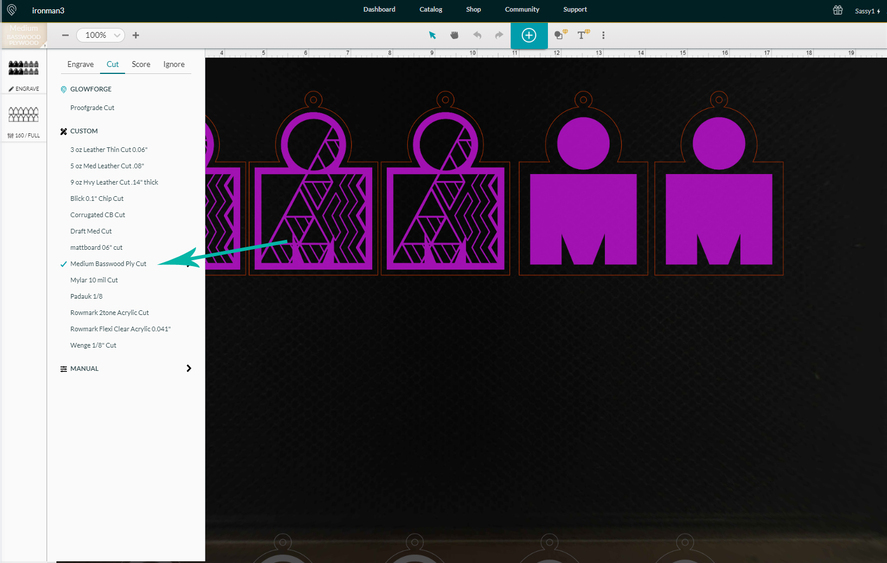
- When you run the Passthrough, you will click on this setting instead of the Proofgrade Setting to select it for use on the passthrough project. Just click on the thumbnail, then on that Custom Setting.
If you want more information on creating and saving your own settings, you can read about it here:
3 Likes
Jules do you think this is the issue with my machine do I need to e-mail GF to get the setting tuning? This is what my machine does, it wont cut on the 1st try but on the 2nd it does or it doesn’t. Is like I have to guess I will try your recommendations of today see what happens