Problems cutting through materials all the way

Yeah, it was confusing for a few folks a while back before they posted pictures…just wanted to check the orientation.

1 Like

Gotcha. Here is what mine looks like installed.

Yep. That looks right.

1 Like

Looks right to me.

If you’re bored and want to keep testing, I would set up the file with some lines, different focal points and see what they look like. It looks to me more like a focus issue than anything else, but I can’t tell you the cause of it, with things going on like the warped tray, etc. the line test will at least show you if it’s able to change the focus.

1 Like

Thanks, I’m certainly not bored, but very determined. Anything I can do to help gather data to solve the problem seems like it will help. I’ve probably got about 8 hours into troubleshooting this by now…

I’ll look into doing the line test and learning about different focal points. Thanks for suggesting it.

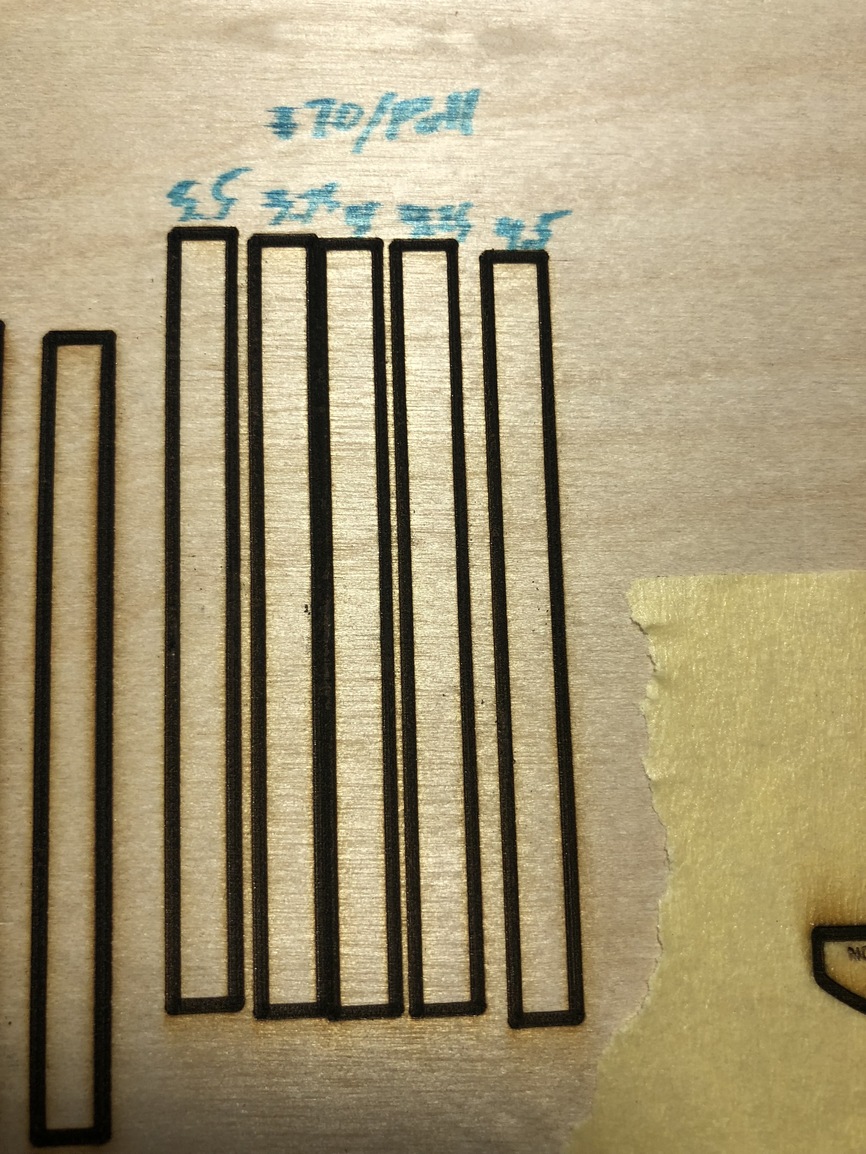
I did some testing with what you suggested, and here are the results. I made a rectangle and cut at 5 different focal lengths. The plywood thickness is 3mm. I used honeycomb pin downs, and checked to make sure there was no give in the plywood before I cut it.

The far left were done at 3mm, but double passes (the boxes not labeled).

The ones labeled were single pass cuts in order of thickness in .25 mm increments- 3.5mm, 3.75, 4, 4.25. I ran 170/full for all passes. I honestly can’t tell a difference in any of them. In all cases, the cutting probably went no more than .5mm deep, if that.

IMG_1659

I also tried cutting through cardboard, and couldn’t do that either. It went a little deeper but I was worried I was going to catch it on fire if I slowed the laser down anymore.

IMG_1660

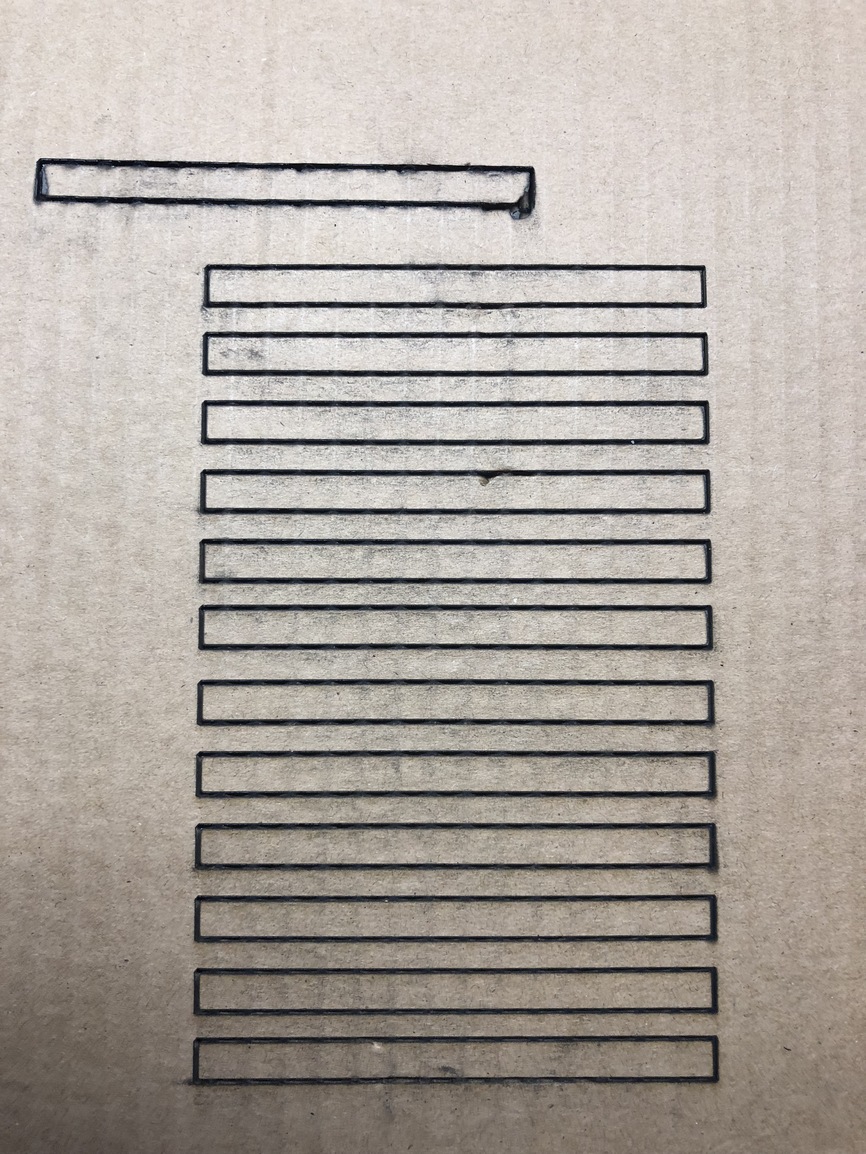
I can’t imagine I’m doing something so wrong that the laser can’t even cut through cardboard, in this case it’s only 2.8mm thick. I used power 100, and tried speeds of 150 and 125. (The top box was done at 125). It seems like people are doing it on here all the time with ease.

Based on this, does it point to my Glowforge having some kind of focus issue? Will GF only support me on this issue if I use their Proofgrade material? It looks like they shipped out my replacement crumb tray. I just really didn’t want to wait until it gets here, but I’m not sure if they will consider this as a valid test. (I did measure the crumb tray I have, and it’s only the honeycomb that is warped on the far right side- I was able to get the wobble in the tray out by putting some tape over the divet, and checked the level).

Interesting. I found another post, and it looks like this person has a very similar issue, and the resolution was to get a new unit.

Hmm. Those lines are pretty thick which makes me think your lens is in upside down.

1 Like

Yeah, someone else thought that as well but I think we confirmed it’s in correctly. I also triple checked it, looked at the instructions, and took it out and put it back in a few times just to make sure I heard the “click” and didn’t push it in too far.

It’s possible that you might indeed have a focusing issue with the machine, (one that you can’t fix through cleaning and adjusting the lens), but you are not going to be able to test for it accurately until you get the new tray in.

When the new tray comes in, you can retest for these issues on the Proofgrade draftboard, and at that point Support will be able to see the metrics for the machine and let you know what’s going on.

Until then…i dunno…maybe work on a few designs? (It’s what I do when I’m not working.) There’s nothing else to test until the tray gets there.

3 Likes

I think you are right, waiting is my best option at this point. I emailed support as well to see if they have any additional recommendations to expedite my testing.

I was really hoping to be able to have things done for a project with my kids, but realistically I doubt I’ll have time now. If the tray doesn’t fix my issues, I am guessing it may take 2-3 weeks minimum for additional troubleshooting and get a replacement. That will be very unfortunate.

Just to make sure - when you were running the job - they were separate operations on the left. You set the material height for actual material thickness. And then changed the focal height within the settings for each operation.

I saw support responded on your previous topic about the material height not being what was expected for the material in question.

1 Like

Yes each one was a separate job, and I set the focal length each time. So a total of 5 separate prints. Also, I did set the material thickness (unknown material type) to 3mm. On the original support issue, I don’t know how much higher they were thinking it was. It was set to the default of .13 inches and I didn’t change anything. It may be because the PG board was offset due to the warp in the far right crum tray which I think is a good 2-3mm of warping in the honeycomb.

Just wanted to make sure the material height entry differed from the focal height entry.

If the two fields are the same, then it will use autofocus. If the fields are different, it will set the focus to match your entry in focal height field.

Makes sense. So the first run on the ones I accidentally double cut to the far left were done with autofocus since both material height and focus was set to 3mm. After that, I increased the focus in increments of .25. so it would have been different than the material thickness.

Another data point for troubleshooting- I think this is going to be my last for a while. I printed out the risers that are the same height as the crumb tray, found here: Risers to Make Lasering Thick Materials EASY

I set my PG Draftboard on top, and it seemed to fit nice and flat. Unfortunately, it did not cut through after 2 passes. :frowning:

I also noticed, with or without the crumb tray, it isn’t detecting that I’m using PG materials, and the camera doesn’t seem to be in focus. I even tried adjusting the material height manually a few times (+/- 2 mm in either direction) and it didn’t help.

Here is what my GF looks like when I have the PG Medium Draftboard in. (Crumb Tray, or 3d printed risers):

Everything I see indicates a focus issue. Especially with the cuts all looking the same after you manually changed the focal height for each operation. If that was done correctly, it should have changed the focus point for each job and the cut lines would look different.

The camera focus is fixed from the factory and won’t inhibit the cutting ability. I don’t know why some of them are that fuzzy. You’d only have to be close with that wide of a lens for everything to stay in focus. That said, the lens doesn’t need perfect focus generally to read the QR codes.

All in all, I think the reality here is that you’ll need to get a proper crumbtray in, and then cut the gift of good measure to see what it looks like. (To get actual Glowforge support - it needs to be Proofgrade material on a proper crumbtray, with a known good file from GF - to eliminate other variables).

Presumably one of those pins in the ribbon cable connecting the head also controls the AF motor, so it might be worth checking to make sure the ribbon connector is seated correctly. If so, disconnect it, take a picture of the pins and post it up here.

3 Likes

I just double checked the seating of the connector, and took a picture of the pins and everything looks good. From my limited understanding and research, I think you are right- it appears to be some kind of focus issue. Too bad there isn’t some kind of lens calibration routine you can run to test it. I am not sure if the lens is even moving.

Thanks again for the suggestions.

After doing some tests and thinking about this, I have a hypothesis on what is wrong, but I’m not really sure how to test it. It seems like in the tests I’ve tried, engraving looks pretty decent and isn’t out of focus. However, cutting seems to be out of focus because the lines are wider, based on the feedback that people have shared in this post after looking at my cutting attempts.

Is it possible that the movement range of my lens is “stuck”, or maybe limited? Perhaps it can move appropriately for engraving, but the movement it needs to make to focus for cutting isn’t working- assuming it needs larger movement. I really don’t know how much movement is required for the lens to make on cutting vs. engraving, but it’s just an idea.

They’ll be the same between engrave and a cut.

Basically, the head has a focus mechanism with a number of steps/positions. The material height is either measured by the scan to set the focal height, or it uses your manual focal height setting, and then it adjusts the lens to the appropriate position which correlates to the distance.

I’m not sure if your engrave is actually in focus either. With an engrave you have a lot more leeway than a cut.

Here’s a Gift of Good measure i did a while back. You might be able to compare it to yours.

The good news is that if it is out-of-focus, and you’re happy now with the engraving, you’re going to be really happy when it’s right. :slight_smile:

image

2 Likes

Is it possible the cut lines are actually 2 lines close together from an expand operation? Zooming in to ridiculous magnification should reveal that if it’s the case.

1 Like