Proofgrade Ply Samples

Jules put together JulesTest samples.zip (8.2 KB)
as a visual reference. Gather some scrap and run it.

Each of the cherry, maple, and walnut with the mask on and off, the difference is obvious.

Makes a handy reference.
Be sure to note the LPI and speed.

Thanks Jules :purple_heart:

52 Likes

What settings should be used for LPI and Speed? Would be neat to put that in small print on the samples too!

1 Like

It’s a matter of preference. I ran these at full speed and 270 LPI.

Yeah, too bad I didn’t think of it before I pushed the button.
:roll_eyes:

3 Likes

Oh cool! Glad to see someone getting some use out of them! :grinning:

2 Likes

Those are nice. :slight_smile:

1 Like

These are great. I have also been slowly putting together “swatches” for the materials I plan on using.

1 Like

very nice thanks a lot !

1 Like

New user here - when I upload the file to my glowforge it gives me a message “your file has many colors, this will result in a lot of steps” and then it sets everything at the predefined settings for proof material - what am I missing. Thanks for the assistance.

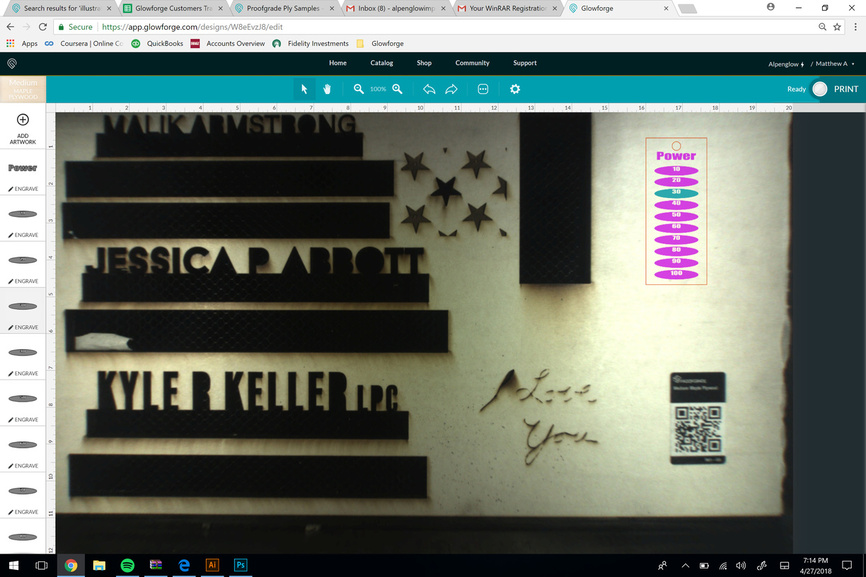
That’s actually just a reminder to you that some your operations might be hiding out of sight underneath the edge of the screen…you might need to scroll down (middle button of the mouse with the cursor hovering over the thumbnail column at the left), in order to see all of the parts.

This is what it’s giving me, but when it engraves there is no difference in intensity. I feel like I’m missing something. The file should still be SVG, correct?

Yeah, but you have to go in and manually code the settings for each of those if you want to see the differences.

(Otherwise it just uses the same Proofgrade default settings on all of the ovals.)

Gotcha, thanks so much!

1 Like