Help me out here.
I see references to prototyping with corrugated cardboard. I see a globe in the promo video that is made entirely of corrugated cardboard.
I’ll share what little I’ve learned. Use the setting that barely gets through. 100/130 is prime in my experiments but experiments are just that, do your own.
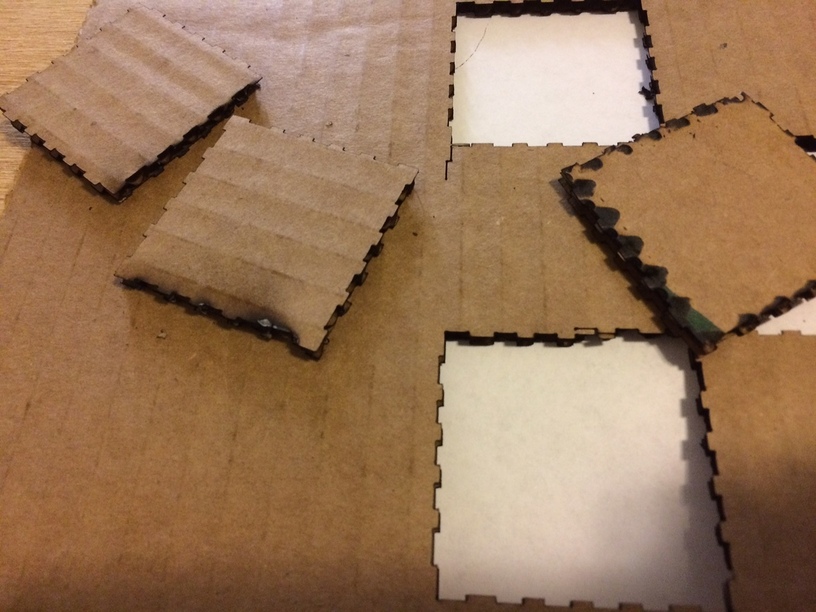
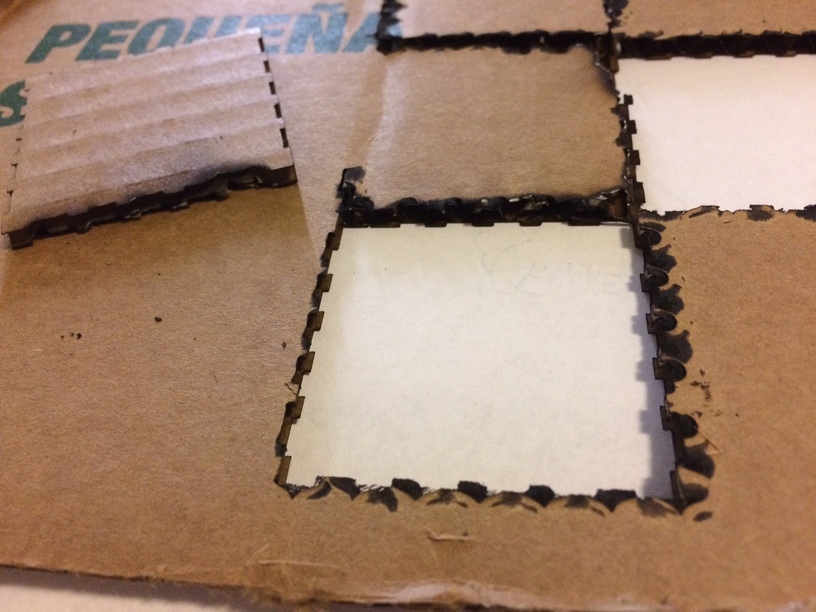
One other problem you’re going to see with corrugated cardboard (that I also saw with foamcore) - sharp corners are going to cause overburning because the machine pauses for a split second and lets the beam remain in one place while it turns.
It does look like a different form of cardboard, at least the images I noticed. It appears to lack the air layers of the typical corrugated box. that would make a huge difference.
I do 40/60. This is one case where doing a test of different colored shapes will help you decide what you think should work. This setting for me gives a nice kerf and not much flashback and avoids a conflagration. Barely a flame on this.
.15" cardboard. You do have to test because cardboard thicknesses vary.
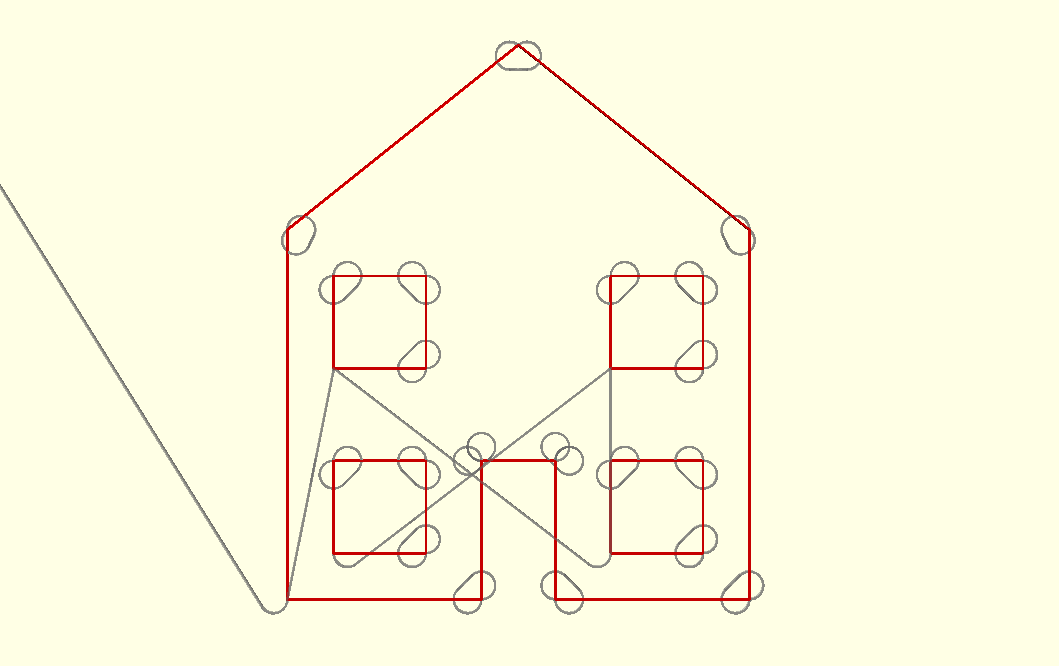
The problem is even with separate lines it will start slowly and stop, so over burn at each end. To laser without over burning it needs to accelerate before turning the laser on, I.e. hit the ground running. At corners it should turn the laser off and orbit around to start the next line at full speed. Here is an example:
The grey lines are laser off moves, the red lines are laser on cuts, always travelling at full speed.
ok, stupid question and I’m actually interested in this. What is the benefit to having the ovals instead of circles? And also, why make the “ovals” inside the shape instead of outside the shape? (I would think that the top two corners of the “door” would be the most efficient way to approach ALL the corners?)
A single circle would just come back to where you started going in the same direction but what you want to do is get back to where you started travelling in the new direction. The easiest way I could think of is to have two circles joined by a common tangent. It can be any path that achieves the same change in direction without exceeding the maximum axis acceleration. They would be ellipses on a GF.
Because having them on the inside means you overshoot the perimeter by less and so can use more of the work space.
This pattern allows the head to run at constant linear velocity with the radius of the circle determined by v^2 / a. There is probably a shorter path where the head slows down and accelerates again allowing it to take a tighter curve. This was just something I knocked up in OpenSCAD.
Has anybody tried a two or three pass cut on corrugated cardboard? One pass to cut the top layer and one to cut the bottom. Or a third to do the inner corrugation. Instead of trying to blast through all three layers at once.
It might keep the power down to a level that won’t start fires. Or it might not.
Yes. I have with thicker cardboard. It actually makes it worse because the flame gets blown into the exposed corrugations and spreads out of the reach of the air assist. It was the only time I actually stopped a print by lifting the lid and took the spray bottle to.
I suggest everyone make very careful tests with cardboard and see how it works. It is extremely likely to catch fire and not go out if you are not careful. Cutting a lot of lines close to each other also makes it more likely to catch fire.
Not sure how this would work with a Pro, but on my PRU basic, I can cut .15" cardboard fairly safely with 40/60. And I stand there watching it all the time.
One of my YouTube videos shows cutting cardboard from inside the bed. Doesn’t have much of a burn spot or flame showing.
I’ll try some beveled corners tonight. I have some ideas on a couple of different signs that I want to make. I’ll keep the text and design beveled and avoid small turns or joints.
We will play with it tonight doing some simpler designs and curves and not as much fine/small details.
I like the 40/60 as well. We will do some playing tonight (unless Merinda has already beat me home and is working on it now. )
I also liked the awesome camera shots from the bed. I love the idea of having the camera in the bed to watch that lower perspective (I have a camera that I don’t much care for that will work well in that space.) I also need to crack out the mount for the SLR so we can put it above for the overhead shot as well.
Thanks again everyone for the tips here. We will try it again and see how it turns out.
[quote=“marmak3261, post:17, topic:8647”]
I can cut .15" cardboard fairly safely with 40/60.[/quote]
I went 50/50 with mine and it worked brilliantly.
Listen up, everybody… ALL THE TIME.
Frankly, cutting cardboard takes seconds. But I did try an engrave, and as @marmak3261 explained to me, my setting was way too slow. As such, I started a very small, uncontrolled smoldering of the cardboard. Lifted the lid, put a damp paper towel on the smolder, no harm to anybody/anything.
 when cutting cardboard.


 )
)