There was a question asked about raster vs vector engraving in context of time and quality.
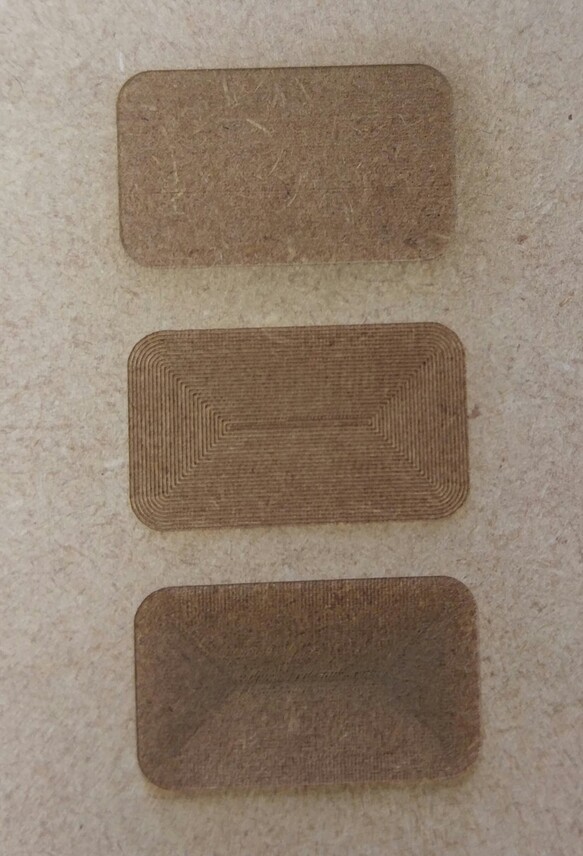
Top image is raster. It took 1 minute 41 seconds
Middle is vector. Not as tight but took 57 seconds
Bottom is twice as many boxes as middle, filled in more but still has visible lines. Took 1 minute 55 seconds.
I think it would be pretty close if you knew the exact DPI of your laser cutter. That way you wouldn’t have any extra overlap and you could specify the engrave pattern which could help prevent warping/burning on some materials.
This is very similar to working with stepover on CNC routers/mills. If you know the exact kerf/dpi you can prevent any overlap or ridges between cuts giving you a flat surface with minimal passes/cut time.
If your laser head isn’t going beyond the box a vector image with perfect arrangement should run almost exactly the same amount of time, unless there are gaps in the middle, in which case a good motion path could turn out to be more efficient than a raster cut.
Every day your beta potential grows exponentially, @smcgathyfay. Your contributions in these past few months have made such a difference in keeping my interest up toward the enthusiastic level rather than impatient grumbling. Thank you so much!!!
So my guess is raster is normally great at dithered objects or filled, but can give an obvious raster lined look but I clear see the lines of pattern on the 2 vectors more.
Is the work flow of raster for fill + vector surround very useful or common to give you the nice smooth edge but still the fast fill?
Depending on the pattern you use for raster it can look different. On my laser I can do bitmap, dither or solid…I also have the option to add texture (I use this when I frost on acrylic…dont like to see lines)
And yes, adding a vector outline can definitly finish the outside shape on certain applications.
One trick to minimize the raster line look is to defocus a little when running the job. Works well for Acrylic. Also the wood species makes a big difference as well. If I’m not looking for grain to be part of the project, I find Alder provides a pretty clean “canvas”.
Experience is going to be important so you have a good idea of what things are likely to look like. I keep a little book of things I’ve done and the material, laser settings and comments about the results. I’ve also started taking photos of the laser settings screen and results with my phone and store them in an album in Dropbox.
Good practice keeping your settings in a book…I do too…so many materials to remember in just your head…lol. Plus with two different lasers…I have different settings…will be 3 when I get the Glowforge…
I’m new to the laser world. What kinds of things do you (@jamesdhatch & @smcgathyfay) record in your notebooks? I’m guessing date, project, material, speed, power. Anything else?