If this already exists, please link below and ignore this
I’m having trouble understanding when a change is needed for custom materials for example, when would you slow the speed of the laser down?
I’ve noticed when cutting EVA foam speed 500/power 80 will cut all the way through but also speed 140/power 1 and 2 passes will also do it.
Is there a rule of thumb for when to change speed, power, or amount of passes? I’ve wasted so much foam, acrylic, vellum, and cardstock trying to figure this out.
How does speed/power/passes affect a print? Right now I’m just picking random numbers and cutting stuff until something works but have no idea how to make the lines cleaner or cut through all the way on thick materials.
Can someone please explain to me or link me to where this has already been answered?
Please explain in noob terms. haha
Some Material Settings I’ve tested that work for me
Thick scrapbook glitter paper | cut = 500 speed, 60 power | score = 500 speed, 12 power
So far I’ve noticed you need multiple passes on craft foam/felt/maybe all materials that melt down, once to melt it, two to burn away the melted stuff?
If you lower the speed, also lower the power dramatically?
My rule of thumb is to go as fast as possible to achieve your goal (engrave or cut). There are, of course, exceptions to every rule.
As for wasting time/material testing, well, you’re going to have to. I keep a spreadsheet of every material and the settings that work to do a light, medium, and dark engrave, and then a cut.
This whole Category is the repository for that kind of information, that previous users have chosen to share, and it’s a good place to get starting points for other materials not covered by Glowforge.
I’d suggest doing a quick search in this category for the Material Name and the word “Settings”. We’re trying to go through and add the word to the titles of posts where people have shared.
You’ve got a great start there though. I keep my starting settings on a list, after testing the material just the way you have done.
Oh and in general, the slower you cut the more you burn. So for thin materials, fragile materials, fabrics, you want to set the beam really fast - high speeds. Thick dense materials like wood - you set the speed slower.
Also (and alas this means wasting more material) when you’re testing how a particular speed and power level will cut, you need longish straight lines, at least an inch or two. I had cuts perfectly dialed in for squares half an inch across, and then nothing cut through for bigger stuff because on really short lines the head never gets up to the requested speed. Physics.
When cutting go for max power and fastest effective speed to minimize charring & kerf thickness
When engraving adjust for max speed and dial power up to get maximum effective through put
Acrylic (especially extruded) can benefit from multiple passes of lower power/higher speed than can cut in a single pass so that it doesn’t overheat a localized piece of the cut so it melts back into the cut.
Use a calibration tool to establish power/speed settings for any new material you do - yes, you’ll be “wasting” material but you’re going to then have a piece of material that will give you and easy way to pick settings. I’ve posted a couple of calibration tools & instructions in Made on a Glowforge but they were for the old settings. They can be modified or you can wait for a bit and I’ll be updating those.
Tell the GF that you’re using PG of some similar material and check out the settings it recommends by converting to manual cuts or engraves and looking at the settings.
For engraves increasing the LPI will increase both the resolution of the engrave but also the depth.
Don’t stress the finer settings levels - not a lot of difference between speed=1000 and speed =950. Don’t try to chase the “perfect” setting because it won’t be perfect the next time due to material differences in production lots or even things like humidity.
Change 1 factor at a time when you’re testing - you cannot reliably determine the impact of changes to multiple factors at the same time.
I also target the fastest speed I can while still getting the results needed.
For delicate materials like paper I start with the highest speed and lower power, then bump the power upward for each test for the desired result. I tend to make somewhat significant changes knowing that I may need to re-adjust. Example if I start at 5% power for paper and dont get what I need, I might bump to 30%. If that overshoots, I try 15%. Splitting the difference between under-shoot and over-shoot sometimes gets you where you need to be a little faster instead of smaller incremental increases.
You kinda develop a “feel” after a while.
If you are using your own wood or plastic products instead of ProofGrade, a trick you can use is to first select a similar proofgrade product in the material selection at the top-left of the GF app. Then in the operation settings you first choose an automatic PG setting. Even though it may already show as selected when the setting pops up, you want to be sure you click it again. Now when you open the settings tab again, when you select the “Manual” options, the original ProofGrade settings will be set by default and now you have a good starting point for modifying to suit your needs.
I second this. Without a calibration tool run against a piece, I do the split-the-difference or binary search method. If 5% power is too little, then the next run is 50%, if that’s too high the next test is 25% if that’s too little then the next one will be 35% (not really half of the difference between 25 & 50 but I operate in “even” increments like 5s and 10s). You only need a handful of tests before you’ll get to one that works. There may be more you can tweak but there’s little difference between 32 and 35% power.That factor sensitivity is most useful for finer materials like paper, thin fabrics, etc. where a few % can make a difference in charring, smoking or other residue.
The Wikipedia page did mention high flammability of PS. Perhaps that’s why no projects with XPS. Can someone with a glowforge please try it out and let me know how high the flames get? Thanks!
Speed is how fast the laser beam moves across the material. So if your power is 100 and your speed is 500 you will a lot less laser energy to your material than if your power was 100 and your speed was 100. The higher the speed, the less laser energy cutting the material. The scale is not linear, as mpipes noted below.
Power should be self-explanatory. The more power the more energy being delivered to the material. One thing to note a power of 100 is less energy than Full Power .
Different materials respond differently to combinations of speed and power. As mentioned above, the faster your material will cut the less charring you should see. For very thin materials it would seem unlikely that more than 1 pass would improve anything for cutting, but you never know.
And finally, the focus height for custom materials could be more important than your speed and power settings. The laser beam is in the shape of an hour glass. The focus height determines where the narrowest point of that hour glass shape is. The further from that point the less energy hitting the material at any given spot. Some materials are more sensitive to this than others. Also, if the material is not perfectly flat, it is basically the same thing as changing the focus height (this is supposed to be automagically taken care of by the when the software is out of beta if not sooner.) The materials you’re using sound like they just lay flat anyway, but it is something to keep in mind when trouble shooting.
edit: as per mpipes, changed so power isn’t linear.
The speed scale is not linear. 100 is 1/39th the speed of 500 (100 = 4inch/min while 500 = 157inch/minute) based on the spreadsheet Glowforge shared for the unit conversion.
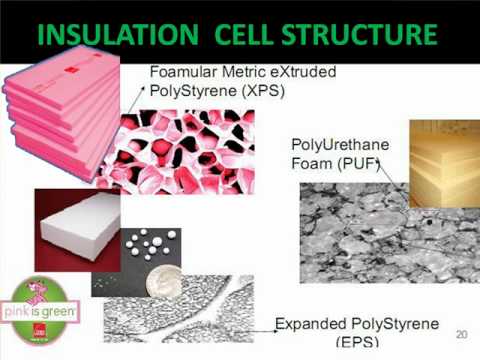
I could be misusing the term “blown-foam”. In my mind all of these are produced with a blown-foam manufacturing process (blown into molds in a factory, not blown in place):
the atx hacker space material list may be referring only to EPS polyStyrene foam insulation panels, and not to XPS polyStyrene foam insulation panels.


 .
. when the software is out of beta if not sooner.) The materials you’re using sound like they just lay flat anyway, but it is something to keep in mind when trouble shooting.