here it is, way back from 2016:
I did NOT use big acrylic discs on the bars though.
here it is, way back from 2016:
I did NOT use big acrylic discs on the bars though.
What size machine screws/bolts fit in the threaded holes on the gantry? Thanks for design idea, so awesome!
Thanks! You will need two M8x1.25 by 10-15mm long.
It’s listed on the SVG file here: Rotary Engraving a Yoyo on my Glowforge
Oh, there we go, the file I had downloaded was Fixture_3 or something and it wasn’t in there, I didn’t know about this file, thank you!
Awesome design. I sent you $10 for providing it. Really Glowforge should look into this for a future add on
Awesome! Thank you so much!
That is some great engineering!
I finally got a chance to try this today on a 2 oz. clear boston round bottle. Rather curiously, the engraving was backwards, literally, on the bottle I tested. When I mirrored the engraving and tried again it came out in the correct orientation. Such an odd thing to happen! I am still trying to figure out why the machine did that. I only had luck with it once actually rolling on the tape. After that it was really sketchy, even on new tape, and was not rolling consistently. Ended up cracking the bottle from the heat buildup in the one spot. Sacrifice to the testing gods… I may have to widen my position guides a hair, even though the math worked out correctly. Just means I have to empty the other one so I can test again! Anyone have ideas on why it would have mirrored my logo?
I’m glad you got to try this out! It has to be mirrored, because as the object rolls the top surface of the object, which is being engraved, is moving in the opposite direction relative to the normal direction of travel.
I have had a lot of difficulty with getting glass to roll consistently, because it’s so slick. What I finally settled on that is working for me is this:
1: Beyond each end of the object, I lay a strip, three layers thick, of masking tap sticky side down, along the full length of travel.
2. Between those strips, I place single layer strips of tape sticky side up. I tape each end down with a piece of tape, making sure to stretch each strip taught.
3. I then install the fixture so that it slides over the tape. The reason for three layers face down, is so the fixture doesn’t stick to the face up layers.
I hope this helps!
Thanks! I hadn’t gotten to three layers on the face down yet, though that’s pretty much how I was laying out my tape. After the last crack I figured I might need to do some adjusting before it blew up on the next try. lol I’ll have to try the heavier layers tomorrow.
Ingenious! Thank you for sharing.
This is an absolutely brilliant design. I was thinking (clearly over-thinking after this video) of all sorts of complicated things that I needed to do. Most of the times the most beautiful solutions are the simplest.
Just downloaded the design and will be sending some money your way soon as I finish this post. I have an idea that may work to help ensure consistent rolling of the objects. Instead of using tape, what about stretching a rubber band or two around the board. Should provide some decent traction. Anyone tried it by chance?
Thank you very much! I have not tried rubber bands. Let us know how it works.
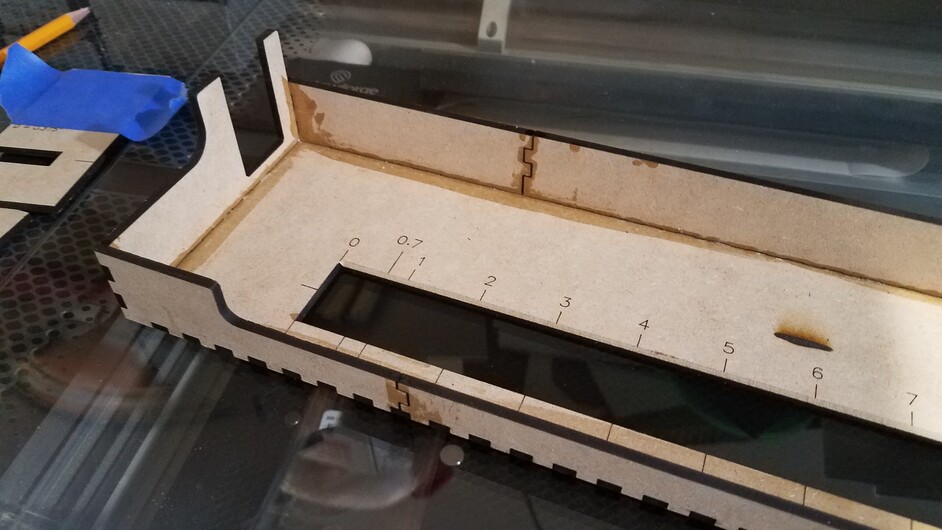
I looked and wondered, and looked some more. Finally, I clicked on your 1st image of the jig and then went “Oh - yeah, that’s great!”
Great idea and I am glad it is working for those who are engraving the larger items.
However I am looking for something I can engrave pens with and this device doesn’t quite do it. I tried several modifications but could not come up with anything that would satisfactorily engrave on pens that are as small as .41" in diameter.
Any ideas would be greatly appreciated.
Perhaps if you made a shallower version that fit on top of the crumb tray?
Can you post a photo of your pen setup, so we can see what you have tried?