Unfortunately I did not take any photos of my setup and presently my GlowForge is busy with another project.
The only modifications I made to your jig, Taylor, was reducing the length of the pieces that attach to the gantry and reduced the height of the risers that these pieces fit into. This allowed me to raise the jig higher so that the pen blank was closer to the laser head.
The real problem is the method of turning the pen blank. The friction method you have employed works great with heavier objects but the weight of the pen blank, even with steel bearings inside the blank, is not enough to get a good consistent revolution while engraving.
I have included some photos of pens I have engraved using a NEJE 1000mw engraver and a jig from Benson Pace in Australia.
These photos show the pen fully assembled. The engraving configuration is the finished wood blank with a brass sleeve glued in as seen in the video below.
Unfortunately my NEJE engraver and my Macbook Pro are no longer talking to each other and I have not been able to resolve that problem.
Any ideas on using your jig (or modification thereof) to accomplish this would be greatly appreciated.
Nice looking pens!
I see that the variation in diameter overall and across the length of the pens could result in uneven rolling. What if you made 0.5 inch diameter bushings and mounted them on each end of the pen blank using a pen mandrel or length of all thread? This would accommodate greater variation between pens, give it more weight to roll, and provide a more uniform rolling surface with more precise guide fit.
I stopped the video near the beginning and I think I see a cap nut connecting the tray he made to the gantry near where the transportation lock screws would go. Very clever way to utilize the stepper motor.
I find the wood, and other materials, from many sources. I then cut them to proper sizes, drill them, install brass sleeves, turn to proper dimensions, polish, apply an acrylic finish, and final polish them.
See my website pensbylarry.com for videos on how I make pens.
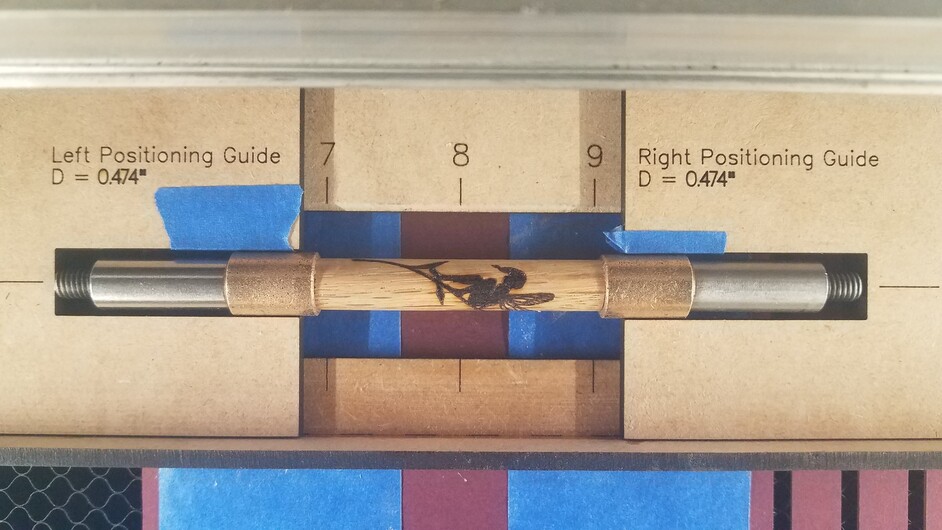
Here is a slimline pen blank I engraved using two 12mm OD x 6mm ID bronze bushing over a length of 6mm threaded rod, and held together with two 6mm round coupling nuts.
I wish there was a video of the process, showing making the jig, assembling/installing it, and finally using it, showing how it pulls to advance the blank. Not asking for it, I just learn visually best.
Unfortunately you have come across one of the biggest scams in the pen making industry.
Many years ago somebody decided that the pen mandrel diameter should be 7 mm.
But nobody makes 7mm threaded rod.
But everyone makes bushings for the 7mm rod sold by the pen component manufacturers.
Only by trial and error will we find out whether the slop resulting from using the undersized rod will cause problems when engraving.
yes please do. if Glowforge doesn’t offer you a designer gig or loads of money for the design, you can easily sell it to lots of us folks (that would never have figured this out). This is a genius! Well done.
The slimline brass tubes are 7mm OD, and run about .249" to .253" ID. A 6mm threaded rod is .236" OD, so not much smaller. A 1/4-20 threaded rod would have a snug fit.
True. Most of my past engravings have been made on the larger pens that use the 27/64” tubes. Again bushings are available to adapt to the 7 mm mandrel. Looking forward to trying out the new layout.
The first design you posted seemed to block the air flow from the air assist fan. Did this cause any problems?
I did not notice any issue with the fan being blocked, but to be safe, I think I will cut down the back wall a bit more to improve the airflow. I made it high for structural reasons, and most of my stuff was engraving larger items where it did not obstruct airflow. I think it will be fine though if I cut it down and extra 1/4 inch. which should allow good airflow even for the pens.
Here is the latest version, which can be used with or without the crumb tray. It also includes a variety of positioning guides and guide tabs.
If you find it useful, and would like to make a monetary contribution, you may do so via PayPal, using my email address: taylor.a.jenkins@gmail.com. Thanks, and I would love to see what you make.