Yep, looks good! (Discourse will shrink the file down to the little yellow dot if you don’t zip it first before uploading.) You can right-click and Save As on the file to download it.
Chuckle! The problem is with Discourse, not with you. Everybody gets hit with that. (Dropbox works.)
If you want to upload another one some day, the issue is with the SVG file type in the permissions for the forum. If you Zip the file first, you can drag and drop it into an open post here and it shows up a lot bigger.
A few instructions may be in order for those that are interested:
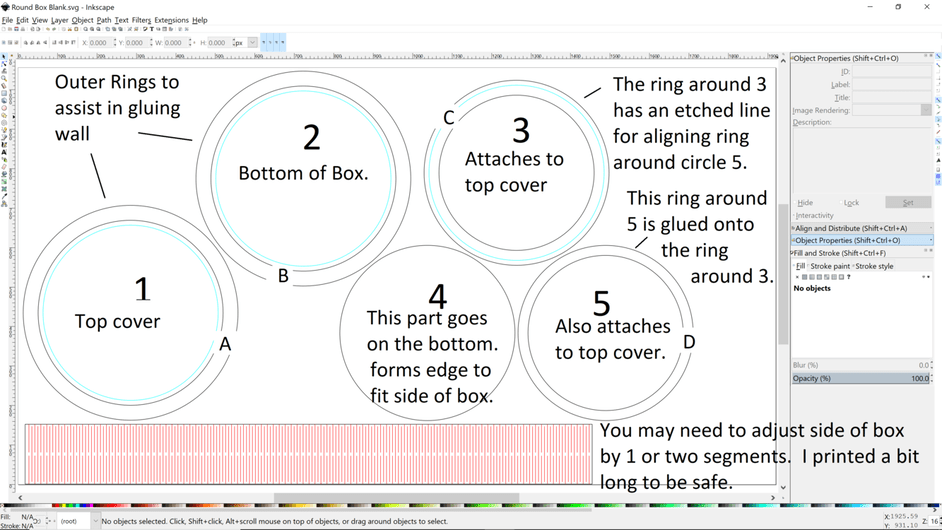
I’ve numbered the circles 1 through 5, and rings A through D.
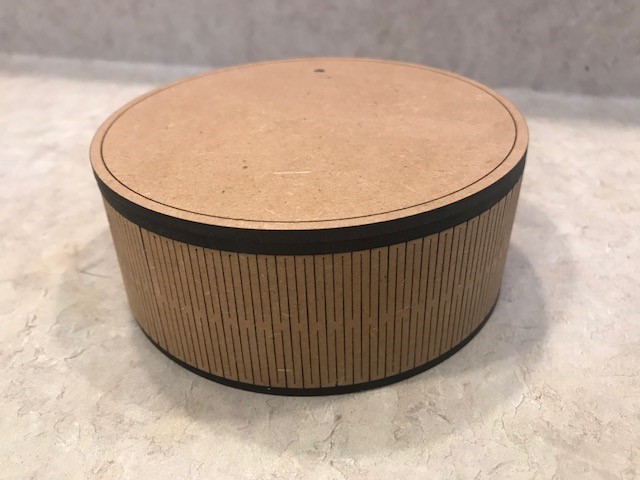
Here is a tour of the parts:
The two larger circle with etches are identical. One is to be the bottom of the box, the other - the top. It doesn’t matter which is which.
The blue (cyan, actually) etch line is a good guide to help you put circle 4 on circle 2.
Circles 3 and 5 are identical as well. These are doubled and form the lid guide that holds the lid in place.
Rings A and B are used to hold the side of the box (The big red rectangle below) whilst you fit everything together. They are waste afterwards, but you might think up a use for them later.
Ring D attaches onto ring C. This forms the top ring that the lid fits into.
Instructions:
Customize your design by putting whatever you want on the top cover. I used the cyan etch ring as a nice circle on the top of the box for accent.
Run the plot.
Keep the covering on the wood for now.
Label all the parts on the covering.
Fit circle 4 on circle 2. This is your bottom. Circle 4 becomes the guide to put the side of the box together. Glue circle 3 and 5 together. It will be the top lid that fits into the box top hole (rings C and D). DO NOT glue it to the top cover yet!
Fit ring D on top of ring C. This is the top of the lid.
When you have your head wrapped around the assembly and how it goes together, remove the proofgrade tape and glue Circle 4 to Circle 2, and Ring D to Ring C. Let dry.
When glue has dried, form the side of the box by taking the long floppy rectangle and placing it around the base above circle 2, beside circle 4.
If necessary, adjust length of box by 1 or two segments by cutting those segments off until box fits well around the bottom assembly.
Place an outer ring A or B (Or both!) over the works to help keep the side in place.
Use thin CA (Super glue) to wick into side to bottom. Allow to dry. If you want, you can use another type of glue, but thin super glue works real well if you use it carefully.
Take ring assembly C and D, and test fit on top of box. You should be able to expand the sides as necessary to make a nice fit.
Remove rings C and D. Now fit the 2 glued circles 3 and 5 into rings C and D, with C being on top. DO NOT GLUE the circles to this ring!!! Just place them inside - it should be a snug fit.
Put glue on the top of the circles 3 and 5, taking great care not to get glue on the sides of the circles. Place the top cover on the assemble and align with ring C. Wait for the glue to dry on circles 1, 3 and 5. This is your lid.
Remove the finished lid from ring C/D. If the fit is tight (and it will be), now is the time to sand rings C and D so that there is a good fit that doesn’t bind.
When satisfied with the top ring and lid fit, put rings C and D onto the top of the box side again and use thin CA to glue in place.
