Scaling Project Plans: Simple Math for us Newbies

There’s been a lot of chatter on the forum lately about material dimensions and how to scale things. It’s all great info, but a bit too advanced for my “pretty little head” at the moment. What I do know is that I’m going to need to alter any project plans that I purchase or create which have finger joints so that they fit the actual size of my materials. (Ex: the design says “this is for .125 inch material” but what I have is actually .136.)

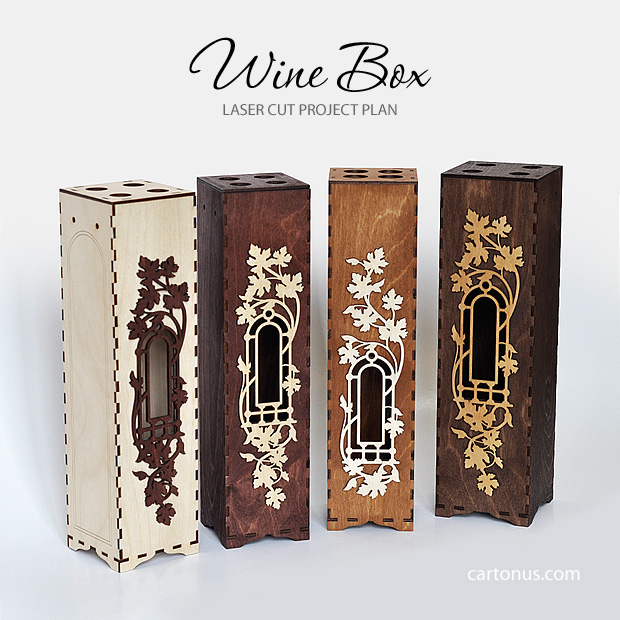
Once my GF arrives, I’m going to start with very simple designs, probably even purchase one or two to get started. I’ve had my eye on this one from cartonus.com:

http://cartonus.com/wine-box/

It’s seven bucks, and I’ve been drooling over it, and though there are probably plenty of free wine box patterns out there, I’m happy to support the artist - I’ve enjoyed drooling over this design seven dollars worth!

So… This is an example where the design spec says it is for 1/8 inch material (.125), and the proofgrade material, according to my cheap calipers, is closer to .136 inches (or so: I don’t have it in front of me, but I recall it being a smidge bigger than .125).

Here is my “keep it simple” plan for dealing with that - This is all conjecture at the moment, so please let me know if my logic is off or the math is wrong or there’s something I’m missing…

EDIT: before you begin, make sure Inkscape is setup to NOT resize stroke width when you resize objects (see comments by @chadmart1076 below followed by my/@cynzu’s walk-through for how to do that in Inkscape v .91)

  1. Get the whole plan for the wine box into Inkscape.
  2. Figure out how much to shrink or grow the whole thing so that the finger joints are correctly sized. [details below]
  3. Select all the objects.
  4. Make sure the check box for “maintain aspect ratio” is checked so that the width and height ratios stay in tact.
  5. Determine what the new width needs to be [related to step #2 above, more details below].
  6. in the “width” window at the top of the screen, set the width to that new value.

The whole project plan will then be scaled to meet the actual dimensions of my proofgrade material so that the finger joints will work. (Let’s hope! again - this is conjecture, so let me know if my logic is faulty)

Here’s the Simple math for figuring out how to set the width (with “maintain aspect ratio” turned on):
Take the current width of all the objects in the project (“select all” then look a the width).
Multiply that by X to get the new width to set.
X = [actual material thickness] divided by [material thickness in the design]

In my example:
X = .136 / .125
X = 1.088

My material was a bit bigger than the material in the project plan, so I’ll scale everything up just a bit (by 1.088).

I understand that taking this approach will shrink or grow the whole box, so this is useful only if the outer and inner box dimensions don’t really need to stay constant.

ok, let the pseudo-code review begin! thanks.
38 Likes

That is the method I have used in the past. It works in most cases (but not all).

2 Likes

Here’s the good news - you shouldn’t have to modify that design much.

The only thing impacted will be the slots that the base is inserted into, and any slots on the lid. Everything else appears to be independent of the material thickness. (Those finger joints on the sides for instance.)

I’d just resize any slots slightly larger using Offset Path…oh crud, you’re using Inkscape. You could just make slightly larger slots, align them over the slots in the design, and delete the originals.

3 Likes

Doesn’t the depth of the finger joint slots need to match the material thickness to get a flush joint?

4 Likes

ya, I think so - that’s the main reason all of this came to mind. I think the “easy” way to get finger joints to work with a pre-existing (purchased) design is to scale the whole puppy to make the joints work. The joints need to match material thickness.

4 Likes

Yes I can’t think of a reason why that wouldn’t work as long as none of the absolute dimensions matter.

2 Likes

Your way sounds much easier but not as robust as mine.

I’d recreate it in F360 which would take a lot of time but completely scalable in any way needed.

1 Like

If you need to maintain the overall size of the design, you can easily adjust the size of the fingers by setting up Guides positioned at the proper distance from each other, and snapping the nodes to them. Illustrator and CorelDraw both allow the 0,0 origin to be moved to any point as well as allowing Guides to be precisely offset so it makes this pretty easy. Inkscape seems it needs to be an “eyeball” process.

Edit: My mistake, looks like Inkscape does allow more precise Guide location after digging through the Help a little bit. Looks like you can draw a new Bezier line that you snap to the inside part of the finger, convert that Bezier into a Guide, then double click on that Guide and enter a precise location relative to its current location.

3 Likes

Yup, that sounds like the robust way to do it - esp if maintaining the inner and outer box dimensions matters, but, alas, I haven’t yet learned F360. I’m looking for Simple at the moment, so am willing to sacrifice the precision in those dimensions.

Someday, I’ll be one of the Big Kids who knows F360, but for now I’m just trying to get proficient with my little 2D world :thinking:

3 Likes

I think you’ll find that 0.01" in difference is going to be negligible from a “looking flush” standpoint at the edges, but I don’t want to dissuade you from trying out the scaling formula. (You might find that the kerf automatically takes care of the difference in the slot fit as well, without making any adjustments.)

If you do your scale-up and find that the fit is loose, just try running one without any adjustments. :slightly_smiling_face:

3 Likes

You are not helping the rest of us fulfill our obsessive needs. :smiley:

7 Likes

I’m really looking forward to having your more experienced and intuitive sense of how much difference fractions of an inch make. I can’t wait to play! I just ordered a stack of :proofgrade: Draftboard and plan to do lots of experimentation with it :slight_smile: My GF hasn’t arrived, but my box of goodies did, so I’m drooling over the :proofgrade: materials.
1 Like

Chuckle! (Just trying to save some material - I ran through a pile of Proofgrade to come to that realization!) :laughing:

I’ve got to get in there and place an order before it’s all gone…I need some to tackle a few of the 3D projects - baltic birch does have to be resized because there is a large difference in size between that and the Proofgrade materials, and I’m too lazy to keep reworking files that didn’t start out parametric.

(How fantastic is it that we are going to be able to get a cheap prototype material that’s the same size as the good stuff?) :grin:

4 Likes

completely, wonderfully, unspeakably fantastic - I was so thrilled when I got the goodie box that all the proofgrade “Medium” stuff is really, actually the SAME thickness, across boards. I even laid some side by side (a piece of plywood next to a piece of hardwood) and put my level on them. YUP, same height. So, it’s great to know that once we design something for :proofgrade: Medium, we can order more Medium thickness sheets knowing that the thickness will be consistent. S W E E T . . . :grinning:

and what a brilliant business plan - they’ll keep us buying materials from them. How many times do we buy a laser? once(ish) - but how many times will we buy wood? zillions.

8 Likes

It was worth the $7 bucks to me. They’ve got a fair number of neat giftable things. I easy save more time/grief than they cost. I did it out of 3mm BB fom Woodcraft without messing with the kerf adjustments. I haven’t tried it on PG though.

You can change the front graphics to match the wine or the recipients :slight_smile:

4 Likes

Noticed that the amount of power used for a cut makes a BIG difference in kerf. So if they want consistency, going to have to use the same values every time or rely on Proofgrade automatic settings. I have been guilty of using way too much power from time to time just because I could.

7 Likes

Yes it definitely does…saw it on the recent cut tests I ran. I found that backing it off about 5% from the full 100% power at a given speed gave a kerf that was so negligible, I wasn’t sure it had cut through…It did but just barely.

If I want to minimize kerf, I try to hit that sweet spot. (If you miss though, you might not get a complete cut, so it’s a chancy prospect.)

5 Likes

I scale the whole project at one time, either in illustrator or if it’s small scale enough for one piece of material I do it in the UI. Maybe I’ve just been super lucky but when I scale whole project everything works out perfect.

2 Likes

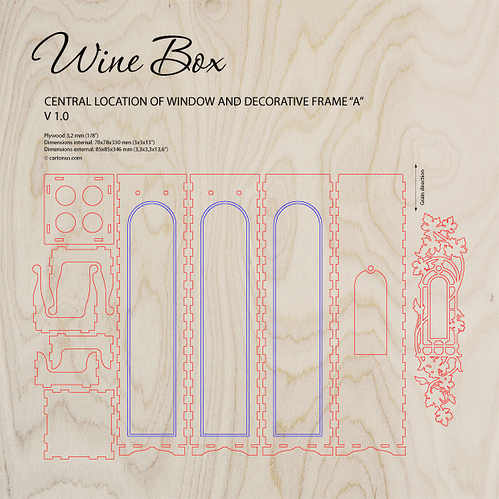
So I was looking at the plans for this box, and was wondering what the bits on the left hand side are? You can see the walls, the top and bottom, the bit of art, and then there are these weird clippy hook things? What are they?

6 Likes

The clip things attach to the lid (the bit in the top-left with the four circles). It looks like they press against the inside of the box to hold the lid in place so it doesn’t fall down the inside of the box.

2 Likes