For all of you having alignment issues…it’s a known variance that is caused by the fisheye effect of the lid camera. You will get closer alignment if you place your projects directly underneath the lid camera (less fish-eye effect there) and as you place designs farther out towards the edges of the bed, the effect gets worse.
Glowforge uses an algorithm to correct for the fisheye effect, and one very important component of getting that algorithm to work is to enter the accurately measured height/thickness of the material in inches. The QR codes enter that information for you, BUT the material should not have any warp in it, because that affects the actual height as opposed to what the QR code says it is.
Okay so…three things to do for better prints:
1. Make sure the height is entered correctly.
If you are using non-Proofgrade material that does not have a QR code, or if the QR code can’t be read because of glare on the sticker, then you can input the information yourself.
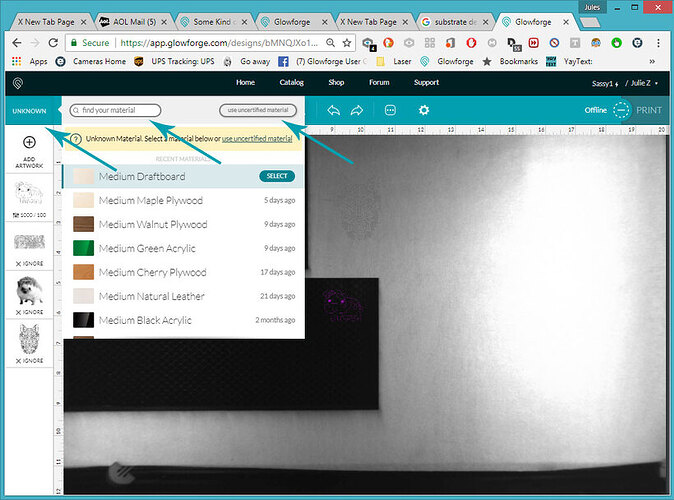
Click on the Unknown Materials button here:
You can use the Search magnifying glass to find the settings for any Proofgrade material - click on it and it loads the values automatically. If you are not using Proofgrade - click on the Use Uncertified Materials button and enter the thickness of the material in inches, as measured with calipers.
Do this first, before you try to place your prints. It’s step one.
2. Make sure the material is completely flat. Even a mm of warp will throw off the cuts and the placement. (Also make sure that the legs of the tray are completely seated down inside the dimples in the machine - it’s easy for them to not be completely seated in there and it throws off the placement.)
I absolutely love to use these Honeycomb Pins to tack the material down - even thick plywood, before cutting it. You’d be surprised at how much warp there is in wood that looks completely flat.
3. If it’s a really important alignment on something that you are not cutting, try to place the design and material directly underneath the lid camera for best results.
If you are cutting and engraving at the same time, the best way to get perfect alignment is to put both the cut and the engrave into the same file, and then do all steps out of one file. The parts will align themselves perfectly relative to each other.
There are a bunch of tutorials that you really ought to read in order to get the most out of your machine - most are just a page or two, but taking the time to read them is going to save you months of “discovery on your own” time.
I’m going to list them below to get you started:
Here you go:
Then if you want to get started designing your own stuff quickly, the Matrix has a lot of tutorials and video links showing the best of the tips and tricks:
For using the Glowforge:
For Using Photoshop, GIMP and Paintshop:
For using Illustrator, Inkscape, CorelDRAW and Affinity Designer:
For using Fusion 360, OnShape, Openscad, Rhino, etc.
Have fun! ![]()
