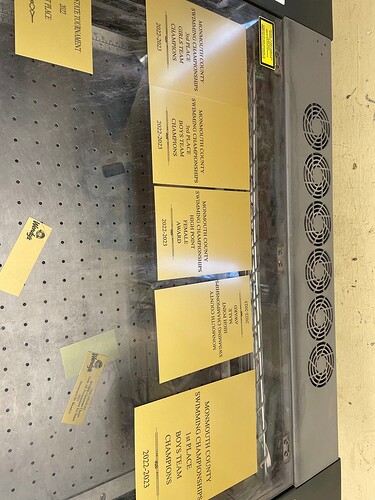
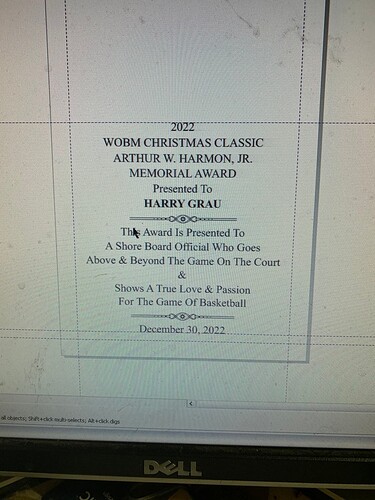
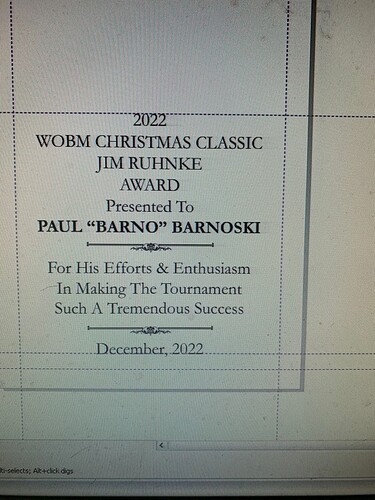
Hi all, new to the GF community but have been in business for years using a large Epilog Helix laser engraver with Corel Draw. We are a trophy and award business and primarily engrave on plastics and metals in a traditional award style. Prior to purchasing the GF I had a detailed convo with the rep who assured me that the files would be compatible with the GF (we have literally thousands of jobs saved and to recreate them would be so time consuming as they have hundreds of letters and designs on some of them not to mention custom logos etc). Unfortunately the Epilog is having some tech difficulties and the replacement part has been back ordered for 6 months and we needed an immediate solution. Enter the GF. So to start it is an older version of CorelDraw probably from 2010 or so. I am able to save the current project as a pdf or an svg or an ai and many other options. I can open it in GF and the lettering/font/layout of the words carry over, however the size and layout of the plate and where everything should be positioned on the plate don’t carry over. I have been able to manually recreate these images for our immediate work but again it’s QUITE time consuming for each one. GF support literally said “sorry not familiar with CorelDraw don’t know how to help you” so I’m hoping someone in this community can help me figure out if there’s something I need to do differently to be able to carry the layout/placement of the whole design and not just the words part of the project. I’ve included a photo of the plates (different wording but the same concept) that I was able to recreate, as well as what the image looks like on CorelDraw (with the CorelDraw file and Epilog machine I load the file, put the correct sized plate in the top left “home 0”x0”” and it engraved it exactly how it’s laid out in the file minding the borders that we have created for the layout). Thanks in advance and if you think you can help but would rather trouble shoot directly just reply with an email and I’ll email you directly.
Welcome to the forum.
There are several users here that are proficient in CorelDraw. I am not one of them. It was my understanding, however, that saving a file as a pdf preserved the formatting of the original. Hopefully you will get some expert help soon.
I have mostly switched to using Inkscape at this point but, I remember having some initial sizing problems in CDR. Exporting to PDF rather than SVG seems to work consistently.
Are you setting your page size to 20” x 12”?
There are regular CDR users who will likely be along to help eventually.
In Corel draw? No i haven’t adjusted the page sizes, however I’m not sure that’s affecting it because again it’s only a text box that opens with the pdf or the svg. Not the size (let’s say 4”x5” plate size with an engravable area of 3”x4” with the text laid out evenly spaced) of the design on Corel draw nor the layout on the design (with the exception of the words- they keep the layout and font but don’t seem to carry the size of the text box either. Oddly enough it also recognizes each letter individually after I open the pdf (I have found that I can fix this by grouping the text box after opening it). Perhaps there’s something I need to click on prior to saving as a pdf to “grab” the layout but I’m not seeing it or it’s above my basic knowledge of this program)
I may still not be understanding your issue but:
From the images you posted, it looks like you have the page size set to the size of your plate with guidelines for margins. The page size and guidelines are something specific to a vector graphics program (Corel Draw, in this case) and, aren’t going to show up when you open an exported SVG or PDF in the Glowforge UI.
If you need the page borders for positioning on the plate, what I have done is create a rectangle object in Corel Draw the same size as the plate/page and, center it on the page so that it matches up with the plate/page border. Make sure you use a different color for that rectangle than you are using for any part of your design you want the laser to cut or engrave (so that it will show up as a separate operation in the Glowforge UI). Export the whole thing to PDF (or SVG), open that in the Glowforge UI. Set focus on your plate. Use the rectangle page border to align to the plate. Set the rectangle to “ignore” in the Glowforge UI.
Actual text and fonts aren’t going to import into the Glowforge UI. So, you will need to convert that to outlines or rasterize your text.
Note that visual alignment with the plate may not be exact enough, depending on your requirements. You will want to calibrate your Glowforge and, may be better off using a jig.
All of those topics are covered in detail elsewhere and, we can probably find you links, if you need them.
PDF does some odd things like that to reproduce text positioning exactly.
Hmm thanks. I was hoping that I wouldn’t have to do a manual fix on every single job file since the current machine recognizes the plate size automatically from what is entered in the file, we put the plate in the machine and it just reads the whole layout without needing any work arounds ( again the Epilog machine also reads the “0” location to start measuring at the top left and when I set something to engrave at 0x0 it doesn’t seem to home there. I also wish when I specifically described to the rep as what we would need to use it for she assured me it would be completely compatible. In any case I wonder if there’s an east way to just click rasterize when saving the whole layout and then just “ignore” the borders in GFP.
This topic was automatically closed 30 days after the last reply. New replies are no longer allowed.


