Updated Material Test Template

Hi, thanks for your answer, but the problem is that I can not set the elements of the design for separate, it takes the same velocity for all the elements :frowning:

Ahhh, my mistake, I should have gone back and looked at the original post again…looks like the original creator rasterized the engraves, so this is more of a view of how the variable power engrave works…which is good, you don’t have to set up separate settings for it. She lists the settings she used right there on the top in the picture.

3 Likes

Thank you for this!

4 Likes

Cool. Soon after I got my Glowforge, I did almost the same thing, with the same Thingiverse thing, as a learning exercise. I dived into the materials.json file (from app.glowforge.com) to get the exact Proofgrade settings from Glowforge, and used it to make some tables on the back side of the template. I also added ruled markings on the edges, and tweaked the center engrave circle to show variations in speed as well as power. I didn’t think of rasterizing the shaded areas, so it was a lot less convenient to use my templates, since I had to manually set the power for each section. Sometime I’ll fix that. Here’s what I’d come up with (very similar to yours): [Glowforge Material Templates - Google Drive](http://Glowforge Material Templates)
PG Medium Walnut_v10_reverse.pdf (369.4 KB)

PG Medium Basswood_v11.pdf (338.0 KB) PG Medium Basswood_v11_reverse.pdf (373.0 KB) PG Medium Cherry_v11.pdf (338.0 KB) PG Medium Cherry_v11_reverse.pdf (370.9 KB) PG Medium Poplar_v10_reverse.pdf (370.6 KB) PG Medium Popular_v11.pdf (337.1 KB) PG Medium Red Oak_v10.pdf (340.5 KB) PG Medium Red Oak_v10_reverse.pdf (367.1 KB) PG Medium Walnut_v10.pdf (339.7 KB)

44 Likes

Thank You!

2 Likes

Hello,

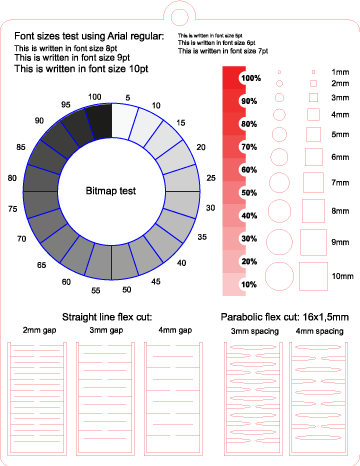
I made a bit more compact version with engraving power testing (not via bitmap) of the testing board if anyone wants
testing_board testing_board.zip (63.6 KB)

[EDIT] Last version here

26 Likes

Nice updates to a useful tool. Folks really should give calibration templates a try on new materials and then keep them next to their GF. They answer the “what settings should I use question” so much faster than posting to the forum.

6 Likes

Thanks and welcome.

2 Likes

It would be awesome if you added the kerf gauges to the edge of this design. Great work!

2 Likes

I’ll gladly add anything to it if that can help !
Do you have an example of board testing for scores ?
I haven’t played with scores yet. I just know the theory about unfocusing it so the line appears a bit thicker and less deep unless we compensate with speed and power.

1 Like

Easy Kerf Gauges :slight_smile:

3 Likes

This is compact

My bad dunno why i talked about Scores where you talked about kerf haha.
But scores test is something i’d like to add as well !

Aaaanyways ! The kerf testing is clever !
I added it. I removed the “4mm straight line flex cut” to give room to the circle kerf tester as it’s way more important in my opinion. I kept the flex testing but am not really convinced about there usefulness…

Although, there now is some duplicates with the circle kerf test. The 7, 6, 5 and 4mm ones are both in the vertical tester and in the matrix. I like the wider range of the vertical ones as well as the squares, but also love the matrix that offers more granularity.
Don’t know what to do yet about this so i keep it as is for now but let me know if you have better ideas :slight_smile:

Here is a ZIP with everything in it (i forgot the gradient PNG file on my prev post)
material_tester.zip (1.6 MB)

Here is the illustrator file :
testing_board.ai (1.6 MB) !

And a PNG preview :

[EDIT] Last version here

14 Likes

Well this should cover all testing options for sure! Thanks.

3 Likes

Woooh! Cool! Mahalo!

3 Likes

Thank you just got some new material today ill try it out :slight_smile:

3 Likes

Is there a video anyone has made to show how the tester template is organized into its seperate jobs for the glowforge to cut/engrave/score/ext. I have only done a single type of job each item I have done. I am a newbie in the glowforge world and am trying to learn all i can. I know there is a lot I dont know yet but I am loving it so far.

5 Likes

There are basically only four variables. Cutting one pass with full power leaves only 2 variables with each species of wood, no matter what the job it is what cutting speed is best for that species of wood that is the main concern, so a set of tests per species kept as a reference can be used for any job and suggest alternatives as well,

I use this design as it uses the least amount of wood but it can be more obscure to figure out, larger test systems are more “in your face” but also use more wood. You can pick the style you are comfortable with and as you use more types of wood build a larger reference set and eventually barely need to refer to it.

6 Likes

I appreciate this a ton! I’m new to a lot of this but trying to teach it to middle schoolers. This will help a great deal! Any other tips are welcome. I have this laser and a Ruida laser as well.

3 Likes

Thank you

1 Like