Is there a video anyone has made to show how the tester template is organized into its seperate jobs for the glowforge to cut/engrave/score/ext. I have only done a single type of job each item I have done. I am a newbie in the glowforge world and am trying to learn all i can. I know there is a lot I dont know yet but I am loving it so far.
5 Likes
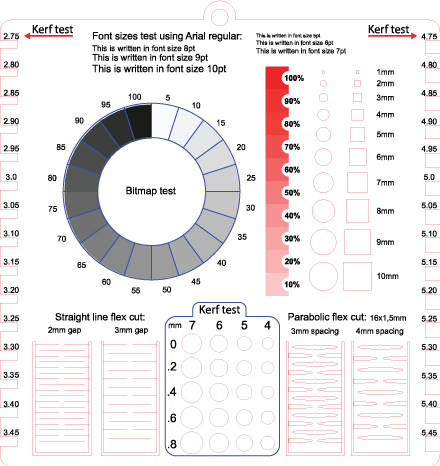
There are basically only four variables. Cutting one pass with full power leaves only 2 variables with each species of wood, no matter what the job it is what cutting speed is best for that species of wood that is the main concern, so a set of tests per species kept as a reference can be used for any job and suggest alternatives as well,
I use this design as it uses the least amount of wood but it can be more obscure to figure out, larger test systems are more “in your face” but also use more wood. You can pick the style you are comfortable with and as you use more types of wood build a larger reference set and eventually barely need to refer to it.
6 Likes
I appreciate this a ton! I’m new to a lot of this but trying to teach it to middle schoolers. This will help a great deal! Any other tips are welcome. I have this laser and a Ruida laser as well.
3 Likes
Thank you
1 Like
Thanks for providing the file, but i’m having a problem. I tried to upload the .svg file, but the Glowforge web software gives me an error about linked images: “The design has linked images. The linked images have been removed. To print images, you can use design software to embed the images when you save the file.”
Is there something I’m missing?
1 Like
Yes i made a mistake on my first link.
On a post later i put a ZIP with the PNG file.
Here is an SVG that embeds the PNG to make it easier ![]()
(click the image to download the ZIP)
I can’t just put the SVG here, forum seems to remove embeded images from SVGs on upload ![]()
[EDIT] Last version here
17 Likes
Thank you! I made this today, and it came out perfectly. Just what I needed.
3 Likes
Sorry new… How do I work this to print properly on GF… How do I get each percentage to print correctly. Thank you…
New to GF… How do I print these properly per materials per each percentage… Do I have to break this apart to print each set individually? Thank you
1 Like
Have you worked thru the tutorials?
Learn By Doing: Your First Prints and More
Also the working with manual mode page will help you understand how to work with various settings.
Again guys sorry for the newbie question… I’ve had my glow Forge for about a month and a half and I’ve been cutting out and engraving many different materials. I want to thank you in the community for providing this test file OK the stupid newbie question do I have to manually go in and set all the different parameters for all the different objects. And if so… Gosh don’t you wish you could save a file with all of its parameters embedded in that file.
1 Like
Yes, unfortunately.
If you save the file by exiting out to the Dashboard and then open the file from the Dashboard, the parameters are saved with the file. Be very careful with the thicknesses of the materials though, that can cause fires if you are going from thick to thin.
2 Likes
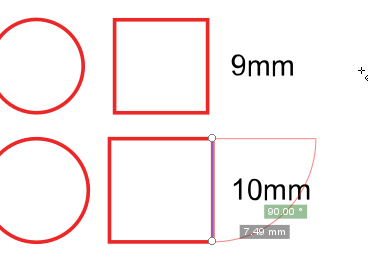
The labelled sizes don’t seem to fit the actual sizes at all. Labelled size is 10mm, but square is actually 7.49mm. Did the whole image get scaled accidentally?
1 Like
I tried to fix the svg to fix the size problems, but it’s just not possible. Scaling the entire svg to fix one size, breaks others.
Maybe this is a problem with the ai to svg export?
Hello, sorry for late answer 
I checked and it seems good to me 
It’s not “perfect sizes” as i get some floating point numbers probably due to the SVG’s pixel<->mm conversion but it’s close to the labelled value.
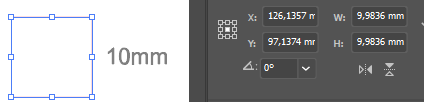
Did you get the latest version of the file ?
What software do you use to open the file ? I’m using latest Illustrator.
Have you tried printing it and measuring the result ?
1 Like
Can someone explain the purpose of each section? I understand I need to find my initial cut through setting first and then manually change the percentages on each step. For some reason all of the dots are just not connecting. For example, why would having all those different sized squares and circles be helpful? What variable is the red graduation bar vs the circle graduation bar showing?
Hello 
The purpose of the holes is to check if an object would fit properly your cut.
Glowforge as some precision gap, it’s not perfect, cutting multiple holes can help check which size you need to cut a hole that fits an object you have.
The circles and squares on the right could be removed from the board though. They’re a bit redundant with the circles matrix on the bottom and the kerf tester on the sides.
The bitmap VS vector engraving has some rendering differences. The 100% of the vector version is much deeper than the bitmap’s. Or was, i havent tried it since my post, maybe it changed since then.
2 Likes
Just saw the latest update mentionning the possibility to export design with detailed settings.
I thought it would allow to just load the design with settings pre-filled, which would have been so nice.
But it’s not 
Still, i made an update to the design and exported it with that tool so all the params are within the file if you don’t know what settings should/can be used to print this design.
(click the image to download a ZIP containing the SVG)
Also i removed unnecessary holes and maed it slightly more compact in width (very slightly).
18 Likes
No, it’s still only for record keeping. And no promises it’ll ever be anything other than. If it ever happens, it’ll be a surprise one day like all the other announcements. It’s just be the way Glowforge roll.
do i have to enter the setting once in the gf app? if so do you have a sheet of what the settings should be? im a newbie sorry…