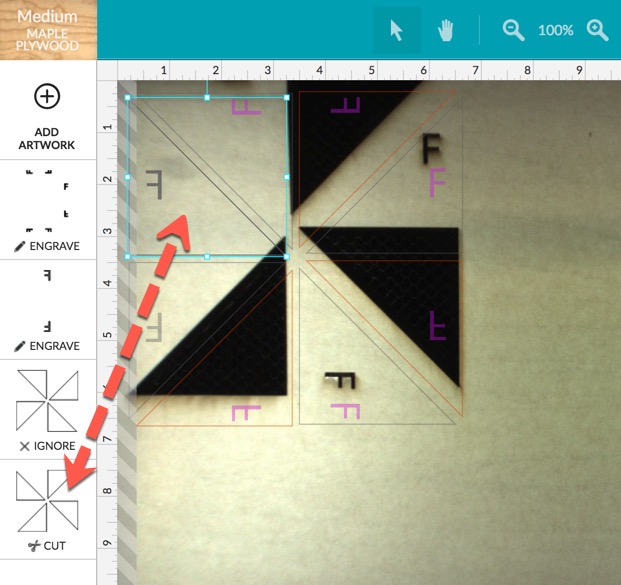
So doing a symmetry example for my niece’s class (she teaches 4th grade). Whipped this up in OnShape super quick and set it to cut. No explanation why it didn’t cut (the other set it set to ignore since I am doing it in Walnut to make them stand out)
1 Like
i believe this issue popped up earlier today as well. the cut in question is grayed out and it looks like its out of bounds. therefore it wouldnt cut
6 Likes
Looks like the engraved part is out of bounds and since it’s contained within the bounding box of the triangle, it’s all treated as one object, so the triangle is also forced out of bounds.
Yep. from the screen you can see that piece is not red and it is in the endzone (only good in football) 
So I had the exact same problem on the other color and it was well inset from the edge
I think the striped margin is only applicable to the engrave. Cuts should be able to go right to the edge.
I don’t believe that’s true. I recall a design I did that the cut took up every last bit of the width of the bed. The stripes stopped me. I needed to shave just a hair off of the design to get it within the stripes.
1 Like
But don’t the stripes only appear if have an engrave?
No, they appear for both cut and engrave. Just at different locations if you only have one.
1 Like
That’s possible. The project I’m referring to had a cut the entire width of the bed. There was a small engrave in the center of the object, nowhere even close to the edges. I don’t see how the small engrave could have affected the limit detection. And as soon as I shrank the cut by a hair’s breadth (without touching the engrave), it was then within the stripes and I was able to execute the job.
But don’t the left and top margins disappear for a cut? The right and bottom expand but remain.
This has been a frustration for me. I don’t mind having a tighter space for engraves, but let me have cuts that are beyond the engrave limits. Since the cut and engrave are in different operations, this should be manageable.
So if you have an engrave anywhere it reduces the cut size. That is a bug if so. Can you turn off the engrave to enable the cut?
There is not a top border on either cut or engrave and the bottom doesn’t change. The left border appears only for engrave and the right increases about the same as the left over the cut border if you select engrave.
Of course the left and right engrave borders depend on speed.
Could be happening when the cut and engrave are in a grouped object but different colors. Will have to explore. My thought is that if they are different operations, they should have distinctly appropriate limitations.
Example: an engrave with a cut border should be able to have more bed space for the cut and still allow the engrave if it’s within the engrave limits.
Here is an example where the outer cut line is just over the limit bands and the whole object including engrave is grayed out.
There are no Groups in the GFUI.
It actually treats some things as grouped and others as separate. I can upload a bounded object with both cuts and engraves and they select as one piece even though they have two or more operations.
Here is an example. The sign “feet” are only cuts and they can be selected separately. The sign is an engraving with an outer stroke and then an outer cut. I can only select the entire sign set. I get wider margins for the feet, so I have taken them to the edge and they are still active. As shown, I have only the cut line over the margin presented for the sign, and it is completely inactive. The margins presented for the sign object was an engrave limit. The margins presented for the feet were the cut limit.
This says to me that objects CAN BE imported as groups and continue to be treated that way in GFUI. This whole project is one SVG of sign plus feet. Note on the left that the sign engrave, score and cut are three operations.
What I’d like? I would like to be able to push the sign cut to a CUT margin and have its engrave portion respond to an engrave margin. Each operation should have its own margins.
Here’s what I’ve noted happening, and staff can correct it if I’ve got it wrong… 
Any time you have an object completely enclosed by another object, those objects are treated as a group for processing purposes. (Makes it possible to move things around on the board more easily. Without that, you would have to make sure you selected everything, and that’s not easy with a full bed.)
So although the enclosed engrave on the shape below might not be too close to the end-zone, the shape around it is too close, and as a matter of fact it crosses into the no-go zone in a couple of places, shown below: (The faint gray lines.)

But you can see the red lines of the bottom left shape don’t cross into the no-cut zone. So that shape processed.
The location of the no-cut zone changes based on a couple of things - if you are processing the engrave at high speed, that zone moves out farther into the bed, because the head needs more room to decelerate the rapid back and forth engrave motions.
So your choices for getting around that problem are:
- Move the shape farther right on the bed, until all of the lines turn red. They will turn red when they are going to process, they stay gray when they are out of bounds.
- Slow down the engrave speed. (And lower the engrave power.) If you slow the speed on the engraving motion, you’re going to reduce the need to have a longer zone to decelerate. But by slowing the speed, you’ll increase the exposure to the beam for the engrave, which causes more burning. So lower the power any time you slow the speed. (Since that can affect the color of the engrave, it’s probably going to char a lot darker and won’t match the others, it’s kind of a last resort.)
1 Like
@henryhbk stated it was the missing cut that was the problem. The cut should be possible right up to the left edge. The engraves are the Fs and they are inside the boundary. It looks like it is applying the engrave boundary to the cut.