Just wanted to add one technical detail since I’m not sure it was stated directly. I may have missed it since this topic went the usual way: we all pick a side and throw rocks at each other.
When you’re doing a raster engrave, the content of the image is irrelevant from a time/complexity perspective. A black filled square is the same as a black outline is the same as a an ornamental filigree of the same size. What does matter is the physical size and lines per inch, as that affects how big of a file is eventually sent to the machine.
I mention this because you talked about simplifying your design quite a bit. I may be misinterpreting what you meant, but just in case and for future reference, that shouldn’t be necessary. Printing at lower resolution for large images, however, may be.
Hopefully Glowforge will be able to remove this limitation soon. They clearly have a large backlog of features to get through.
The file is 10KB per second regardless of the content, so the total time of the job is limited by the 100MB buffer size at the moment to around 3 hours. There seems to be other size / complexity limits in the cloud as well though. For example I think large vector paths choke it but they don’t take long enough to fill the buffer.
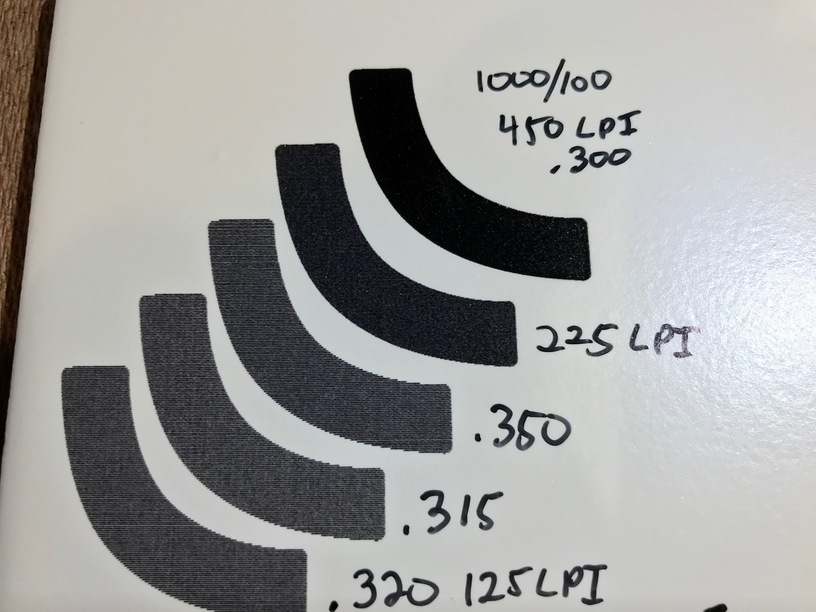
It does depend on the material. For things like wood that are being vaporized and leaving behind a charred and smoking path of destruction, sure, the damage tends to spread out even at low density. But as I posted in the thread on laser tile the other day, this material (mostly) just changes color where it’s hit by the beam with hardly any smearing out. Even at 450 LPI in this camera phone picture, you can make out the individual lines on the end.
I trust the math others have done as to the mechanical limitations of the machine: that’s not my strong suit. I just know that not everything is created equal when it comes to the minimum distinguishable LPI.
Fair enough. I also didn’t want to complicate things but there are of course multiple choke points. It’s possible to successfully produce a file that’s too big to fit in the machine’s buffer, but it’s also possible for the cloud backend to fail to generate the file by running out of time or resources due to complexity, or as we’ve seen, SVG features it can’t handle.
Actually, rereading your description from yesterday, it’s not clear that I was correct in my initial statement. You mentioned that one of the bits indicates whether it’s motion data or laser power. What happens if the power doesn’t need to change? Would a solid grey square require half the data as one that’s a different level on every “pixel”?
The laser PWM value is only used once each time you set the power for an operation. If it is full power the power is set to an arbitrary value, presumably the correct value for 40W for your particular tube. If you use precision power then it is set to 127 to disable hardware PWM and the laser enable bit is used to manually PWM the laser to give the selected power.
So it only ever uses one bit per 100us sample regardless of the mode. It has more bits per pixel because a pixel lasts for many samples. It actually PWMs with an 8 sample cycle at 1.25kHz. That only gives 8 levels but it dithers to get more.
Yes the beam has a peak intensity in the centre and tails off away from it with a Gaussian distribution. So it doesn’t have a hard diameter. You can overlap the fringes of the Gaussian curves. I expect the optimum overlap is when the two fringes add up to the same intensity as the peak. You then have a residual ripple at twice the LPI.
Absolutely! I saw your testing on the laser tiles, (going to come in handy…thanks). But you bring up a good point that when you are using the laser to do something else besides engrave through ablation, the rules might be different, and testing will be required.
Each material has it’s own properties, it’s not a “one size fits all” proposition. In the case of the coating on those tiles, it looks like exposure to the beam is darkening the resin, and subsequent or lengthened exposure continues the darkening process. The 450 LPI definitely looks better.
Wow, your design is stunning! I’m so sorry you are having trouble printing it.
There’s a problem with our software in handling very large engraves and it looks like that what’s happening here. Your message will help us improve our software for everyone.
I’m glad you were able to print by reducing the LPI. If you’d like to print it with a higher resolution, I’d suggest you divide your image into pieces and print them one at a time, as shown below.
Click on the “SPLIT IMAGE” tab and enter the number of rows and columns you want to split your image into
Choose PNG
Click the blue “SPLIT IMAGE” button. The software will split your image into the number of rows and columns you specify and automatically download a zipped file of the pieces.
Create a single file with all the pieces
Locate the file on your computer (where your downloads go) and unzip it
Mac: Double click on the file to open it
Windows: Double click on the file to open it, then click “Extract All”
Open a new file in Inkscape (used for this example, although other software will work too)
Choose File > Import and select all the images from the zip file
Line up the images up so they are seamless. In Inkscape, when you drag the images near each other, they will snap together. (If they don’t, go to View > Show/Hide > Snap Controls Bar and adjust the settings.)
Select File > Save As and save the file as an Inkscape SVG file
Upload and Print
Sign in to app.glowforge.com, click “Upload” and choose the file you saved. Each piece of artwork will import as a step in the app. Click on a step and choose “Ignore.” Ignore all the steps but one, and then press “Print.”
When that print finishes, leave your material in place
Set the step you printed to “Ignore” and print another step
Continue ignoring and printing until you’ve finished
Well, cutting-and-pasting-in-place on a separate layer in Photoshop was definitely much easier, but thanks for this! What I just learned from this: You can save a layered SVG and import it as multiple operations. Cool.
Still, some part of me almost wants to agree with the Mr. Negativity-and-Sarcasm guy - I’ve found I’ve had to use this method on all 3 of my most recent projects (even after reducing LPI and following other tips in this thread), just to get it to print. I’m actually still trying and failing on one. It’s pretty frustrating and time-consuming, and I hope GF can put a dent in this problem soon.
Looking past who said it, yes, you should be able to drop a high res photo that all you have done to it is adjust the brightness and contrast. Then print it full sheet. Anything less is not an acceptable long-term.
At least with indexing and material flipping there is nothing there so we know it is not finished as it is not even started as far as the end user is concerned.
As much as I love the and where it looks to be headed, engraving leaves me with a quesy feeling.